This week I want to share with you my Big Winter Shawl v3. I call it that because it seems that every Winter I get the urge to knit a big colourful woolly shawl to wear. This is the fourth time I've attempted it, but the third time I've succeeded. Previous editions are a a striped More Than a Triangle Shawl, the never finished Modern Quilt Wrap (which I will finish one day) and a big orange and grey version of Pterotactyl. This year's version is the Ridgeland Shawl by Marc Smollin, who also designed Pterotactyl.
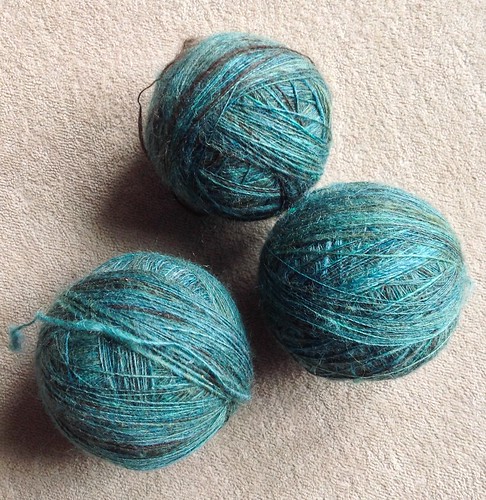
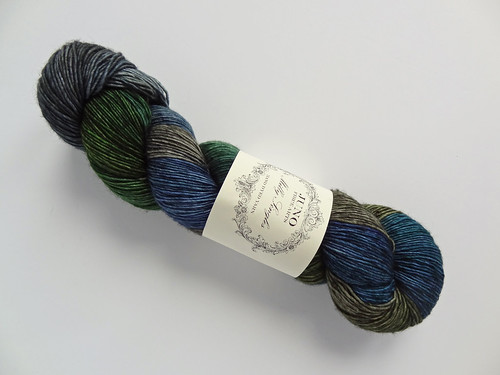
This gigantic shawl was cast on in October and it ground to a halt during the stranded section. I did not enjoy this section of the shawl, I'll explain more in a minute. The shawl was designed using Holst Garn Supersoft 100% Uld and I decided to use that yarn as it was one I hadn't tried before, and I'm always on the lookout for nice and woolly yarn. I managed to find it at one my favourite online shops, Tangled Yarn. I think what swung the yarn choice for me was I had a voucher to use for this shop, so it seemed a good idea to use it to get my shawl yarn from there, especially as I couldn't seem to find it elsewhere.
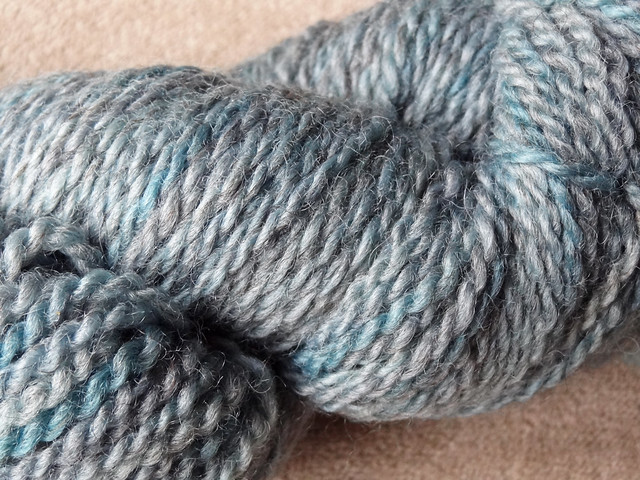
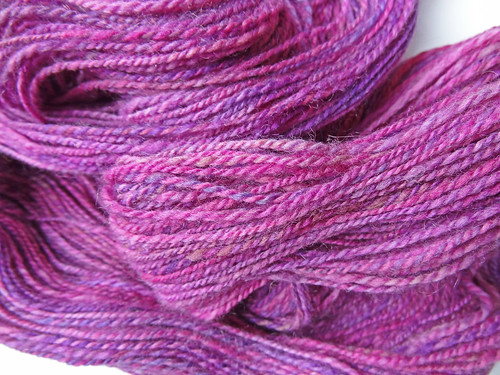
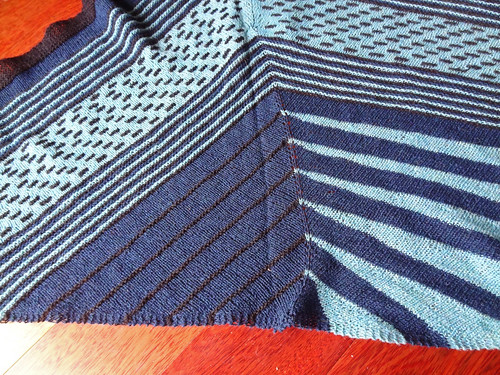
The colours I chose were Aquamarine,Graphite and Mariner. The yarn is made of 2 loosely spun plies of wool, which feel thin because of the oils that coat the fibres. Once the yarn is washed, the oils are removed and the yarn blooms. If I was to make this shawl again, I would choose colours with a wider difference in colour values than the Mariner and Graphite had. It's hard to judge values properly using a website. Those colours blended a bit too closely for my liking, though I still love the colours.
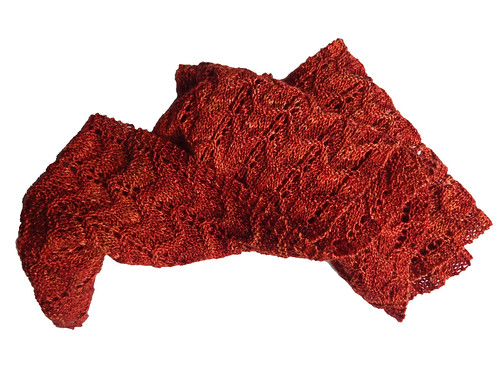
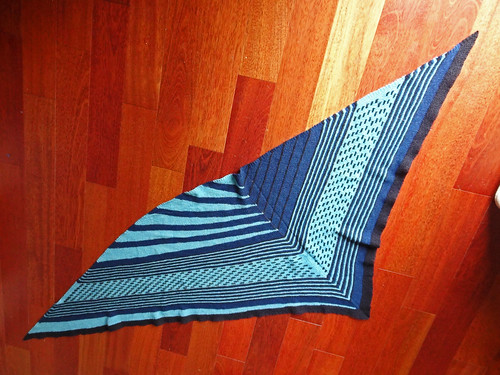
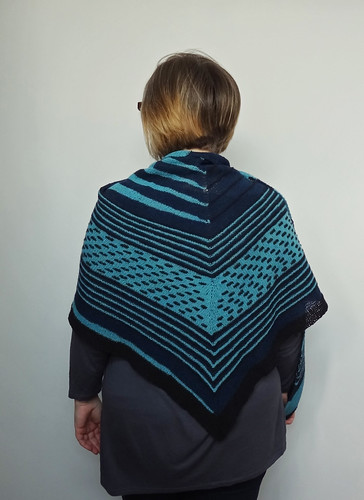
The shawl is an unusual shape. From the centre point to the right hand tip it measures 32" (0.81m), but from the centre point to the left hand tip it measures 56" (1.42m), which gives a total wingspan of 82" or 6'10" (2.08m) and the depth of the shawl is 33" (0.84m). The size of the shawl is what attracted me to it in the first place but if I'd thought before I started, I would have swapped the sides of the shawl over as I prefer to have the right side longer on asymmetrical shawls. My shawl is also larger than the pattern states. I should have reduced my needle size, as I usually knit looser, but I didn't swatch, because I never do for shawls, and I didn't think. The result of this larger gauge is a more airy shawl, which is probably better for warmer weather but not as snuggly as my Pterotactyl, which is knit in Kauni, a sport weight yarn.
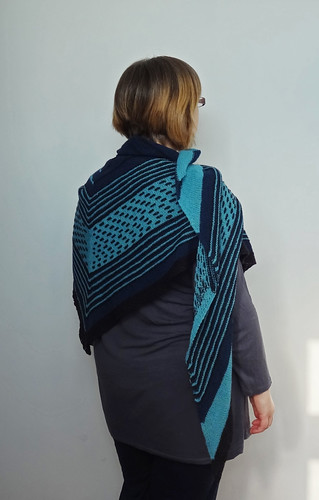
The enormous wingspan of this shawl meant I had to fold it in half to block it. When folding I didn't take into account the curved nature of the centre line of the shawl, which means I have a fold line in the shawl that is distinctly visible. I may have to steam it out. This curved centre line means, despite blocking the top of the shawl perpendicular to that line, the left hand side of the shawl curves up. This makes it a little hard to wrap around without displaying the wrong side of the knitted fabric.
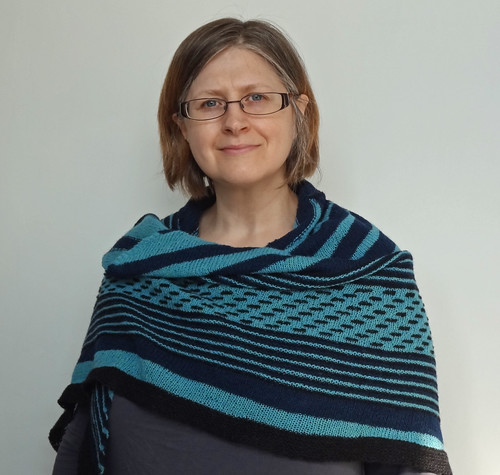
You can see how the top wants to fall forward. I'm also not happy about the way the back looks, because the stranded part of the shawl doesn't look "right" to me. The black dashes don't seem to sit in the right places, which I'm sure is down to me having an off stitch count, rather than the pattern.
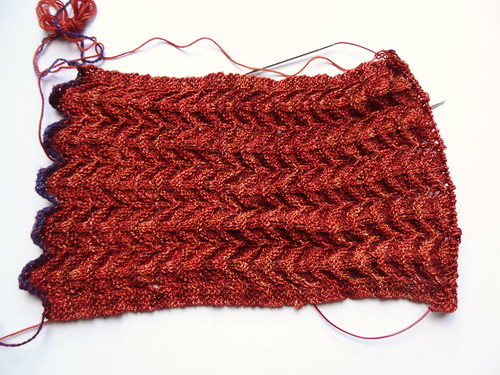
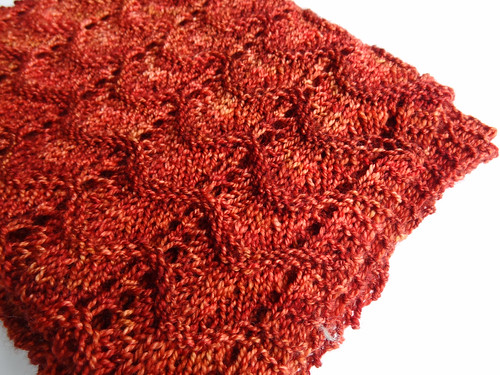
As I said earlier, I did not enjoy the stranded part of this shawl. I wasn't expecting to hate it, because I like stranded knitting. What I didn't take into account was how long these rows were going to be and how annoying it is to k3 in one colour and then p3 in the other colour. This stitch pattern is what is carried out on the wrong side rows and it drove me mad for some reason. The reason this shawl took so long was my lack of desire to finish the stranded section. It sat half done for months. In the end I had to make myself do it by rewarding myself for finishing a repeat, and only then allowing myself to work on another project for a day or so. I don't often have to force myself to knit, but I was determined not to be beaten by one section of the shawl.
Over all, I am using this shawl a lot for round the house. I think it is a good weight for this time of year, and it does wrap me up nicely because of it's size. It also matches the colours in my lounge nicely, so it's pretty draped over the sofa. I probably won't wear it out and about because of the little niggles that would drive me crazy out in public. To be honest, I have more than enough shawls that I adore to wear out in public. This will make a very nice "sofa shawl", but I won't be making it again, despite having lots of the yarn left over.
As it's a Friday, I will be linking this post up to Tami's Ami's & Other Creations. To see other finished objects, click on the button.
Friday, 28 March 2014
Tuesday, 25 March 2014
STSAL2014 - Ready to Start Plying
Today is the Stitched Together Spin-A-Long 2014 update day. To see other posts in this series, click the button below.
Whilst spinning singles in a reasonably uniform colour, there isn't much of interest to show. However, yesterday I wound my last single onto a plying ball. Before yesterday, I only had two plying balls, so I had to make another one out of needle felted fibre, to hold my third set of singles. Making a needle felted ball is such a simple thing to do, but it's a little time consuming. I also managed to break two needles whilst doing it. It's hard to hold a sphere stable whilst stabbing it from directly above, you know. This tutorial shows the basics of what I did, but I used a Clover Felting Needle Mat
and a Needle Felting Tool
. I also used a toothpick to hold the ball in place to ensure I didn't stab my fingers with a barbed felting needle. It's really not a fun experience. The toothpick makes it a little more tricky, but at least I received no damage to my hands.
Once I had my third felt ball to use for making a plying ball, I finished winding off the last of my singles.
The singles have now rested for a day, so I can now start plying. It's ages since I made a true 3-ply yarn, I hope I don't get in a mess!
How are you doing with the Stitched Together Spin-A-Long? Have you created a project on Ravelry or blogged about your progress. If you have, please add your link in the comment thread. I'd love to know how you're doing. Or alternatively come and join in the chat over on the Ravelry Board. The Ravelry Board is also a good place to ask for advice or to bounce ideas around with fellow spinners. You still have plenty of time to join in, as the SAL doesn't end until April 30th.
Whilst spinning singles in a reasonably uniform colour, there isn't much of interest to show. However, yesterday I wound my last single onto a plying ball. Before yesterday, I only had two plying balls, so I had to make another one out of needle felted fibre, to hold my third set of singles. Making a needle felted ball is such a simple thing to do, but it's a little time consuming. I also managed to break two needles whilst doing it. It's hard to hold a sphere stable whilst stabbing it from directly above, you know. This tutorial shows the basics of what I did, but I used a Clover Felting Needle Mat
Once I had my third felt ball to use for making a plying ball, I finished winding off the last of my singles.
The singles have now rested for a day, so I can now start plying. It's ages since I made a true 3-ply yarn, I hope I don't get in a mess!
How are you doing with the Stitched Together Spin-A-Long? Have you created a project on Ravelry or blogged about your progress. If you have, please add your link in the comment thread. I'd love to know how you're doing. Or alternatively come and join in the chat over on the Ravelry Board. The Ravelry Board is also a good place to ask for advice or to bounce ideas around with fellow spinners. You still have plenty of time to join in, as the SAL doesn't end until April 30th.
Friday, 21 March 2014
MadTosh Sock Infinity Scarf
In January I made an infinity scarf/cowl for my Mum. I was delighted with it, and more importantly, she was. After trying the pattern on a soft drapey yarn, for her, I really wanted to try it on a springy and bright yarn. I chose a yarn that had been very kindly gifted to me by Tara. Tara is a long time blogging friend (and I highly recommend you check her blog out, as she makes lovely stuff) who knew how much I wanted to try Madelinetosh yarns. She knew that a skein of this delightful stuff, she had in stash, would be perfect for me, so she sent me it. I had been waiting for right project for this very generous gift and this seemed a perfect fit.
Whilst I was knitting this project, I was a little worried about how the yarn felt. It felt less soft and more rigid than I anticipated, as I thought Madelinetosh yarns were all meant to be incredibly soft. Then I remembered this was the sock version of the yarn and this is why the yarn has an incredibly tight twist on it, to compensate for the lack of nylon.
Once the project was soaked for a while and blocked, the yarn softened considerably. You can see the drape.
I thought this pattern would work for semi-solid yarns and I think I have been proven right by this project. I also think it would work well for variegated yarns.
I really love the infinity scarf as an accessory. It's versatile, warm, stylish and it stays put.
I love this infinity scarf and I love the rich warming colour of it. It fills a hole in my accessory wardrobe. I am really tempted to make another one in some new yarn I bought, Juno Fibre Arts Milly Singles in the Peacock colourway.
This would also fill a void in my accessory wardrobe, and the yarn feels so soft, I know it would feel amazing round my neck. This is the first time I've bought anything from Juno Fibre Arts but there was a discount code for free shipping on one of the podcasts I watch and I fell in love with the colourway, the free shipping provided and excuse to get it. I have a feeling in a month or so you may see another set of photos of this particular pattern in my new pretty yarn.
Tuesday, 18 March 2014
STSAL2014 - Update 2
Well, another week has passed of the SAL. We even have entries in the Finished Objects thread, which I find incredibly exciting. One thing I don't think I specified overtly is that you can only enter once for the prize drawing. There are many new spinners who are taking part and lots of people are using spindles, it seems unfair that those of us who use a wheel should have an advantage over those of us who don't. Therefore, I'm afraid you can only enter one spinning project for the draw. I think I'm going to leave any entries in the thread that you post or have already posted, even if they are further entries, but only one will count for the draw. I think I'm going to make a spreadsheet for entries anyway, so it's no hardship to do that.
Another thing I've found exciting about this SAL, is the large quantity of people who are fairly new spinners. They are asking questions and people are helping and the Chat Thread is everything I hoped it would be. Please come and join in, I think you will be inspired by the participants.
I've had a fairly low output this week on my own spinning project. I think I've spun around 4-5 punis in total. This is what I have so far.
I think I might be able to fit one more puni on before I have to wind off the cop. I have 13 punis left to spin and I'm kicking myself for not dividing them all up by weight before I started. I shall have to work it out after I wind it off and weigh it.
As you can see, the last few meters of singles spun are a bit scraggly. I think I may try evening them out a little before starting the next puni, because other than that, I've stayed fairly consistent. The yak parts are a little harder to managed than the other fibres, because the staple length is so short and the single breaks quite easily at those points, unless I'm careful. It's a great learning experience though.
I hope you are making progress and enjoying yourself too. If you have a blog post relating to your progress, please link up below. If you can't see the link up button, you may have to "allow the script to load". In Chrome, for example, there is a little shield in the address bar that you need to click.
Friday, 14 March 2014
Lerryn Mittens in The English Gentleman DK
Do you remember a while ago I got a lovely review copy of The Scrumptious Collection Volume 3? I mentioned that there were several patterns I was interested in knitting. The first pattern I chose to knit was the Lerryn Mittens by Rachel Coopey. I didn't use Fyberspates Scrumptious DK, in fact I didn't even use a merino/silk blend. I used something wooly and fluffy instead of smooth and silky. I used something from my stash, The English Gentleman DK in the Shiver colourway from Countess Ablaze. I bought this skein because my curiosity was piqued after the description informed me of the following:
It is exactly as described, buttery soft and yet rustic. The BFL/masham blend is wonderful and I enjoyed every minute of knitting these mittens.
The yarn is DK weight and the pattern described Fyberspates Scrumptious DK as being more of a worsted weight yarn. It was a one size pattern and I have rather broad hands, so taking all this into account I decided to stick with the recommended 4mm needles, despite usually having to drop a needle size due to my loose knitting tendencies. I think was the right decision as the width of the mittens was perfect.
However, the position of the thumb was not exactly spot on. My fingers are a bit low in the mitten, as you can see above. The length of the cuff is great, as it comes several inches past my wrist, so in an ideal world I probably would have started the thumb maybe a few rounds further into the mitten to allow my hand to fill the top of the mitten.
But even with this area of air at the top of the mitten, from the outside it looks fine. It may even work in my favour as there is more air to trap around my fingers, which will warm my hands better.
My favourite part of this project was the cuff. I really enjoy twisted rib and being able to cable the whole mitten without a cable needle was definitely a bonus. I also really like the way the increases for the thumbs are worked. It's a very well thought out pattern. By the way, if you've never cabled without a needle, I have a tutorial on how to do it if you are interested.
I know my yarn choice means that a lot of the texture stitches are obscured, but they are certainly still visible and the cable patterns still pop.
The mittens definitely needed blocking, especially as my fingers don't fill the ends completely. I used my homemade mitten blockers that I created for use on the Fiddlehead Mittens I made eons ago. I originally made the blockers because the original blocking didn't stretch the mittens enough to make them comfortable for me to wear (with my enormously square hands). I made the mitten blockers using a tutorial from Eskimimi Makes. It was well worth the time it took to make them, as the blockers will be used time and time again.
I would quite happily knit this pattern again as it was great fun and not that tricky to do, especially as I used two circular needles to knit in the round. It is my preferred technique for knitting in the round as I am incredibly clumsy and inclined to poke myself in the eye with a dpn!
I also loved knitting with the yarn so much, I bought another skein (surprise, surprise). This time in the You Keep Me On The Edge of My Seat colourway. I would love to knit an entire sweater with this yarn, but sadly I have stash to use first. I shall have to make do with my solitary skein, though I will probably make it stretch with the leftover yarn from the mittens.
I'm thinking it could may become a hat, possibly a Rikke, what do you think?
In summary, lovely pattern, amazing yarn and nice warm and light mittens to replace the Fiddlehead Mittens as the weather becomes milder. I'm pretty happy.
Do you have a desert island yarn? I have finally found mine and this is it. Soft, buttery, rustic without being scratchy, this is my perfect yarn.I could not resist being told by one of my favourite dyers that this was her perfect yarn, I had to try it. I also fell in love with soft pale ice blue of this colourway. When I decided on this pattern I wanted to try knitting it in something completely different to the designer intentions. This yarn qualified.
It is exactly as described, buttery soft and yet rustic. The BFL/masham blend is wonderful and I enjoyed every minute of knitting these mittens.
The yarn is DK weight and the pattern described Fyberspates Scrumptious DK as being more of a worsted weight yarn. It was a one size pattern and I have rather broad hands, so taking all this into account I decided to stick with the recommended 4mm needles, despite usually having to drop a needle size due to my loose knitting tendencies. I think was the right decision as the width of the mittens was perfect.
However, the position of the thumb was not exactly spot on. My fingers are a bit low in the mitten, as you can see above. The length of the cuff is great, as it comes several inches past my wrist, so in an ideal world I probably would have started the thumb maybe a few rounds further into the mitten to allow my hand to fill the top of the mitten.
But even with this area of air at the top of the mitten, from the outside it looks fine. It may even work in my favour as there is more air to trap around my fingers, which will warm my hands better.
My favourite part of this project was the cuff. I really enjoy twisted rib and being able to cable the whole mitten without a cable needle was definitely a bonus. I also really like the way the increases for the thumbs are worked. It's a very well thought out pattern. By the way, if you've never cabled without a needle, I have a tutorial on how to do it if you are interested.
I know my yarn choice means that a lot of the texture stitches are obscured, but they are certainly still visible and the cable patterns still pop.
The mittens definitely needed blocking, especially as my fingers don't fill the ends completely. I used my homemade mitten blockers that I created for use on the Fiddlehead Mittens I made eons ago. I originally made the blockers because the original blocking didn't stretch the mittens enough to make them comfortable for me to wear (with my enormously square hands). I made the mitten blockers using a tutorial from Eskimimi Makes. It was well worth the time it took to make them, as the blockers will be used time and time again.
I would quite happily knit this pattern again as it was great fun and not that tricky to do, especially as I used two circular needles to knit in the round. It is my preferred technique for knitting in the round as I am incredibly clumsy and inclined to poke myself in the eye with a dpn!
I also loved knitting with the yarn so much, I bought another skein (surprise, surprise). This time in the You Keep Me On The Edge of My Seat colourway. I would love to knit an entire sweater with this yarn, but sadly I have stash to use first. I shall have to make do with my solitary skein, though I will probably make it stretch with the leftover yarn from the mittens.
I'm thinking it could may become a hat, possibly a Rikke, what do you think?
In summary, lovely pattern, amazing yarn and nice warm and light mittens to replace the Fiddlehead Mittens as the weather becomes milder. I'm pretty happy.
Tuesday, 11 March 2014
STSAL2014 - Update 1
I'm delighted to say that the Stitched Together Spin-a-long 2014 (#STSAL2014) is well underway. The chat thread on the Stitched Together Ravelry Group is busy with lots of discussions about fibre and spinning choices. I'm so pleased there seems to be a good number of novice spinners joining in, which is just what I hoped for.
My own spinning has got started. After the success of my previous spinning attempt, when I took the time to make samples, I did the same thing again.
I tried a bit of spinning in the worsted style to create a semi-worsted single, but was happier with the woolen style. The samples on the card are all woolen. The photo below shows a close up of the samples.
The singles I spun were very fine in comparison to my previous attempts at spinning. I think this was due to the beautifully fine fibre preparation. The fibres drafted so simply it was a piece of cake to get a fine single. As the single was so fine I have decided that I prefer the 3-ply yarn. I haven't quite decided if I'm going to chain ply it or do a true 3-ply. There is no advantage of doing either method because the colour is fairly uniform without massive changes through the length of the singles.
In the above photo you can see that though there are parts of the punis that are darker (probably the yak) these areas are blended really well. As the single is so fine, these areas won't be too overwhelming in any one place of the yarn, especially as 3-ply.
I am really enjoying spinning these punis. Doing long-draw spinning is great fun and I know it's faster than spinning in a worsted style. I'm amazed at how fine I am getting the singles.
I think the yarn that I can create out of them is going to be really beautiful. I can also see a great many more punis in my future as they are such fun to spin. I finally understand what all those US podcasters have been talking about so enthusiastically.
I've added a link up to this blog post and it would be great if you could join in. If you can't see the button to add your link, you may need to turn javascript on your browser.
Sunday, 9 March 2014
Ribbon and Ring Cowl Pattern - Now Available!
You will be pleased to hear that I have finally got my act together enough to do a final read through, of my latest cowl pattern, after my testers finished weeks ago!
As you can see from this photo, the cowl is fastened using "ribbons". My sample was knit using i-cord because I wanted to play with my new knitting mill. There are full directions of how to thread the ribbons in order to tie the cowl properly.
The pattern is knit in one piece using a straight-forward and interesting pattern, which would be a good first cable project. The pattern uses a single 100g skein of either worsted or aran weight yarn. The above sample was knit using Malabrigo Rios in the Lettuce colourway.
My other sample was knit using Babylonglegs Radiance in the Belladonna colourway. This option also uses buttons to close the cowl, rather than ribbons.
One of my test knitters used both methods of closure to make sure the cowl is securely fastened with buttons and then adding ribbons as a purely decorative embellishment.
There are full instructions for adding buttonholes to the pattern.
The Babylonglegs Radiance yarn has an unusual effect where each yarn ply takes the dye in a different way. It results in a very complex and rich colour.
The pattern can be downloaded via the Download page of this website, on Ravelry, and on Craftsy. The purchase option on Ravelry and this website is will be charged in GBP, £1.75. The price on Craftsy is charged in USD, $2.95.
I hope you like this pattern as much as I do. I've been wearing both versions constantly this Winter. It's a great pattern to use up a single fun skein of aran or worsted weight yarn, that's a quick knit and perfect for a gift.
Enjoy!
Friday, 7 March 2014
Squishy Yarn
I have good news, I can start spinning for the Stitched Together SAL (#STSAL2014). I have cleared my favourite spindle and I have found a bag that fits my punis, so they can lay nice and flat, whilst waiting to be spun. Have you seen Nic's Knots, Karrie Bags? It turns out that these bags are the perfect width for my Fondant Fibre punis to lie flat in!
The above photo shows my Karrie Bag. All my punis, along with all my lovely spinning things, fit inside with room to spare.
As you can see from the above photo, I have started playing around with the punis, to see what I should make with the fibre. I'm still not sure.
Of course, you are probably interested in the yarn that arose from my need to free up my favourite spindle. It is gorgeous! I already told you about how I made a decision about how to spin this yarn, the Fondant Fibre MCN Nests. All the preparation really paid off. It's completely reinforced the lesson of why you should spend some time making samples in order to get the yarn you want.
I am delighted with this yarn. By the way, have you seen Daisy Bun Boo Designs bags? I bought a couple this week, and one of the bags (the Extra Large version) was perfect for storing my part finished yarn, whilst wound on my niddy noddy.
It is an enormous bag, and I was delighted I had found something to protect my half finished yarn. It's very nicely made, with pretty fabric, both outside and in. Can you see the dainty spotted lining in the above photo? The circular base of the bag is reinforced with interfacing, which helps give the bag shape, and will hopefully protect the fabric on the base of the bag, a bit better than leaving it un-supported.
When I bought the bag, I didn't realise quite how big it was, and I intended to use it for larger projects, such as my sock yarn blanket, but when I saw it, I knew I had to try putting my niddy noddy in it. I couldn't believe it fit so well, that I could secure the elastic draw-string closure on the bag, without pulling.
I always put my plyed yarn on the niddy noddy as I wind it off the spindle, to make room on it to ply the rest of the singles. I then tie the end of the yarn, already wound on to the niddy noddy, to the end of yarn, newly spun on the spindle, and continue to wind it on to the niddy noddy. That way I end up with only one skein to block and store. The knot is easily dealt with when it comes to knitting it up.
After the spinning was complete, I soaked the finished yarn for 30 mins in a warm basin of Euclan. I had to rinse the yarn several times as there was a little bit of bleeding, which often occurs with deeper coloured, hand dyed yarn or fibre. I then put my hands inside the loop and widened my hands until the yarn was taut and then snapped the yarn a few times, by drawing my hands a little closer together and then widening them back out again quickly, to help even the twist a little. I decided not to thwack this soft and delicate yarn.
I am very happy with the results of all my preparation. It is a worsted 2-ply construction. I got 350m of 3-ply/light fingering weight yarn. I think it has to be one of the best meterage I've ever got in my hand spinning. The yarn is generally consistent, though there are a few areas where the sections are either too thick or too thin. For the most part, these sections are in the minority.
Of course, now I have this lovely, squishy yarn, I want to play with it. I am desparate to knit it into something so I can wear it. My instincts are leading me towards a shawlette, but of course an infinity scarf or moebius cowl could work too. Basically, I want to wear this ever-so soft yarn around my neck somehow. There are a few patterns that sort of could work but I haven't found anything that jumps out at me. Does anyone have any suggestions? I really want to use every single scrap of this lovely yarn.
I may end up swatching and then making it up as I go along. Who knows, this could end up inspiring a new pattern!
Tuesday, 4 March 2014
STSAL2014 Has Begun
I'm very excited today. I recorded the latest episode of my podcast yesterday, where I launched the Spin-A-Long (SAL) and opened the SAL threads on the Ravelry board. The chat thread is already a lovely lively place and lots of beginners are going to join in, which makes me extra happy. I wanted the SAL (details are are towards the bottom of the linked post) to be a nice safe place for people who are quite new to spinning, to start feeling a bit more confident. The SALs done by more experienced spinners and the Tour-de-Fleece can be quite intimidating for newer spinners, because you don't want to seem stupid by asking really obvious questions. I know this, because that is how I felt last year when I joined in with SALs for the first time.
It is easier to ask questions of people who still remember, very vividly, the first time they picked up a spindle and fibre. I think we have some other more experienced spinners joining in though, so we can pick their brains!
I think I know what I want to spin for the SAL, but before I can do that, I really want to clear off my favourite spindle. I'm up to the plying stage of the Fondant Fibre nests and I keep getting distracted by other things, so it is taking longer than usual. I will probably spend some time today really giving it my full attention.
My SAL project is going to be more Fondant Fibre. The Malachite punis I bought at the same time as the pretty pink nests are calling to me. (If you want to know more about punis, there is an interview with Kate of Gourmet Stash who has quickly become the US Puni queen and she explains about the preparation here.)
The punis are 65% Merino/20% Shetland/15% Yak and as I don't think I've spun yak before, I'm quite excited. I have 100g of punis, and even better than having a decent quantity to start with, is that this is a repeatable colourway and blend. If I create yarn that I adore, but want more of it, I can request another batch.
This will be the first time I've spun yarn out of punis. I spun a couple of samples and really enjoyed it, so I think it will be a real treat to spin this fibre into yarn during the SAL. I wanted to try something a bit different for the SAL and I think this type of fibre preparation is a good thing to try. I have yet to decide how I want to spin the punis, so if you have any ideas, I'd love to hear them. Part of me wants to spin them worsted to get a semi-worsted yarn, because that is how I spun the samples I had, however the "push your boundaries" part of my brain, wants me to spin them long draw. After the success of the Polwarth I spun a few weeks ago, I am more inclined to give it a go.
I think I will be spinning some samples again!
I hope you are thinking about joining the SAL. Even if you are a complete beginner, two months should be time enough to spin 100g. Please come and join us in the group where you can share your hopes and fears and we can talk you in to taking part!
Labels:
Fibre,
Podcast Episode,
Spinning,
STSAL2014
Subscribe to:
Posts (Atom)