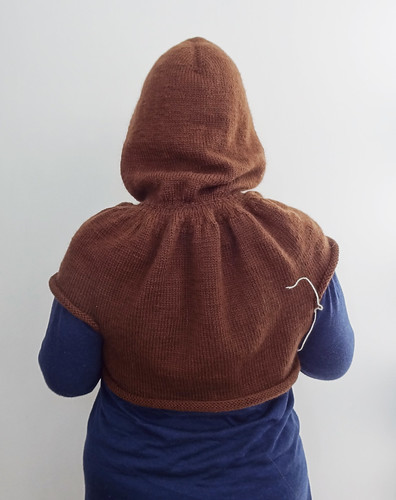
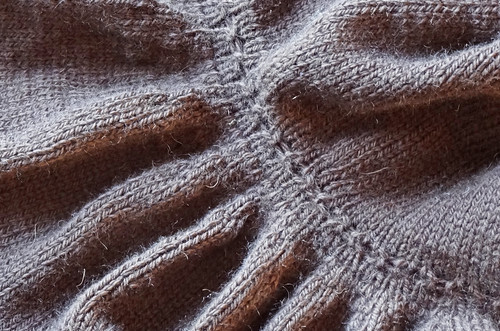
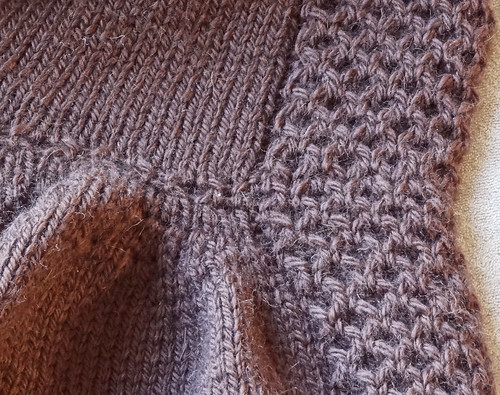
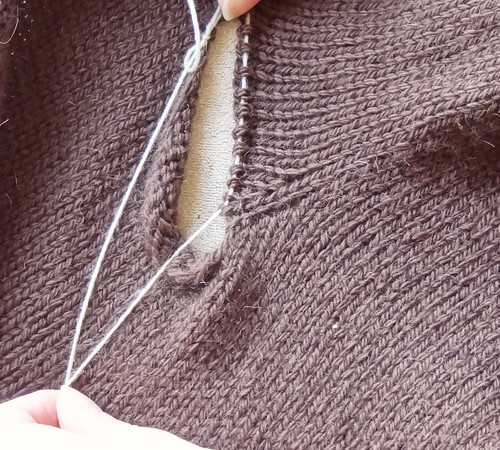
Last week I talked about my next Challenge To Myself. What I didn't talk about was the finished item from my last CTM. The CTM project in question is Dew Drops Shawl by Bex Hopkins. I started this project in March and it has hung around forever. I think this is partly to do with other projects taking precedence, and partly to do with the lace portion requiring a tiny bit more thought than I had anticipated. There is lace knitting on both the right side and wrong side of the shawl, when you get to the edging, which means there are no rows on which to zoom, without thought, along. I prefer my lace to have a rest between the rows where my brain is required! However, if the resulting project is worth it, I don't mind. I think this is worth it.
With hindsight, I wouldn't have chosen this dress to wear when photographing something purple, but I'm afraid this is what I was wearing when I had the energy to photograph the shawl. I think you get the idea though.
It is a lovely size of shawl. I did two additional of repeats of the stocking stitch part of the shawl, but decided not to add additional repeats of the lace charts to make the shawl bigger. I probably could have got away with it because I have 100m left of the yarn, but I am happy with the size of shawl I have.
I like shawls to cover my lower back, but not be too long that I end up sitting on them. I also like that the shawl comes past my elbows, but not so far it gets damp when washing my hands.
The yarn is amazing. I'm glad I waited to become a better knitter before using it, because I bought the yarn in 2010, when I'd only been knitting a couple of years. The blend of camel and silk results in a yarn that blooms when it is wet blocked. It is so soft and warm it is unbelievable and the sheen is gorgeous.
The silk gives the camel strength, and the camel gives the silk warmth and softness. I would definitely buy yarn from Artisan Yarns again. When I bought the yarn at a show, they had just started out, but they seem to be going well, which I'm really happy about. This yarn is definitely luxurious and worth every penny. I'm not sure if they still do this blend, but I know they had some other interesting ones, when I've seen them at shows, and they now sell some yarn through Loop Knitting.
I think this pattern has worked out brilliantly for this yarn and I'm so happy I chose it. It has a large enough section of stocking stitch to really showcase the yarn, and the lace gives texture and interest.
I couldn't be happier about how my Challenge To Myself is going. It has stretched and challenged me to use yarn that I was either scared to "ruin" or wasn't quite sure what to do with. I am pleased that not setting a time limit has kept me going without pressure. I think the other challenge I set myself at the start of the year is not going to happen, the Knit The Queue 2013 challenge. I think trying to both these challenges and the KALs and podcasting is just one challenge too far for this year. It did help me focus my mind somewhat, but I'm not going to follow that challenge in an active manner anymore. The CTM, however, is definitely going to stick around. I think even when I get to the end of the stash boxes, I'll just keep going round again because it is a great way to focus my mind on what stash I have and how to use it.
As this is a Finished Object, I'm going to hook up with Tami, so click the button if you want to see other lovely finished objects.
Showing posts with label Knit The Queue 2013. Show all posts
Friday, 9 August 2013
Wednesday, 24 April 2013
My Melia is finished, photographed and well loved
I don't think I need to say more about this project, than the post title. I adore it! Let me show you why.
Look how cozy it is! I am so glad I decided to add a zip instead of a the knitted strap at the top of the garment. I've been wearing this as a jacket in our cold Spring weather and it has worked perfectly when zipped right up. If the jacket was only fixed at the top, like the pattern, I think it wouldn't be warm enough when it is cold enough outside to wear this. The jacket is immensely warm because of the dense and fuzzy fabric. The camel content in the yarn is definitely going to pill, in fact it already is, but, it makes for a wonderful warm fabric, so I can't and won't complain.
In order to have full flexibility with the jacket, I decided to install a two way zip. I love that I can wear it fully, or part, closed. In fact, you can zip it so it looks like it would if it were held together at the top the way it was designed to.
I cannot say how much I love the look of this cable pattern. I particularly like the nice flare on the sleeves. The sleeves are a little long, but I love that because I suffer from cold hands. I often have to wear mitts indoors because of poor circulation in my extremities. I've not had to wear mitts indoors when I've worn this garment.
The detail in this pattern is gorgeous. From the beautifully turned hem, to the cable pattern around the pockets. The pockets are just deep enough to keep your hands warm, but I probably wouldn't use them for anything else other than possibly a handkerchief!
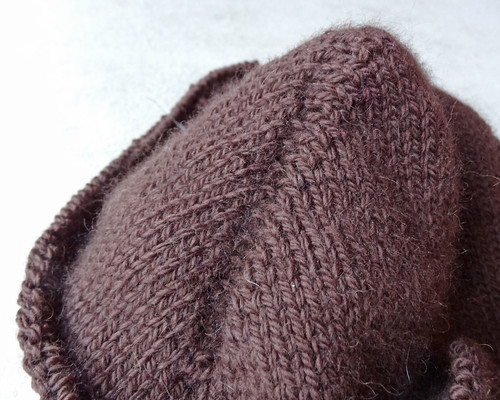
When I blocked the garment, after knitting, I used wires, and I angled the bottom half of the jacket outwards. This has, unfortunately, led to a little flaring of the hem. I think this will disappear after wearing it, as it is already less noticeable. When blocking the jacket, I used my polystyrene head form (that I use for blocking hats) and placed it in the hood. This pulled the fabric at the top of the hood into a nice soft shape that hid the short row shaping beautifully. The hood keeps my upper back and shoulders really warm, when it's not being worn up.
I love this jacket and I have been wearing it as much as possible since I finished it. It is a wonderful cozy cardigan for Winter and it's a great light and warm jacket for Spring and Autumn. I could not be happier with how it turned out.
I'm so glad I was finally well enough to take these photos to share, as I have been wearing it for a while now, but I didn't feel like the project was complete until I showed you guys! I can officially mark this off my list for Knit The Queue 2013 and Challenge To Myself. I've already pulled out my next KTQ2013 project, it's a kit for some stranded mitts designed by Bombella. The next CTM is the Dew Drops Shawl, which is being knit in Artisan Yarns Soft Silk Camel Lace.
Hopefully I'll be able to take some photos of my progress soon.
Friday, 5 April 2013
Sumner is Done
I have actually photographed something that I finished. Admittedly it was only a couple of snaps with the camera on my phone, but the quality of the pictures is more than adequate to show you my finished project. As you can probably guess from the title of this post, my finished project is Sumner. It's the hat I told you about a couple of weeks ago.
I am incredibly happy with this project. I really enjoyed knitting it too. The yarn choice worked perfectly, substituting BabyLongLegs Semi-Precious with BabyLongLegs BooSock. The merino content in BooSock is 80%, whereas in Semi-Precious, it is only 50%, which makes it a bit warmer and the yarn more springy. The 20% bamboo content of this yarn gives it strength and lustre. I think this yarn will actually be tougher than the recommended yarn, as well as warmer.
I still love Semi-Precious, though, and have ordered a skein of the specially dyed "Go! Green for Refuge" colourway. This yarn has been dyed as part of a Veuf Tricot's money raising endeavours for Refuge, a UK charity that supports women and children who have been exposed to an abusive home life. Veuf Tricot has designed three accessories that reflect his training to run the marathon and were designed to use single skeins of yarn that were dyed especially for the project, by three different UK dyers. I wanted to do something to support this, frankly, crazy decision to run such a long way and decided at the outset I would be purchasing one of the skeins of yarn. A large portion of the purchase of the yarn is going to Refuge. I think I always knew it would be the BabyLongLegs yarn that I would be buying! If you want to show your support for Refuge and Jim's efforts, please consider making a donation on Jim's JustGiving page or buying one (or all) of the patterns, or maybe treat yourself to a special skein of yarn.
Going back to finished project, here is the finished item, in all it's glory.
The folded brim is fantastic at keeping the cold wind out of my ears. When I started this hat, I assumed it would be perfect for Spring. In reality this hat is incredibly warm. I was really surprised at how warm it was, considering it is knit in sock yarn. I think it is because of the density of the knitted fabric, plus it has the doubled fabric for the brim and the body and crown of the hat has ridges that increase the amount of air that is trapped around the head.
When I started this pattern I simply loved the way it looked, but it has turned out to be a really warm addition to my accessories collection. Woolly Wormhead is, once again, triumphant in her hat pattern creation. It can be a bit fiddly to make all those ridges, but they do pull you on as you knit. You think to yourself, "just one more ridge". This hat took a bit longer than the last couple I knit, but it was very satisfying to create and I love the finished article. I love it when you enjoy knitting the project and it results in something you love wearing. For me, that ticks all my boxes. I am a combination of a process and product knitter. I will slog through a project to get the resulting product, but I will also end up with something I don't particularly need because I really wanted to enjoy the process of creating it. So this hat makes me happy in all ways! Knit The Queue 2013 is turning into a very enjoyable endeavour. I need to decide which item to start on next, once I finish a super secret urgent project I will make my decision.
To see other people's lovely finished things, click on the box.
Labels:
Charity,
FO Friday,
Hat,
Knit The Queue 2013
Friday, 15 March 2013
This post's for me
I haven't been blogging much over the last few months. You probably don't notice that much, because you probably have a feed reader full of other blogs to read. Speaking of feed readers if you use Google's Feed Reader you may be part of the mad scramble to find another reader to replace it. I am trialling Feedly as it has an app for both Android and Apple. It's ok, but if anyone has any other suggestions for replacements please let me know as I rely massively on my feed reader.
Anyway back to my original point. I haven't been blogging much because my health is not great at the moment. Someone at my surgery decided that as they couldn't find explicit instruction in clear language in my notes about why I should be taking a certain medication, which I've taken for several years, I needed to be referred back to a Consultant. They did not refer my back to my original Consultant who I saw for nearly 10 years, but to a stranger. So for 6 months I have had my meds messed about with and as a result my hormones have been all over the place and my endometriosis has been kicking my butt. Six months down the line and I am back on my original meds and my hormones are still not stabilising. I feel RUBBISH and as a result I've not been blogging as much.
I think my blogging has taken a back seat as I didn't have any energy to take pretty pictures, nor the brain power to write lucidly! I've always subscribed to the school of thought that if you can't do something well, then don't do it at all. It's a stupid way of doing things, especially if you are ill. If I stuck to it rigidly I'd never do anything and all my crafting would never have got started, because no one can do anything perfectly at the first attempt. So this blog post is just for me. It is to remind me that just because it's not perfect I can still write a blog post, especially as there are things I want to tell you about.
I finished knitting Melia!!! It is gorgeous, but it isn't blocked yet, and it might not be for a couple of weeks, because of health issues. I haven't sewn in the pockets yet as I want to block it first. When it is blocked, the pockets sewn in and a zipper added I will take some photos and I will blog about it properly, but I just wanted to crow in triumph that the first CTM and KTQ2013 project is pretty much finished.
As I have finished my first CTM project, it was time to start the second one. I dived into box number 2 and pulled out 2 skeins of Debbie Bliss Angel, bought in January 2011. (I'm beginning to detect a Debbie Bliss theme here, first Fez and now Angel?).
I am currently searching for the right project for this yarn. I have narrowed it down to two fairly straight forward projects, one was a free pattern I got when I bought some Rowan Kidsilk Haze last year and the other is Just a Whisper Wrap/Scarf by Tonia Barry. I am currently leaving towards the freebie pattern I got called Wiggly Edge Shawl, as I think the wrap would be lovely but would be a touch boring to knit..
As I have also finished my first Knit the Queue 2013 project, I thought I'd cast on for another project from my queue, a Woolly Wormhead pattern called Sumner. The pattern is from Classic Woolly Toppers and uses a 4ply yarn. The pattern specifies Semi-Precious by BabyLongLegs, but I have some really nice BooSock from BabyLongLegs in stash that I want to use instead. BooSock has 80% merino and 20% bamboo, content. It has some of the sheen and strength that Semi-Precious has, so I think the replacement will work.
This hat will hopefully be a nice Spring weight hat, though knitting it in sock weight yarn might take a while. I have caked the yarn and will start swatching this weekend.
I'm hoping in the next couple of weeks my health will settle down a bit and I will have more pretty pictures to show you, but until then I will keep on blogging for myself, trying to write down the things I want to remember and hope you don't mind the shoddy writing and lacklustre photographs!
Anyway back to my original point. I haven't been blogging much because my health is not great at the moment. Someone at my surgery decided that as they couldn't find explicit instruction in clear language in my notes about why I should be taking a certain medication, which I've taken for several years, I needed to be referred back to a Consultant. They did not refer my back to my original Consultant who I saw for nearly 10 years, but to a stranger. So for 6 months I have had my meds messed about with and as a result my hormones have been all over the place and my endometriosis has been kicking my butt. Six months down the line and I am back on my original meds and my hormones are still not stabilising. I feel RUBBISH and as a result I've not been blogging as much.
I think my blogging has taken a back seat as I didn't have any energy to take pretty pictures, nor the brain power to write lucidly! I've always subscribed to the school of thought that if you can't do something well, then don't do it at all. It's a stupid way of doing things, especially if you are ill. If I stuck to it rigidly I'd never do anything and all my crafting would never have got started, because no one can do anything perfectly at the first attempt. So this blog post is just for me. It is to remind me that just because it's not perfect I can still write a blog post, especially as there are things I want to tell you about.
Thing 1
I finished knitting Melia!!! It is gorgeous, but it isn't blocked yet, and it might not be for a couple of weeks, because of health issues. I haven't sewn in the pockets yet as I want to block it first. When it is blocked, the pockets sewn in and a zipper added I will take some photos and I will blog about it properly, but I just wanted to crow in triumph that the first CTM and KTQ2013 project is pretty much finished.
Thing 2
As I have finished my first CTM project, it was time to start the second one. I dived into box number 2 and pulled out 2 skeins of Debbie Bliss Angel, bought in January 2011. (I'm beginning to detect a Debbie Bliss theme here, first Fez and now Angel?).
I am currently searching for the right project for this yarn. I have narrowed it down to two fairly straight forward projects, one was a free pattern I got when I bought some Rowan Kidsilk Haze last year and the other is Just a Whisper Wrap/Scarf by Tonia Barry. I am currently leaving towards the freebie pattern I got called Wiggly Edge Shawl, as I think the wrap would be lovely but would be a touch boring to knit..
Thing 3
As I have also finished my first Knit the Queue 2013 project, I thought I'd cast on for another project from my queue, a Woolly Wormhead pattern called Sumner. The pattern is from Classic Woolly Toppers and uses a 4ply yarn. The pattern specifies Semi-Precious by BabyLongLegs, but I have some really nice BooSock from BabyLongLegs in stash that I want to use instead. BooSock has 80% merino and 20% bamboo, content. It has some of the sheen and strength that Semi-Precious has, so I think the replacement will work.
This hat will hopefully be a nice Spring weight hat, though knitting it in sock weight yarn might take a while. I have caked the yarn and will start swatching this weekend.
END OF THINGS
I'm looking forward to tackling a few smaller projects for a while after the big project that was Melia. I also like that I am ticking off two more items from the "things I want to do this year" list and I'm using stash yarn for both.I'm hoping in the next couple of weeks my health will settle down a bit and I will have more pretty pictures to show you, but until then I will keep on blogging for myself, trying to write down the things I want to remember and hope you don't mind the shoddy writing and lacklustre photographs!
Labels:
CTM,
Knit The Queue 2013,
Melia,
Pattern,
Yarn
Wednesday, 6 February 2013
More Melia!
I have more Melia news. I think this is possibly the project I have had the most to say about, since I started blogging. After contacting Ysolda's office I got a reply from her assistant. I was told that the problem I was having must be down to Ravelry not updating the files properly. I was told to get in touch with Ravelry to straighten it out. I sent another email requesting the up to date file version numbers so I could deal with Ravelry and I never heard anything back. However, next time I visited my library on Ravelry, there was an "Update Available". I clicked on that button and guess what file had been updated? Yep, you guessed it, Little Red in the City! Ysolda's assistant had obviously got onto Ravelry for me. So now I have up to date files to work from.
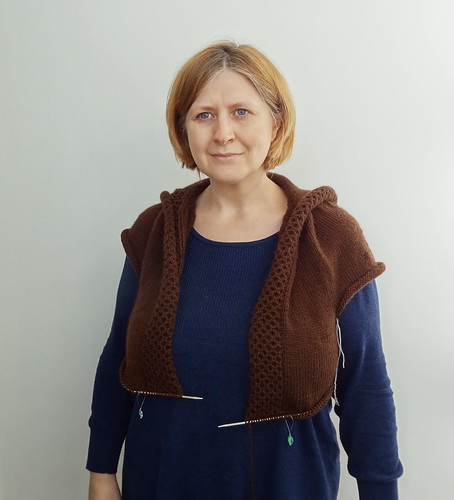
After looking again at the incorrect charts from the original file I was working from, it appears that I have made the garment 2" bigger than required, rather than 2" smaller as I originally thought. I put the garment onto waste yarn and tried it on. It is is much bigger than I thought, when I tried it on whilst still on the needle, and it may be big enough to insert a zip into it, as the edges meet at the front, which is not how the garment is styled (it should have a gap between the front edges of around 2 inches). I like the idea of being able to close the garment completely as I think it will be much warmer worn like that and a zip will be hidden beautifully behind the lovely plump borders. I saw a project by giraffgirl done in this way and I like how it looks.
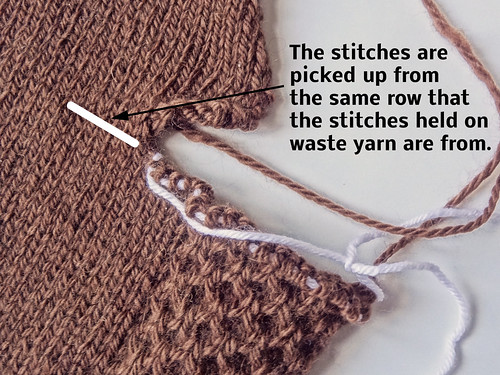
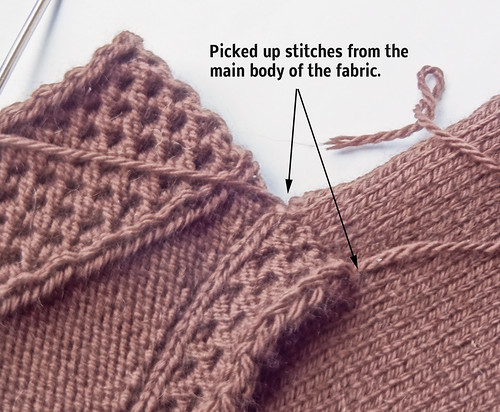
So, once I had decided to keep knitting this size, I have made excellent progress. I've done the main body of the garment and done the hip shaping and gone back to start knitting the top of the pockets. I got a little confused with this so I've done some photos showing what I did. I found this project that had a photo giving me a hint. I then was able to move forward, as the pattern wasn't very clear at this point, for someone who didn't know what they were trying to create.
The idea behind using this technique is to have the top of the pocket appearing seamless. The body of the garment forms the back of the pocket and the front of the pocket is formed by knitting the border stitches and creating the top fabric at the same time.
To create this seamless pocket, whilst the body of the garment is knit, the borders are put on waste yarn. After knitting it, the body is also put on waste yarn. You are next told to place the stitches held on waste yarn for the pockets back on the needle. These stitches are the border stitches. Once the border stitches are back on the needle, you pick up the required stitches from the same row as the stitches now held back on the needle. The next row knit will create the new fabric growing outwards from the body of the garment.
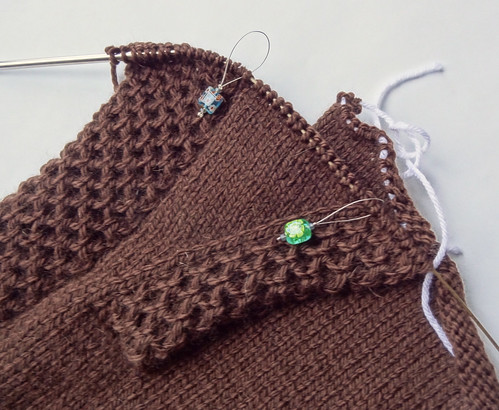
On the right hand pocket the picked up stitches are picked up and knit at the same time, working from the body out and then the border stitches are worked in pattern. On the left hand pocket the border stitches are worked in pattern and then the picked up stitches are knit. This ensures the picked up stitches grow from the same point, at the same rate, as the border stitches.
As the pocket is worked it will create a flap that forms the front of the pocket.
I think this technique is very clever and looks fantastic, it just took me a while to get my head around it. I hope these pictures will help others, trying to muddle through this part of the pattern, get it straight more quickly than me!
This garment is captivating me, and, despite all the woes of the incorrect pattern version, I can't seem to stop working on it! To see other works in progress, click the button.
Labels:
CTM,
Knit The Queue 2013,
Melia,
WIP
Wednesday, 30 January 2013
More Knitting The Queue 2013
I have only been knitting on two things this week, one is a test knit that I have finished, which I will share on Friday, and the other is the ever gorgeous Melia. For those that don't remember, Melia is the first project on my Challenge To Myself AND Knit The Queue 2013. One project ticks both boxes. It's quite sad that it's such a big project to start off both quests, as it is going to take quite some time to finish, but I am loving every minute of it! You can see how much further I've got since my last update.
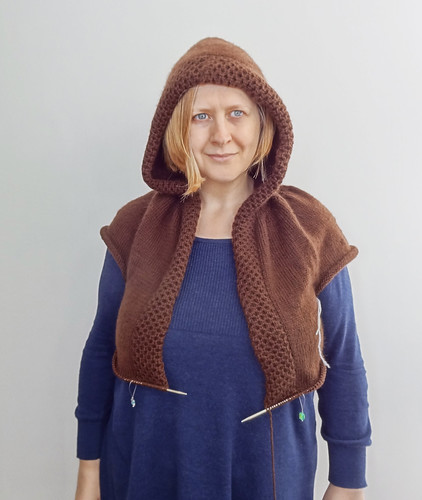
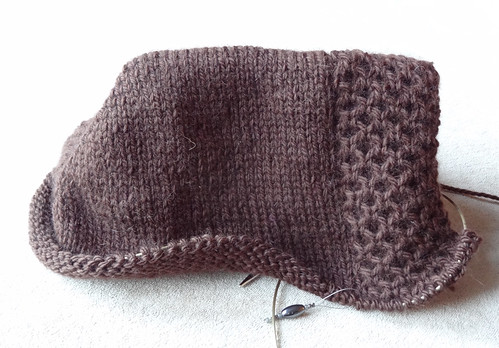
You can begin to see more clearly how the clever hood construction works now.
The rows of increases after the hood shaping gives the garment lots of room at the back, to create (what will hopefully be) a flowing and roomy cardigan/jacket.
I think knitting on the cable border, as the garment is knit is a very good idea. It saves having to do a huge long pick up of stitches at the finish of the garment, but it also creates a lovely smooth transition from the decreases of the hood shaping to the increases of the body of the garment. If the border was added at the end of kntting the body of the garment there probably would have been gaps at this point. Instead we have this:
Obviously, working a border this way wouldn't work in all cases, but in this one it does. I think Ysolda Teague shows how carefully she designs garments throughout this project. She uses the right technique, in the right place, to create the right effect in the easiest way. You could see this in the hood shaping at the start of the project. You can also see it in the increases in the body of the garment. The increases after the hood shaping are done by knitting into the front and the back of the stitch. This is a simple and quick method of increases, but it isn't invisible. This isn't a problem at this point of the garment because there are lots of increases made closely together, so the individual stitches are hidden in the folds of the knitted fabric. Later in the body of the knitting there are increases made before the armholes are created.
The increases are made almost invisibly. The stitches flow out elegantly from the body into the arms. This is done by using a LLI and RLI (as Ysolda abbreviates it to). This isn't the best increase for all situations as it can show a little gap alongside the stitch the increases are made from, but in a fabric as dense as this (it's knit at a dense gauge) as the body moves into the arm, it's an elegant solution. Knitting Daily has good diagrams, and there is a good YouTube Video to explain this technique.
NEWSFLASH
I have just come across the Pattern Errata for the PRINTED version of this book. It made me double check the PDF I printed off to use. It seems that though I bought the printed copy from Ysolda's website in order to get the PDF version of the book, and all the updates on Ravelry, the digital files on Ravelry had not been updated to reflect the errata that was listed on Ysolda's website as being in the PRINTED version of the book.
On Ysolda's website, it states the current digital version is 1.3, but on Ravelry the most recent version available is 1.2. The single pattern for Melia is listed as being v1.1 and in none of the available digital copies have the column headings changed on the charts for determining stitch and row counts. This means that all the little numbers of stitches and rows I worked out to make this garment fit me perfectly are 2" out. Is it wrong of me to assume that getting the most up to date digital versions of a pattern, on Ravelry, will ensure I have the most up to date pattern available and that it will have been amended the to include the errata from the printed version that were listed on the website? It seems to me to defeat the object of having a digital version on sale.
I also found reference to this errata on Ravelry in a thread **19 months ago, so it's not like there hasn't been time to up date things!!
I am now going to have rip out all the work I've done from the hood downwards because my maths is wrong based on the column headings. I love this pattern dearly and I WILL recalculate and revise the pattern, rip it back and re-knit it, but I really shouldn't have to. It shouldn't be this hard! I'm so upset about this because it such a lovely garment, but looking at the picture below, I really need to do this, because it is gaping at the bust, more than can be explained by trying on the garment with the knitting needle still in the working edge.
So I'm now going to crawl under my comfort blanket and cry for a bit before going over the pattern again and seeing if I can avoid going all the way back to the increases after the hood, because I'm not undoing that as it looks pretty good. Hopefully by this time next week I'll have stopped sobbing and got back on track. I'll keep you posted!
To see people who are going forwards instead of backwards, click on the button.
Labels:
CTM,
Knit The Queue 2013,
Melia,
WIP
Wednesday, 16 January 2013
Busy Knitter
Looking at my January 2013 Crafting set on Flickr confirms my suspicions that I have been knitting lots this month. The trouble is, I've been knitting lots on lots of different projects, so I haven't got very far on most of them. I have got a finished Pterodactyl that I'm keeping for Friday's post, but it doesn't feel like I've got very far on the rest of them.
I shall start with my Melia. Oh, how I LOVE this project and the yarn. Together they are a knitters dream. I have a finished hood.
One of the many reasons I love this project is that it always has something to keep you occupied. While you are churning out the hood, there are the lovely little cables at the edges to keep you happy. When you get to the neck shaping of the hood, you do one row of decreases and then you add four rows of the cable pattern, to pull it in the rest of the way. It's so clever!
It makes an ordinary set of decreases into something pretty as well as functional. It also provides a strong section of fabric to prevent stretching across the shoulders in this seamless garment.
As you can see, without blocking, the edge of the cabling pulls round. I think with blocking it won't pull round quite as much, but it will soften the edges nicely. The yoke hasn't been started yet, which is why the hood doesn't have much shape yet, as it isn't being anchored in the right place.
When I can tear myself away from this CTM project, am working on a test knit. It's a 'Giddy' Made With Love design. It's the first test knit I've done for Amanda, and I'm enjoying it. The test group is informal and relaxed and very friendly. I'm really glad I complimented the sample and said yes when I was invited to test it. I'm not going to show pictures or give details until the pattern is ready for release, as I haven't had permission. But I thought you should go and look at Amanda's other designs as there are some very pretty ones!
Of course my other project is my Knotted Cap KAL! There are lots of very different yarns being used by the members of the KAL, and one person has even finished. Not only has Calophi made her hat, she even made some matching mitts, using the cable design from the hat. I love that she made the body of the hat a bit longer, which has changed the shape of the hat significantly.
For my version of the hat, I am using Fyberspates Scrumptious Aran in Magenta. It's lovely stuff. Working with it though is not as simple as I expectd, because it has 45% silk content, which means there is less give in the yarn, than when I knit this hat before. It makes the cabling a bit more challenging. However, I have still got this far:
That wooden object, holding the skein, is a Yarn Pal. I've been looking for one in the UK for ages. I loved these from the US, but didn't want to pay the Import Tax. Then I was browsing Ripples Crafts for yarn and saw the Yarn Pal option on the shop headings. I was so pleased when I saw them I instantly put my name on the waiting list for one. It came last week and it's lovely. It keeps the skein off the floor when I yank it. In fact, I don't really need to yank it now as it just needs a gently pull to unravel the yarn. I'm just leaving this yarn on the Yarn Pal because the Fez, I'm using for Melia, came pre-wound and it doesn't really sit on the Yarn Pal easily. The yarn travels underneath and over the top of the skein in Fez, so I think I can only use the Yarn Pal in instances where I wind the skein myself.
I used the Tubular Cast on from Woolly Wormhead's tutorial again. I do like how stretchy it makes the cast on edge. It also makes the edge look invisible as there is no hard line created as the cast on stitches stretch along the bottom.
I've chosen to knit the cables without a cable needle. I did a photo-tutorial for employing this technique for my Handyman Hat pattern, but the principles are the same. Cabling without a needle definitely speeds up the process of knitting this hat. I think this hat is going to turn out very nicely. I may even knit some mitts to match, if I have enough yarn left over!
To see other works in progress, click on the button.
Labels:
CTM,
Hoodie,
Knit The Queue 2013,
Knotted Cap KAL,
Melia,
WIP
Wednesday, 9 January 2013
Short Row Bonanza!
This week I have mainly being knitting short rows. My two main projects use them. It's just as well I don't mind short rows or I'd be tearing my hair out. Well actually I was tearing my hair out, not because of the short rows but because I put them in the wrong place - grrrrr.
I have started work on my first Challenge To Myself project. I cast on for Melia, and straight away hit a snag. The hood sizing given for this pattern requires you to choose, S, M or L, depending on how big your head is. What it didn't give was what S, M or L equated to in specific inches around your head. I made a punt and decided to go for M size. If I'd understood how the shaping of the hood was created I might have chosen differently.
The hood is created by using a provisional cast on. The number of stitches you cast on for the hood creates the spine at the top of the hood, from which short rows create the peak. That spine runs from the front of the hood down towards the back of the head. The short rows start 16 sts back (in my case) from end of the cast on stitches, and work back towards the end of the cast on spine.
Above you can see the short rows row meeting from both sides of the hood. The hood is created in two parts. One edge is worked and then the provisional stitches are picked up and the other half of hood, using short rows, is worked. This creates a hood with no seam, but it took me a while to get my head around the shaping, because I lost the stitch marker that is placed to mark where the short rows go. It took getting to the end of the short rows to work out I had a very wonky hood. I had to unravel what I'd done and work back to where the provisional stitches were picked up and try again.
Now I've explained how the hood is constructed I hope the sizing will make more sense. In my chosen size M, I cast on 55 sts. At the specified gauge of 18sts over 4", this gives a spine of approximately 12". 18sts of that hood are used in the cabling which pulls that part of the stitches in by about 1". Using that measurement you can line up your tape measure with the back of your head and measure to where the hood will sit, and make a choice about the hood size you want to make.
The hood is a very clever construction, but because I didn't understand it when I cast on, it was easy to make a mistake when I lost my stitch marker. I think I am now back on track. I do love the cable panel at the edges of this garment. It's so soft and squishy and the slipped stitch at the edge pulls the edge around softly and neatly.
Edited To Add: The sizes for the hood are actually on the pattern: S=20", M=22", L=24" These sizes are given on the original sizing page (p.149)
I am really enjoying this project. The yarn is just as beautiful as I initially thought. The very slight fuzz caused by the camel content in the yarn doesn't hide the honeycomb panel or the stitch definition in the stocking stitch body. I think I am going to be addicted to this garment.
During the short amount of time I'm not knitting Melia, I am working on Pterodactyl. I have reached the end of the last grey section and I'm about to start the bottom border.
I don't want to finish this project. I have enjoyed every minute of working on it. My only consolation is that I will be able to wear it soon! I was originally going to add a couple of extra repeats of the wedges, but I don't think I'll have enough yarn to do that. Plus I think I was mistaken about the size of this shawl. I think it will be more than big enough to wrap comfortably round my shoulders. I don't know how quickly this project will get finished, as Melia is taking up a big chunk of my knitting time, and I will be casting on for the Knotted Cap KAL in the next day or so. Never mind, it will get finished eventually!
Labels:
Cardigan,
CTM,
Knit The Queue 2013,
Melia,
Shawl
Wednesday, 2 January 2013
My First Challenge To Myself Post
On New Year's Eve I found myself surfing around the 'net and found something I felt compelled to at least attempt to join in with, a new idea buzzing around Twitter and Ravelry, the idea of "Knit The Queue 2013" (KTQ). This is a brainchild of Mooncalfmakes. To take part, in some form or another, I decided to make a section of my queue that I realistically wanted to tackle this year. I specifically chose patterns that I really wanted to make and that I actually had yarn for. This would be part of a two pronged attack, including the Challenge To Myself (CTM) to reduce my stash. I have created a sub-set of my queue, which you can see here. It numbered 22 items with a good mix of project type.
On 1st January, in accordance with my CTM plans, I went to my first box under the spare bed and determinedly looked away whilst lifting the lid. I rummaged around and grabbed a plastic bag and tugged it free. I then nearly cheated and threw it back. The yarn I had freed from the stash was part of a collection of several plastic bags. I had freed the Debbie Bliss Fez I received in compensation for a ruined baby blanket I knit 2 and a half years ago! This particular yarn constitutes a rather large portion of my first box of stash. I have 20 skeins of this stuff. I have sat on it for 2 and a half years because it is, by far, my most valuable yarn. I never buy this sort of quantity of yarn, and certainly never buy this sort of yarn at it's full price. I have sat on this yarn because I was scared to ruin it, because it is so lovely. This aran weight yarn is comprised of 85% extrafine merino and 15% camel. It is so soft and fuzzy, yet plump and rounded.
I am pretty proud of myself for not caving in to my baser instincts. In my head I assumed that most of my CTM projects would involves single skein or at the most a couple of skeins. It was probably silly of me to think that way, but I did. With that in mind, I am so pleased I pulled all the Fez out of the stash and headed downstairs to examine my yarn and Ravelry.
When I looked at Ravelry, one of the items on my KTQ list was Melia from Little Red in The City, which I reviewed in 2011. I have always wanted to pair up this yarn and this pattern and it seems that now is the time to act on that decision. I have swatched the yarn in a generous sized piece of fabric. I wet blocked the fabric gently, and then after it was dry, hung it up with wooden clothes pegs suspended from the bottom edge of the swatch. This method of putting the swatch under tension was a tip I got from Little Red in The City and it seems a sensible one when this pattern has very large pieces of stocking stitch in it.
I think I have got gauge first time, but I need to leave the swatch to settle for a few days first. I love the stitch definition on this swatch. The fabric is dense but still has gorgeous drape to it. The swatch has made me really excited about knitting this garment, especially as I think it will be a really useful addition to my wardrobe.
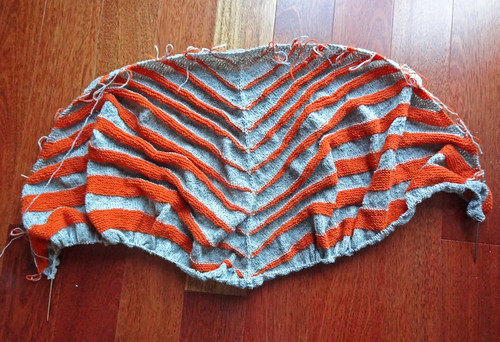
Whilst that swatch is being put under tension, I have been motoring on with my Pterodactyl. I've reached the last wedge of orange before the border. I'm trying to decided whether to add any more wedges because I still have lots of yarn left.
The shawl, as directed in the pattern, is quite shallow, and I prefer my shawls to be deeper at the back. I might put a lifeline in at the point where the border should be knitted and then it will be easy to rip back if I decide I've made a mistake by adding extra wedges. I want to keep on knitting this shawl not only be because I like my shawls deep, but also because it's so pretty!
I think that is plenty to be getting on with in my first WIP Wednesday post of the year. I'm quite looking forward to settling into my new knitting routines! If you want to see what other WIPs are in progress, click on the button. Remember there is still time to vote on the hat pattern you want to knit with my KAL (the pattern chosen will be reduced in price for the KAL).
On 1st January, in accordance with my CTM plans, I went to my first box under the spare bed and determinedly looked away whilst lifting the lid. I rummaged around and grabbed a plastic bag and tugged it free. I then nearly cheated and threw it back. The yarn I had freed from the stash was part of a collection of several plastic bags. I had freed the Debbie Bliss Fez I received in compensation for a ruined baby blanket I knit 2 and a half years ago! This particular yarn constitutes a rather large portion of my first box of stash. I have 20 skeins of this stuff. I have sat on it for 2 and a half years because it is, by far, my most valuable yarn. I never buy this sort of quantity of yarn, and certainly never buy this sort of yarn at it's full price. I have sat on this yarn because I was scared to ruin it, because it is so lovely. This aran weight yarn is comprised of 85% extrafine merino and 15% camel. It is so soft and fuzzy, yet plump and rounded.
I am pretty proud of myself for not caving in to my baser instincts. In my head I assumed that most of my CTM projects would involves single skein or at the most a couple of skeins. It was probably silly of me to think that way, but I did. With that in mind, I am so pleased I pulled all the Fez out of the stash and headed downstairs to examine my yarn and Ravelry.
When I looked at Ravelry, one of the items on my KTQ list was Melia from Little Red in The City, which I reviewed in 2011. I have always wanted to pair up this yarn and this pattern and it seems that now is the time to act on that decision. I have swatched the yarn in a generous sized piece of fabric. I wet blocked the fabric gently, and then after it was dry, hung it up with wooden clothes pegs suspended from the bottom edge of the swatch. This method of putting the swatch under tension was a tip I got from Little Red in The City and it seems a sensible one when this pattern has very large pieces of stocking stitch in it.
I think I have got gauge first time, but I need to leave the swatch to settle for a few days first. I love the stitch definition on this swatch. The fabric is dense but still has gorgeous drape to it. The swatch has made me really excited about knitting this garment, especially as I think it will be a really useful addition to my wardrobe.
Whilst that swatch is being put under tension, I have been motoring on with my Pterodactyl. I've reached the last wedge of orange before the border. I'm trying to decided whether to add any more wedges because I still have lots of yarn left.
The shawl, as directed in the pattern, is quite shallow, and I prefer my shawls to be deeper at the back. I might put a lifeline in at the point where the border should be knitted and then it will be easy to rip back if I decide I've made a mistake by adding extra wedges. I want to keep on knitting this shawl not only be because I like my shawls deep, but also because it's so pretty!
I think that is plenty to be getting on with in my first WIP Wednesday post of the year. I'm quite looking forward to settling into my new knitting routines! If you want to see what other WIPs are in progress, click on the button. Remember there is still time to vote on the hat pattern you want to knit with my KAL (the pattern chosen will be reduced in price for the KAL).
Subscribe to:
Posts (Atom)