Showing posts with label Felting. Show all posts

Tuesday, 25 March 2014

STSAL2014 - Ready to Start Plying

Today is the Stitched Together Spin-A-Long 2014 update day. To see other posts in this series, click the button below.

STSAL2014 Small Button

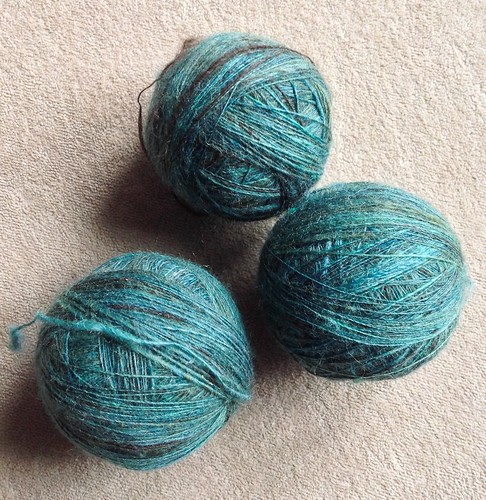
Whilst spinning singles in a reasonably uniform colour, there isn't much of interest to show.  However, yesterday I wound my last single onto a plying ball. Before yesterday, I only had two plying balls, so I had to make another one out of needle felted fibre, to hold my third set of singles.  Making a needle felted ball is such a simple thing to do, but it's a little time consuming. I also managed to break two needles whilst doing it. It's hard to hold a sphere stable whilst stabbing it from directly above, you know.  This tutorial shows the basics of what I did, but I used a Clover Felting Needle Mat and a Needle Felting Tool. I also used a toothpick to hold the ball in place to ensure I didn't stab my fingers with a barbed felting needle. It's really not a fun experience.  The toothpick makes it a little more tricky, but at least I received no damage to my hands.

Once I had my third felt ball to use for making a plying ball, I finished winding off the last of my singles.
AdobePhotoshopExpress_2014_03_25_08:57:45

The singles have now rested for a day, so I can now start plying. It's ages since I made a true 3-ply yarn, I hope I don't get in a mess!

How are you doing with the Stitched Together Spin-A-Long?  Have you created a project on Ravelry or blogged about your progress. If you have, please add your link in the comment thread. I'd love to know how you're doing. Or alternatively come and join in the chat over on the Ravelry Board. The Ravelry Board is also a good place to ask for advice or to bounce ideas around with fellow spinners.  You still have plenty of time to join in, as the SAL doesn't end until April 30th.

Friday, 28 October 2011

Annual Slippers

Every year, since I started to knit, I have made my own slippers.  I knit, or crochet them and then I felt them.  I have tried a couple of patterns, with some success.  My first attempt at slippers, was a crochet pattern by Susie Johns.  The pattern is called Mulan and was from Let's Knit Magazine, December 2008.  I liked these slippers.


In fact, I still have them.  The only problem with these slippers is that they are knit with DK weight yarn and they are a little light weight for me.  This is probably how they have survived since December 2008!

My next attempt at slippers was the Chilko pattern by Chrissie Day.  This pattern was from another Let's Knit Magazine, this time from February 2009.  I have given these details because people are always asking me where I got the pattern from, because they want to make these slippers.  I have to admit, they are pretty damn fabulous!

Here are my previous attempts:


My favourites were the red ones, in the large picture.  They are still being worn, but have a hole in the sole.  The other ones have died and gone to that big slipper pile in the sky.

I love these slippers because they are a quick knit, and use less than 100g of aran weight yarn.  They fit brilliantly and look like ballet slippers!  Here are this year's incarnation:


Look at how they make my big plates of meat a teeny bit more elegant!


I know it's a bit of a stretch to think of my huge feet at elegant, but I'll take any help I can get.

The yarn I used, this time, was Cascade 220 and I LOVE this shade of purple (8886).  I actually picked up 3 skeins of this, pretty cheaply, on eBay, but I know it is getting easier to obtain in the UK.  I have bought some from Get Knitted before and I've seen it at First 4 Yarns.  Both shops have a good range of the Cascade colours to choose from.

This was the first time I had used this yarn for felting, but I will be doing so again.  It felts beautifully, and the colours are gorgeous.  I did, however, throw a couple of colour catchers into the washing machine, and they came out a very deep purple indeed, so I shall have to remember that for next time I felt with this yarn - it will run!

If you know me, you will probably be aware that I don't like to do a felting wash with only one little pair of slippers in.  So you won't be surprised to know that in the next couple of weeks you will be seeing more Finished Objects from this load.  They will appear gradually, as I want to add fabric, and other such embellishments, to the other three projects.  So until I finish the other projects, just this taster will have to suffice!

It was nice to get felting again.  I've not done any in ages, and I'd forgotten how much I love it.  If you are in the UK and haven't tried felting because you have a front loading washing machine, look on my Tutorials page for tips.  I've been using a front loading washing machine for felting my projects since 2008, and I've been pretty successful with it. Don't be scared, it's easier than you think!

If you want to see more finished objects, then click on the buttons below.  I'm sure you will find something pretty to admire!


Wednesday, 24 March 2010

One last felt

I always try and do multiple felts in one wash, as it somehow feels less wasteful. It probably isn't, because I am constantly having to drain my machine to check on the felting progress, but to felt only one thing as a time just feels wrong.

This means that after my previous felty posts, here is one last felt to tell you about.

This, my friends is what happens to Kidsilk Haze when you stick in the washing machine.


It doesn't look too bad does it. But look closer....


Yes, that is a curled over edge. It is also what is left after I spent 20 minutes teasing one of the folds apart. I couldn't face any more teasing, and I don't think the felt could tolerate any more either.

I love the look of this scarf, which is from Knitting Never Felt Better: The Definitive Guide to Fabulous Felting by Nicky Epstein. It is a book I got for Christmas in 2008 and I cannot fault the book. It has wonderful pictures, is full of information and ideas, but this project did not work for me.

The book suggested using hazel nuts to make the "bubbles", tied with elastic bands. I could never find hazel nuts, probably because my OH does all the shopping. But I did find some wooden beads. In two different sizes no less. This is what the scarf looked like before being felted.


I rather like it! I love the effect of the "bubbles" on the felted scarf, which can be seen in this picture.


But I think the ends felted more heavily than the middle of the scarf, because of the weight of the beads.


This would have worked if the edges of the scarf had not wanted to roll over on themselves. It would have made a lovely soft body of the scarf and the ends would have hung beautifully. However because this was felted in a machine ,and wasn't controlled carefully by hand felting, the edges became quite lumpy. The soft silkiness of the Kidsilk Haze was also lost with the felting. However I think with a soak in some fabric softener would have regained that, if I'd done it before removing the wooden beads. I think if I was to try it now, the puffiness of the "bubbles" would be diminished, though it could be worth a try because it is a little too scratchy to use at the moment.

If I was to try this project again, I would probably try to crochet the edges of the scarf to keep them flat during felting, using an acrylic or cotton yarn. I am really tempted to try this project again, but with my adjustments in technique because it really is very pretty to look at, even if it is scratchy to wear. I'm sure I have another ball of Kidsilk Haze knocking around.....

Sunday, 21 March 2010

Pink Purse

If you read my last post carefully, you will have noticed that I didn't use all my pink yarn on the slippers.

I decided to make a little pink purse to use as an additional gift for Rachael's birthday. I thought it would make a nice gift bag.


This is a very simple construction, involving stocking stitch until I ran out of yarn, with the last few rows knit in garter stitch using acrylic yarn. I sewed up the sides using mattress stitch. The acrylic yarn at the top edge prevented the stocking stitch from rolling over and sticking together. This probably wouldn't have been a problem with such a small project, but I didn't want to ruin the purse by taking a short cut.


Once felted, I cut out the acrylic yarn and then sewed a lining with a zip on the top. I then sewed the lining into the purse. I have to say I wouldn't use mattress stitch in a small felted purse again, as it caused a bit of a lump inside the purse.


Once the lining was stitched into the purse, and the zipper tested, it was all set to receive the lovely bracelet I made for Rachael. Now all I have to do is gift wrap it and find that blasted birthday card that seems to have grown legs.

Friday, 19 March 2010

Bright Slippers

My beloved felted slippers have started to show wear and tear, so I decided that I needed to replace them. As I loved the pattern used for my last slippers - Chilko by Chrissie Day from an old Let's Knit magazine, I decided to stick with it. I may just have to laminate my copy as I know I will probably be using it every year to replace my old slippers.

Felted slippers really are wonderful. They are warm, but your feet don't overheat or get too sweaty. The real bonus is that they don't get stinky the way man made fibres do, and if they do, you just lob them in the washing machine. If you have never had knitted, crocheted or felted slippers may I recommend you give them a go at some point. You won't be disappointed.

To ring the changes a little I changed my colour scheme and yarn brand. Everything else remained the same. I used Katia Trico-Fieltro in two different colours, pink and turquoise.


When the knitting part was done, I ended up with huge slippers, as I usually do. I didn't worry, as I knew they would shrink in felting. However the felting didn't make them quite as small as the previous slippers I used. I think if I was to use this yarn again I would drop down a needle size. However, though the slippers are not snug, they are not boat like and they remain on my feet when I walk. I can't really ask for anything more.


I love the contrast between the two colours on the toes.


You may notice the two thin lines embedded in the felt, on the side of the slippers. This was caused by elastic bands. I decided to be clever and use them to hold the slippers in my desired shape, around the stuffing of plastic bags, as they dried. They worked brilliantly, but did leave a mark. I would use them again but would place something underneath the elastic bands to stop them scoring lines in my lovely slippers.


Aside from these two issues, the slippers are great, as always. The yarn is thicker than I have used previously, so these slippers are slightly more padded and comfortable, which is a real plus. The colour of the yarn I used is so glorious, that I can't help but smile at my feet.

I used around 3.5 balls of yarn, a full ball of turquoise on each slipper and as soon as the decreases started I switched to the pink yarn. I will definitely be using this yarn again for felting projects as I is quite reasonably priced and the colours are great. I fear I may have caught the felting bug again!

Sunday, 27 December 2009

Christmas Presents 2009

Now that everyone has finally received their Christmas bounty I am in a position to share some of the projects that I have completed. As well as sharing these projects I can also tell you at last about two patterns that are now available for purchase on my website.

Firstly I made a hat for my Dad. It is called "Handyman Hat". The original pattern was knit using Mirasol Akapana on 4.5mm needles. I knit the final version using 4mm needles in Mirasol Miski. This version used ALL the yarn with very little spare as I didn't realise I was using different yarn until I got it home and gauged it. However, this colour was perfect for my Dad and he deserved to have the soft and silky yarn on his head.


This pattern is available for download from my Ravelry Designer page or from my website.

The second new pattern I have to tell you about is named after my friend Rachael. I got some amazing BabyLongLegs yarn and knew it had to be made into a hat for Rachael.


Once I made one, I had to make another for my Dad's wife. Thelma is a gardener and I know that all people who dig in the outdoors need to keep warm in digging weather!


And then I made another one, which I finally got to keep!


Thankfully everyone states they are happy with their hats! Again the pattern can be downloaded from my Ravelry Designer page or from my website.

You may think I went a little bonkers with the hats this year, and you would be right. Rachael's other half, Martin got a hat too.


I used the same yarn as I did for the scarf I made for his birthday last year. I couldn't let him walk the dog with a cold head, when Rachael's would be warm - now could I?

I made my Mum a scarf. She was delighted with it, and I am glad to be able to knit something nice for her. My Mum is allergic to animal fibres and can't wear wool. I made her a PomPon scarf, and she very nearly didn't get it, because I love the colourway.


This stuff is fabulously warm and soft and everyone who makes one, wants to make another. I am no exception to the rule. I knit one for Rachael straight after finishing this one, but didn't get to take a photo because it was seized as soon as I cast off!

As well as the scarf, Mum had put in a request for a bedside holder for her glasses. She claimed to be sick of knocking them off the bedside cabinet every time she tried to find them. I crocheted then felted this little whojamflip and she loved it. She can also put her rings and watch on the tray to keep them safe and sound at night.


I knit a cardigan for my brother, but didn't have time to get a photo before wrapping it up. I have been promised a photo of the cardigan being modeled by it's recipient in the near future. As soon as I have a photo I will share it, because I am very proud of my largest garment to date.

Phew I think that's everything I have to share at the moment. I got lots of goodies for Christmas, but I'll tell you all about them later, because this post is MAMMOTH! Hope you are enjoying your break and save a chocolate for me!

Tuesday, 13 October 2009

Goody Goody Yum Yum!!!

I got such lovely lovely things in the post today, that I am a giddy girl. Some are things I bought, some things I got for free. Do you want to see what I got....do you......well maybe I should share the loveliness with you nice folks.

Loveliness Number 1


British Merino Aran Wool, kettle dyed by BabyLongLegs, in "Greens". Isn't it lovely? It is ever so sproingy and very very pretty indeed.

Loveliness Number 2


British Merino Sock Wool, dyed by BabyLongLegs, in "Purple PetrolHead." It has long stripes in the most gorgeous of colours. I don't think I will be putting this yarn on my feet, it deserves to be seen by more people.

Both of these yarns were bought by me, after finally giving in to the gorgeous yarns that BabyLongLegs dyes. She is a colour genius and a friend of a couple of the people at my Borders knitting group, Lottie and Liv. They are always using her yarns and the colours really are incredibly vibrant and unusual. If you ever get a chance to buy some of BabyLongLegs yarn or roving, take it, because if you love a certain colourway, it may be snapped up before you talk yourself into spending your pennies. Already the "Purple PetrolHead" is gone, but if you are interested there is still a couple of skeins of the "Greens" left.

Now onto....

Loveliness Number 3


A felted flower brooch, sent to me by Felting in Fibrespace (AKA Beth Connors). I have been reading her blog for some time, and Beth decided to run a little contest. I won it! I was so pleased because I really loved the brooch, that had already been blogged about. It really is a lovely pale yellow. I think it will do really well to close my Comfort Shawl, what do you think?


I never did show you the photo of me wearing the shawl, did I? Well here it is being closed by a jade pin, that I think belonged to my grandmother.


Loveliness Numbers 4 & 5


All the lovelinesses from Fibrespace came in a sweet little box with a bird stamp on the front. The bird on the right is a brooch, which I love, and will probably attach to a lapel on a jacket or coat over the winter months to cheer me up. The button/badge on the left is going linger around in my mind while I work out what to do with it. It is so cute, and pretty it must be used in the right way. It doesn't have a pin, just a loop on the back that could be used to thread something through or be used to sew it to something. Like I said, I will have to ponder a while how to use it to the best.

To have such wonderful things come in the post on the same day, has filled me with much joy. Now I'm off to play with my pretties!

Wednesday, 23 September 2009

New Tutorial

There have been a few discussions on Ravelry lately, about felting in a front loading washing machine. I have only ever felted this way, but I know the majority of books on felting, knitted projects, are from the US. When I felted my first project I had to take a huge leap of faith because I couldn't find much information on the internet about felting in a front loader. So, as a result of these discussions and my own experiences, I have written out a few tips on how to approach felting a knitted project in front loading washing machine.

You can find the tutorial here. I hope this helps other people take a leap of faith, into the felting unknown!

Thursday, 10 September 2009

Wedding Gift

Well, I am back from one of the best weddings ever! We had glorious blue skies and sunshine all day, which helped set the very relaxed and happy tone of the whole event. The only flies in the ointment were my awful photos. I am so glad that this is the technological age and I can just pinch everyone else's photos when they are published online, because with a grand total of SIX photos that came out without blur, I need to take full advantage of other people's expertise. I have obviously been taking far too many static close ups of crafts and have forgotten how to photograph people! I must rectify this before my next outing.

One part of the wedding I can show you, was the gift I made for Stephen and Emma. You must have known this was coming? I mean what kind of sister wouldn't make something to celebrate her favorite people getting hitched?


I made a piece of "art". After receiving the gift both Stephen and Emma (and I) declared as it was without any kind of practical use but was very pretty, it must be art! I also informed them it was much better than when I was doing ceramics as it wouldn't break if it got dropped.

This "art" is essentially an urn, made from knitted wool that has been felted, then embellished. The felt was created using alpaca/wool yarn and was knitted with two strands to give strength. Knitting with two strands also enabled the colours to be blended gently. The colours selected were chosen to match the wedding colours and their bedroom decor.

The urn was knit in the round from the bottom to the top, in one piece, where an i-cord cast off was used (I bet that doesn't surprise you does it?!). After felting, the embellishments were added.


Little flowers were stitched on using seed beads and gemstones. These flowers were interspersed with sequins, secured with more seed beads.


Then I added two rings around the neck of the urn, made by using satin stitch, in hand dyed threads. The rings were then highlighted using sparkly metallic thread. Between the the rings more gemstones were added, punctuated by stitched squares.


Using more hand dyed thread, I zig zagged points from the sequins, up to the neck of the urn to draw the two sections together. The hand dyed threads were a perfect match with the colours of the urn and the gemstones I used. They really helped make the project a success, and I would use Stef Francis threads again without hesitation. I actually still have quite a lot left over from this project and I really want to learn how to use them in a more adept and complex manner.


I finished the urn by stitching on the date of the wedding on the base. I wish my date had been as neat as the one on the quilt made by the bride's mother, but then she has had many more years of practice than me. Perhaps I will catch up one day, but I doubt it! I wish I had a photo of the quilt given to the happy couple as it was very beautiful, and handily in the same colour scheme as my urn. My friend Debbie (the mother of the bridesmaid) also made a gorgeous cross stitch sampler as a gift. As Emma said, they have lots of crafty friends, and we all wanted to celebrate their marriage by crafting.

Emma was also lucky enough to have her mother make her wedding outfit, a very beautiful purple silk skirt and jacket, with a cream bodice. I am so pleased that both the jacket and the bodice will be emerging again on nights out as they are both very beautiful and can be worn again and again. I wish I had a photo that did the outfit justice. Maybe I shall ask Emma nicely and see if she will let me post a photo from her collection, as I am sure you will agree with me it is a truly special outfit.

I had a wonderful time with my family and friends this week and I shall never forget everyone sitting in a circle playing pass the parcel and battling it out at the pub quiz. It was a fabulous event that reflected a fabulous couple. Stephen and Emma, I love you both and wish you much happiness in your lives together.

Thursday, 6 August 2009

Felted Coin or Notions Purse

I have finally finished my felted purse. I have named it the Felted Coin or Notions Purse, because I couldn't decide what people might use it for. Personally I am using it for storing my stitch markers in. It sits on it's flat base, with zip wide open, so that I can easily reach in for markers whenever they are required.


I love how neat and crisp the finished purse is, and it matches my On Target Bag perfectly, if ever I decided to change it to a coin purse.


I have written up the pattern, with full instructions on how to felt it and add the zip. The pattern is available to download for free from my pattern page, and is a very good way to use up an odd skein of wool, or to try out felting for the first time.


As with all my patterns, if you have any questions, please contact me at mail@craftycripple.com, or via my contact page.

Wednesday, 15 April 2009

Project Updates

As promised in yesterday's post here are some pictures of my ongoing projects and some details about my progress. If I don't post this update now, I'll forget where I am and get all confused. Not that it's difficult to confuse me, but I want to stand a fighting chance of staying sane.

I have got to the end of the pattern repeats for my Porom Inspired Scarf. I did 12 repeats of the pattern, which gives a nice length of scarf. I am now adding an edging. I have decided to crochet on the edging because the scarf has been designed to be reversible and if I knit the edging, there will be a very obvious wrong side. If I crochet the edging, then the right and wrong sides are much less obvious, as you can see here:


The is the other side.


It is only the top edge that has been crocheted so far. I am planning on doing at least 3 rounds, but will probably go up to 5. Each round will have an increase in the amount of stitches by adding chains between each treble. I am trying to write up this pattern as I go and once it is finished, if anyone wants it, they can have it, on the understanding that I won't have tested it on anyone.

Next update is for my Sweetie Wrapper Socks. I have managed to knit the heel flap and turn the heel and pick up the gusset stitches. I am now reducing the gusset, which seems relatively straight forward, and then I will knit the leg. I plan to knit until all my yarn is gone, so I don't know how long the socks will get. Again, I am going to try and write up this pattern, simply so I remember what I did this time, as the sock structure seems to be going really well for my foot.


The amalgam of tutorial's seems to be working. The Toe-up Gusseted Heel Tutorial comes from Maia Spins, and seems to be a good fit for me.

Last night I finished the wardrobe for my April Kitty Swap knit and proudly present - Jennifer!


As you can see, Jennifer is sporting a luxurious white fur coat and a fabulously fully lined handbag. Jennifer is also wearing false lashes.


I hope her recipient loves Jennifer, as much as I have enjoyed making her.

As a follow up from last night's post, I have decorated my felted flower a little more.


I added the stamen and some beads are placed around the top edge of the petals, along with needle felting a tiny amount of purple fibre along the same edge.


I tried to hand felt the bangle again today, but seemed to be getting nowhere. To finish the project, I did a felt wash, using the washing machine, and it seems to have shrunk enough to be usable. Once the bangle is dry and the embellishment done, I'll add some more photos. I think my mistake with the bangle was making the fibres too dense. I should have separated out the fibres so it would have been less dense, and had more shrinking room. Wet felting is much easier with very fine layers of fibres, and I will probably only do wet felting on very small scale projects in the future, because of the physicality of it. Still, I am glad I tried this new technique as I feel like I learnt some things from it. Learning new things, is never a waste of time!

LinkWithin

Related Posts with Thumbnails