Friday, 22 February 2013
Pretty Distractions
Pretty Thing 1
Yarn from Wharfedale Woolworks
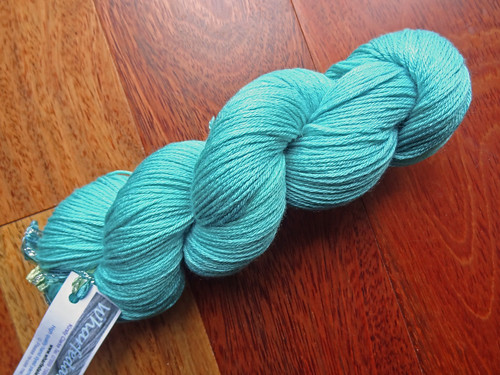
This yarn is 50% Falkland merino and 50% silk and it is gorgeous. The colour in the above photo isn't perfect, this one is a little closer to the truth.
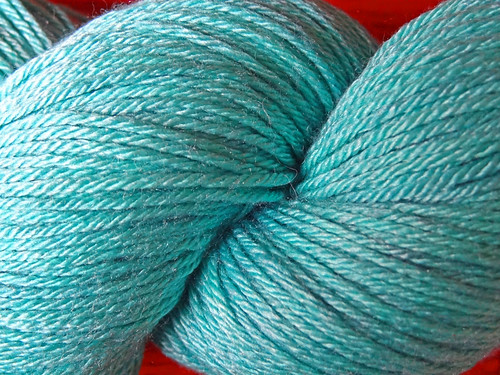
This shade is one of my favourites, and as soon as I saw it I had to buy it. It's hard to get this precise colour for some reason, and there was a 10% discount on the store, until 28th February (so there's time to get your own), so I had to buy it. I KNOW you understand!
When the yarn arrived I just wanted to knit with it straight away. This is unusual for me because I usually want to live with a yarn for a while, getting to know it, before I start swatching. This yarn demanded to be knit straight away, so I spent yesterday charting merrily for a lace scarf that uses this yarn. I am itching to cast on, so I can imagine myself doing so today. I have been too long without lace to knit and it's driving me crazy. Who knew I would end up so addicted to lace!
Pretty Thing 2
Another distraction that arrived yesterday was something I bought for myself using Christmas money and my savings as a very early birthday present to myself. I've got another 2 months to go, but I just couldn't wait any longer. If you follow me on Instagram, Facebook or Twitter you will probably have already seen this snap.
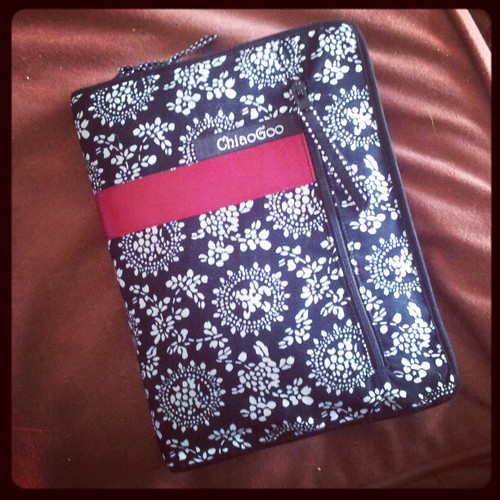
Yup, I got the full ChiaoGoo Interchangeable Lace Needle set. It fills me with horror when I think about how much this set cost at £105, but I LOVE these needles and as I will spend a great deal of time every day using them, I think it was worth it. Not only are the needles great to use but the case is really pretty too. I'll do a proper review next week, with better photos.
Pretty Thing 3
With the giveaway that I ran as part of the Knotted Cap KAL came a set of stitch markers. AnnaLeslie wanted green markers and my bead collection was sadly lacking in that particular colour, so I ordered some from Spellbound Beads. I've been to this shop in person and visited their stand at various shows and I can spend hours looking at all their sparkling goodies. I, of course, couldn't just buy beads for the stitch markers so some extra beads just for me made their way into the basket. After making the stitch markers and posting them off with the rest of the prizes I made some earrings with my new beads.
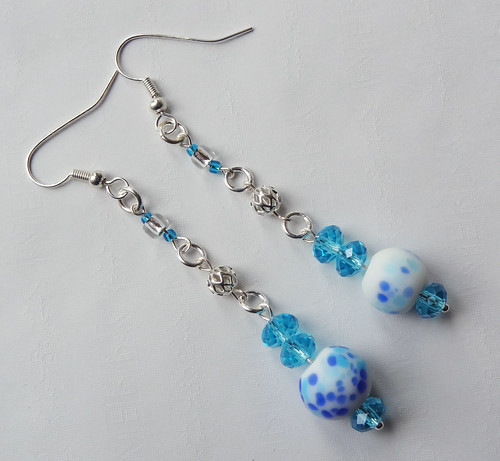
Aren't they pretty? They are about 3.5" long and made in four parts. I made these earrings nice and long so they peek out below my hair when it hangs loose, rather than tucked behind my ears. The four parts are joined together with split rings and each section is held together by handmade eyepins, with the bottom section supported by an headpin.
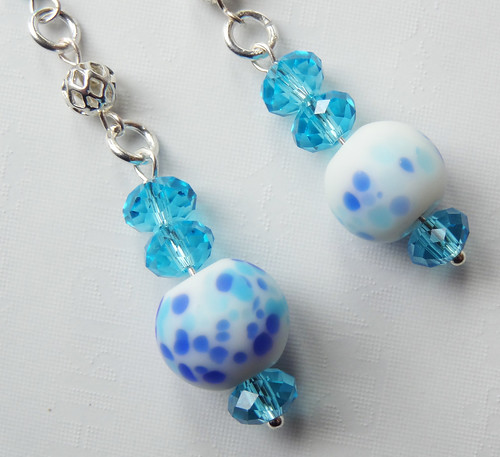
The bottom section is my favourite because of the contrast between the matte painted ceramic bead and the blue crystals. I still have quite a few of both of these beads and I'm tempted to play with them some more, as making these reminded me of how much I enjoy working with beads, wire and pliers!
So I hope you are not disappointed by the lack of socks, but instead have enjoyed my pretty distractions.
To see finished projects of a more fibrous nature, click on the button.
Wednesday, 30 November 2011
Stitch Markers
I decided to buy some a while ago, but they were split ring based, and the split of the split ring kept catching in my yarn. So goodbye split ring stitch markers, you look pretty, but I cannot use you. So in a fit of enthusiasm, I dug out my jewellery making supplies and whipped up these little beauties.
I used up all the odds and ends of beads that I have left over from various projects. I like that they are all different.
I used tiger tail which, for those who have never used beads for anything other than knitting, is metal wire that is coated in plastic. It is flexible, strong and doesn't tarnish. It really is very useful for things like stitch markers.
They are very simply made, these little stitch markers. Each one only took; some tiger tail, a pretty bead, two small seed beads and two crimps. I essentially followed exactly the same process as KnottyGal did in her tutorial, which is similar to the technique I have developed for making stitch markers, except I added the seed beads between the crimps and the big bead.
I've just realised that I never shared my previous stitch markers with you, or at least I can't find the blog post if I did! I made them in March, and I think they got swallowed up with KniCroBlo 2011 and the preoccupation of the approaching surgery. (That feels so long ago now!). As you can see, the design is a little different with these older ones.
These older ones keep the ends of the wire inside the beads, which means there is less chance of the wire ends catching in the yarn, but it is more fiddly to make the markers this way. So I tried KnottyGal's technique this time.
I have to say, they were a lot quicker to make this way, and they don't seem to have caught on the yarn at all yet. I think you just have to make sure you trim the wire ends right back to the crimp.
It's so nice when you can make something pretty, that is also incredibly useful! Thanks to KnottyGal for putting up her tutorial and prompting to get off my backside and make some more stitch makers, rather than swearing when I run out!
Friday, 17 June 2011
Tired Girl
As I have no new photos I thought I would share some older photos with you. I never did show you the finished Daybreak Shawl because Knit and Crochet Blog Week got in the way. There was one photo as part of a collage, but not a full on "ta dah" type post. So here, in all it's belated gorgeousness is my Daybreak Shawl.
It is really hard to capture how fluffy, light and warm this shawl is. The Lang Jawoll Magic sock yarn is fantastic and I'm so glad I bought another skein, as I think I might do another version of this one day.
I ran out of the contrast colour and had to use the main colour for the last row and cast off. I think it actually looks better, having that flash of colour on the edge of the shawl.
This shawl is a really good size, and hugs your shoulders when worn. I have it by the sofa for when I get a bit chilly in the evenings as it keeps me just warm enough without causing me to overheat. I love the simplicity of the of the design and how effective it looks, in yarns that have long colour changes in them. This would be a totally different shawl in two solid colour yarns. I always think that Stephen West designs should be easy to work out how to do yourself, but, no else did. He is the man with the vision, and as such I do not begrudge paying the pattern fee.
Moving away from knitting, I realise I didn't share the jewellery I made for my sister in law's wedding. I made a matching set of earrings, bracelet and necklace with pendant. I chose black and red colours to go with both of my outfits over the weekend, the black and white polka dot dress, and the red frock I wore for the evening celebrations.
I'm sorry this photo is not as clear as it could be, but you get the general idea. To hang the glass drop beads, I attached them with three links of fine chain. This was the first time I had used this particular type of design and I'm pretty pleased with it.
The bracelet and the necklace use the same type of chain, which I find really elegant and interesting. I made the bracelet very simple, with just a leaf and vine ornamented bar and loop closure.
I love how simple this bracelet is. I contemplated adding other beads and decoration to it, but I knew that would ruin it.
The necklace is also quite straightforward with the same chain as the bracelet and a single drop pendant.
The pendant uses a large heart shape glass bead, and black glass beads that I also used in the earrings.
I am so happy about this set, and it reminded me how much I enjoy playing with pliers and wire. I ought to do it more often, but yarn tends to get in the way a bit!
To take a look at some more recent finished objects, click on the button below, I'm sure you will enjoy what you find!
Friday, 16 July 2010
New Jewellery
Last week I made these:
The stones are red agate and I love the shape of the hoops. I got a string of the smaller red agates and hope to use them along with some larger pieces that I got from Mary Clare to make a matching necklace. I may tinker with the centre stones as I have some pretty little amber coloured seed beads that may work better than the clear bead in the centre.
I love that these are made from natural materials and therefore have individual characteristics. The two earrings cannot possibly match exactly. The stone warms against the skin until you don't notice they are even in your ears, despite being quite large. I really must get cracking on the matching necklace as I'm sure I'll love it as much as these earrings.
Yesterday I decided that I needed to make some jewellery to match two new tops that I bought in a sale, while shopping with my Mum. Both tops have grey/blue tones and most of my hand made jewellery doesn't really go all that well. I pulled out a couple of my beads from Spellbound and made some earrings.
Aren't the beads pretty. They hardly needed anything added to make them into pretty and striking earrings. Then I decided that needed a necklace to match, as both tops had quite scoopy necklines.
As soon as I saw this blue stone at Spellbound, I knew I just had to have it. I didn't really have anything for it to go with, I just loved it.
The centre square stone came from Mary Clare, from when I made my pink necklace. I love how left overs from one project, can become an integral part of another. I don't know what either of these stones are. I really should look into finding out what the names of my favorite types of stones are, if only to make buying them again easier.
When I made these necklace I used a chain to hang the pendant on, but after wearing it yesterday I decided that it looked too flimsy for such a substantial piece. Instead, I bought some blue ribbon and used that. I think it looks much better now. Unfortunately I forgot to take a "before" photo so you can see what I mean.
I think the ribbon also unifies the colour scheme across the combination of earrings and necklace. I'm really pleased with how these look with my new outfits.
The more jewellery I make, the more I enjoy the process. Its just as well, because I have enough beads and stones to keep me going for a couple of years now! I got a book at a charity bookstore a couple of weeks ago that should help me out as I try new things. Its from the same series that taught me to crochet, so it has to be good!
I do love charity bookshops, you never know what gems (ha, a pun! GEMS, geddit??) you will pick up.
If you live in the East Midlands and would like to learn about jewellery making there are numerous classes run at Mary Clare, taught by a really talented teacher and maker Caroline. Click here for details, and look under "workshops". If you don't have the time or inclination to learn, Caroline sells her creations for VERY reasonable prices in the store. Personally, I have to remind myself that I have plenty of beads at home and that I'll never learn if I keep buying other people's creations. However, that doesn't stop my fingers itching everytime I walk past the display.
Monday, 17 May 2010
Bracelet and Earrings
I chose beads from the stash I bought at the Sewing for Pleasure Show at the NEC and supplemented them with some pretty silver charms from Mary Clare.
I wanted the bracelet to work with both my turquoise necklace and my pink one, so I used green/blue beads and hints of pink. I think the choices worked really well. I even added the little seahorse made from glass, that I bought on holiday several years ago. I bought it before I even started making jewellery but loved it so much, that I had to have it. I works brilliantly, I think.
From the cute silver charms, I have two favorites. The first is a tiny silver fish, that goes well with the seahorse. (As it is a beach holiday the theme works for me).
The other favorite charm, proclaims that my jewellery is hand crafted.
Sorry if it is a bit blurry. I bought several of these little charms as I thought they would be great sewn into presents. I decided to add it to the bracelet as a little advert of my skills ;-)
I have been wearing the bracelet all day, as a test run. I have had to re-attach three charms which flew across the room when I gestured too broadly. I think they are all now safely secured and I will wear it with pride in my fancy hotel.
Of course my new bracelet required matching earrings.
I think they will go fantastically with my new top and skirt, by continuing the teal vibe.
Again, I apologise for the blurriness of the photo. It's hard to stay perfectly still and take photos at the same time. Maybe I should have just laid them down and taken a still life, but I wanted to show scale.
I am very pleased with all my new jewellery and I can't wait to show them off on my holiday, I feel all Summery already!
Friday, 9 April 2010
The sun came out.
Because of the unexpected sun, I am very pleased report some actual crafting has taken place - yippeee! I took the opportunity to play with some beads. I combined some beads I have had for a little while, with some of those that got bought at the NEC. Do you remember these?
When I bought them I had no idea what I was going to do with them because they didn't seem to "go" with anything I already had. So I thought I would start out by using a couple of the beads to make a pair of basic earrings. When I had finished I took another peek in my big box of beading goodies and found this amazing stone.
I fell in love with this pink stone when it first arrived in Mary Clare. There were some rectangular ones as well, but I love this tear drop shape and had to buy it immediately with no thought at all about what it would go with. I was glad I did, because the rest got snapped up almost immediately.
I later bought the marble type stones which have a very neutral colour to them but have a warmth that mean they can go with the pink. I put all these stones together with the purple ones from the NEC and added some tiny pearl seed beads and the result was this:
I started off fixing the main necklace to the pendant part just through the tiny loop at the top of the pendant.
This twisted the necklace quite a lot and I decided that it was going to drive me nuts, so I inserted a split ring to allow the junction to move around a bit more freely. I think this solution worked.
It certainly looks more elegant. I think I am starting to get the hang of this type of necklace, though I am sure I will do lots more just to improve my techniques and my eye. I know that others may have done much better things with the same stones, but I am satisfied with what I have at the moment.
I am really enjoying building up my collection of home crafted jewellery. I can make jewellery that doesn't cost a fortune which means I can wear it every day. I don't fret about things getting a bit bashed because if it does, I'll just make a new one. It also means I get to wear things that look exactly as I pictured, rather than settling for something that kind of looks like the image I had in my head that I found in a shop. I stopped buying costume jewellery a long time ago, because I had nice jewellery given to me over the years and felt that I should wear that. However, I don't wear the nice stuff for every day because that diminishes how special it makes me feel. The home crafted stuff fills the gap I have created for myself. It also lets me play with pretty things!
Hopefully the sun will continue to shine and I will have other things to show you.
Tuesday, 30 March 2010
Sewing for Pleasure (Part 2)
The first purchase of the day was beads from a place called The Pearl Girl. The website is currently being updated so may not give you any info. The beads were lovely though!
They look like sweeties. The red beads are to go with some pretty beads I picked up at Mary Clare after my jewellery course. I fell in love with some and knew I needed to get some more to go with them, as nearly all my other beads are in the blue and green spectrum of colours. I have NO idea what to do with the purple beads, I just really liked them. Each string was on a couple of pounds each so I think I got a relatively good bargain.
My next stop was The Button Lady. If you have ever been to a craft exhibition you have probably seen her stall. It is amazing. She has such pretty buttons and clasps that can completely transform an outfit. She does have a mail order side to the business but it is really hard to choose from her gorgeous collection based on a printed catalogue. Her website is not great, but I can understand her reluctance to photograph every button she sells, as she would never leave the house. If you do go to a show where she is exhibiting, it is well worth seeking her out as she has lovely items you won't find anywhere else in the UK. I bought two sets of buttons from her. I got 6 of these paua shell buttons.
Each button is different because of the nature of the material, but they are so gorgeous and will transform a quite ordinary outfit into something special. Now all I have to do is choose the project to show them off! The other set of buttons I got was a bit different. I only bought 4 of these celtic beauties.
I shall probably just string this on a pretty ribbon, as I don't think it needs anything else. I love dichroic glass and I think this is a particularly pretty example. I didn't get the name of the stall as I was so giddy with my find.
My final bead splurge of the day was at Spell Bound Bead. I had passed this stall once and didn't look at it because there were too many people crowded round. I knew I wouldn't get my wheelchair anywhere near to check if I would be interested. Our second trip round the stalls meant I caught a glimpse of a corner of a display and nosed myself in. I am so pleased that I did! Look at my haul!
Aren't they fab! These beads were the only thing I put on my debit card as I had around £2 less in my purse than I needed. I also got some headpins to take me up to the minimum £10 card spend, but they were good value and they will get used. Here is a slightly less confusing picture.
Here are the red ones to add to my growing red collection.
I am pretty sure that I will buying from this website again. The beads and findings are all reasonably priced and they are good quality. I shall look forward to playing with these in the near future. I can't wait to see what they will become!
So that is it. The tale of my purchases at the Sewing for Pleasure Show 2010 at the NEC. The pretty pictures tell only part of the tale as there were so many other amazing stalls where I couldn't buy things. The purchases also don't tell you about how friendly all the people at the show where, both the vendors and the attendees. Everyone was really helpful and allowed me space (where possible) to get my wheelchair in close to the stands.
Big thanks also goes out to the NEC who not only provide free undercover parking for the disabled close to the location, but they also have lots of mobility scooters you can use. I find wheelchairs better at exhibitions as you can get closer to the stalls, but I know if I didn't have someone to push me around (thank you Linda) I would have really welcomed a scooter. It was also free for Linda to get in to the show as she was the woman who was helping me get to the show and pushing me around.
My only complaint about the NEC is the signposting to get out of the complex and on to the correct motorway - who knows which direction on the M42 takes you the right way???? Other than the problems getting home, it was a great day out and I have been filled with inspiration and good memories. Now all I have to do is work out where to start!
Sunday, 14 March 2010
A Little Bit of Bling
The class was aimed at people, like me, that wanted to have a go with beads and wire but didn't really know where to start. It was a brief two hour course and tonnes of information was poured into my tiny brain and it left me dying to have a go with my newly implanted skills.
Of course once I got home, other projects got in the way and I didn't do any. So on Friday when my friend Rachael bought some components to make into a necklace I offered to put them together for her, using my new found skills.
This weekend I pulled out my new over the bed desk which Margaret the patchwork teacher gave me, propped up my pillows, turned on the radio and started playing with beads and wire. It has to be one of the most pain free crafting sessions I have ever done! I quickly put together the bits needed to make the necklaces. They turned out like this.
The idea is that both pendants can be hung from the same chain, so they needed to be easy to change over. I used the same technique on both pendants. I made a loop, with wire on the pendant and then threaded through a jump ring to sit on the chain. The jump ring allows the pendants to be slid on and off easily.
I really like the above glass pendant as it is so interesting, but I prefer the bright cheerful colour of the one shown below.
This pendant is actually sold as a button, but I think it works brilliantly as a piece of jewellery.
Once I quickly dispatched these pendants, I decided to make a bracelet for Rachael's birthday, which is coming up soon. I used a pre-made charm bracelet that has elastic running through and split rings attached to the chain. This gave me a very good base on which to start hanging my pretty green beads.
I bought a bag of mixed beads and added a few individual ones that caught me eye to fancy up the bracelet.
The above was one of the individual beads (the polka dot type one on the right). I love the way the light moves through this bead. One of the other individual beads is in the photo below on the left of centre. It is cylindrical in a more acidic green colour with pretty coloured speckles.


