Showing posts with label Mittens. Show all posts

Friday, 14 March 2014

Lerryn Mittens in The English Gentleman DK

Do you remember a while ago I got a lovely review copy of The Scrumptious Collection Volume 3?  I mentioned that there were several patterns I was interested in knitting.  The first pattern I chose to knit was the Lerryn Mittens by Rachel Coopey.  I didn't use Fyberspates Scrumptious DK, in fact I didn't even use a merino/silk blend.  I used something wooly and fluffy instead of smooth and silky.  I used something from my stash, The English Gentleman DK in the Shiver colourway from Countess Ablaze.  I bought this skein because my curiosity was piqued after the description informed me of the following:
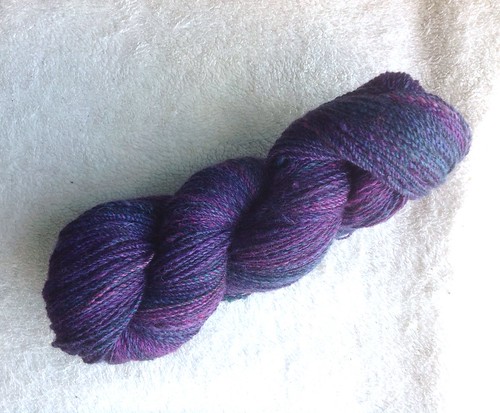
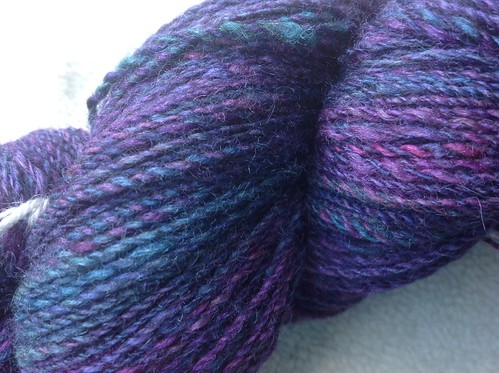
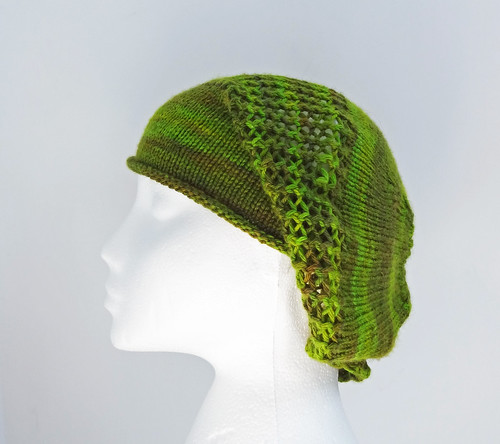
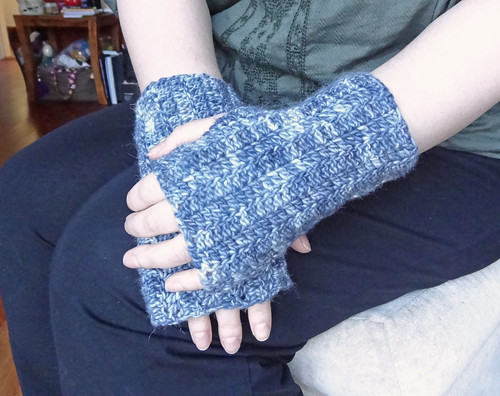
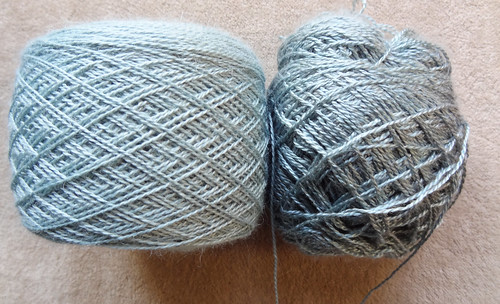
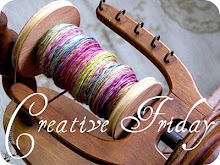
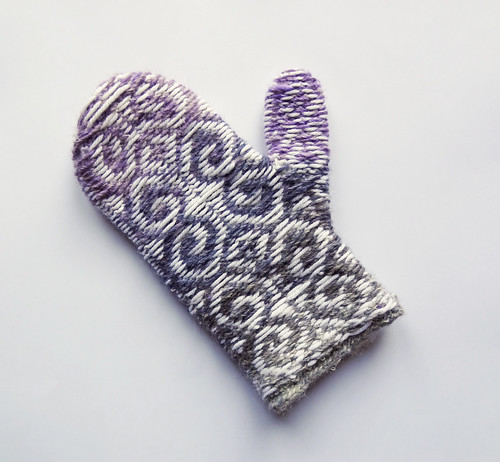
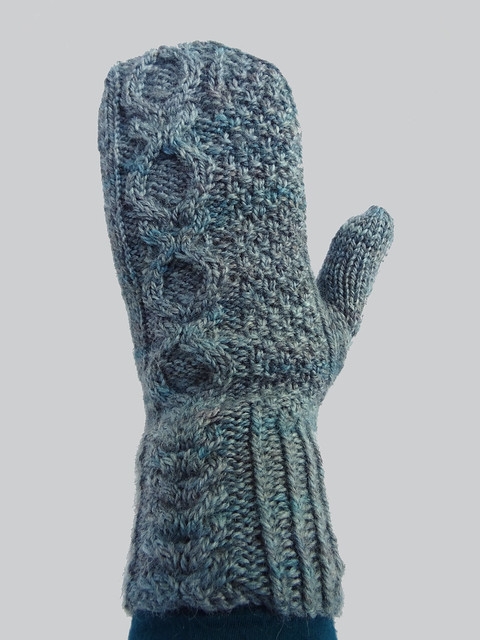
Do you have a desert island yarn? I have finally found mine and this is it. Soft, buttery, rustic without being scratchy, this is my perfect yarn. 
I could not resist being told by one of my favourite dyers that this was her perfect yarn, I had to try it.  I also fell in love with soft pale ice blue of this colourway.  When I decided on this pattern I wanted to try knitting it in something completely different to the designer intentions.  This yarn qualified.


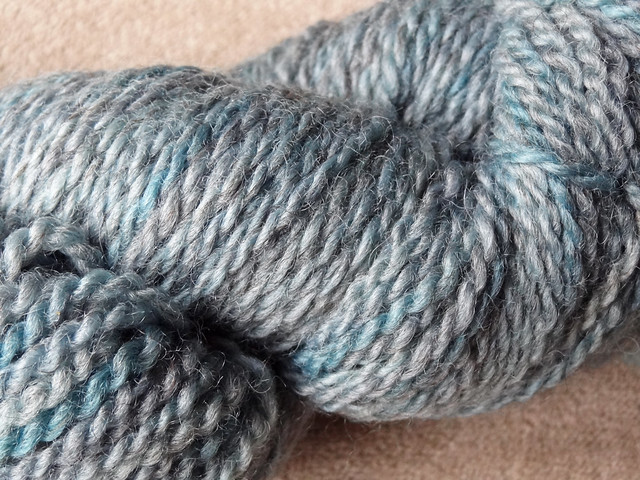
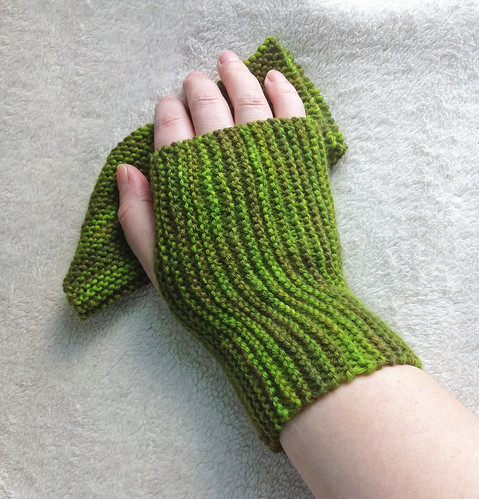
It is exactly as described, buttery soft and yet rustic.  The BFL/masham blend is wonderful and I enjoyed every minute of knitting these mittens.


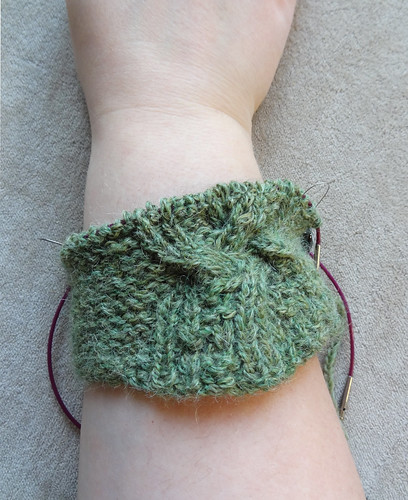
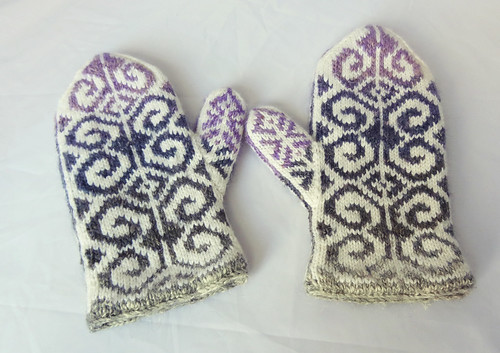
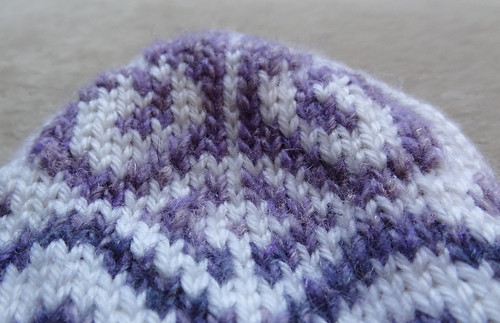
The yarn is DK weight and the pattern described Fyberspates Scrumptious DK as being more of a worsted weight yarn.  It was a one size pattern and I have rather broad hands, so taking all this into account I decided to stick with the recommended 4mm needles, despite usually having to drop a needle size due to my loose knitting tendencies. I think was the right decision as the width of the mittens was perfect.


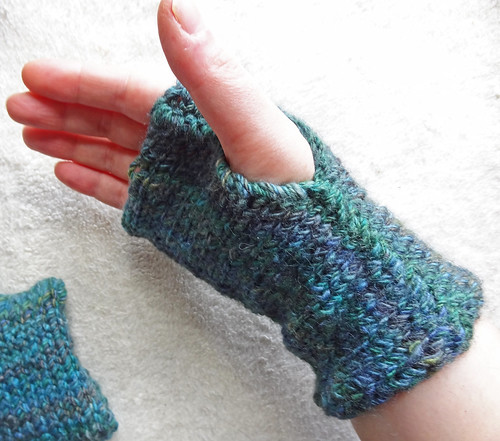
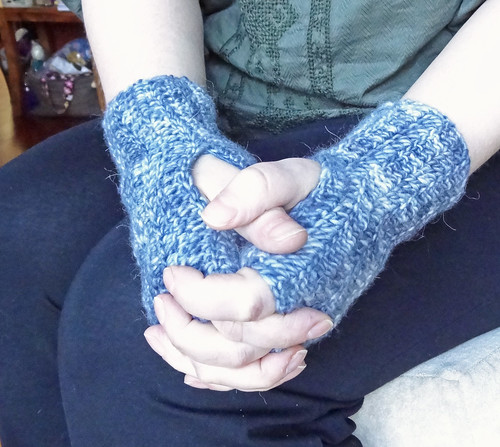
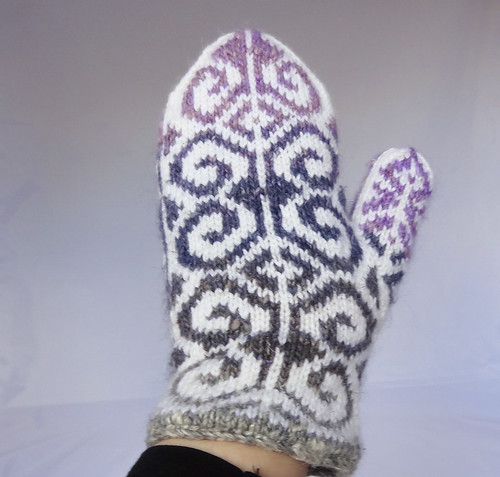
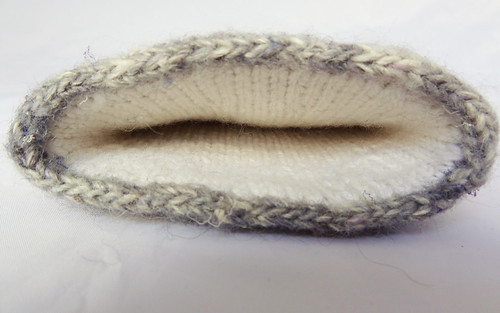
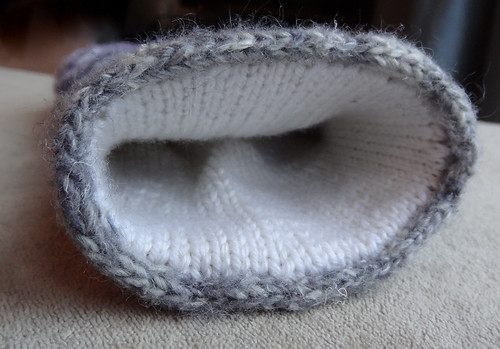
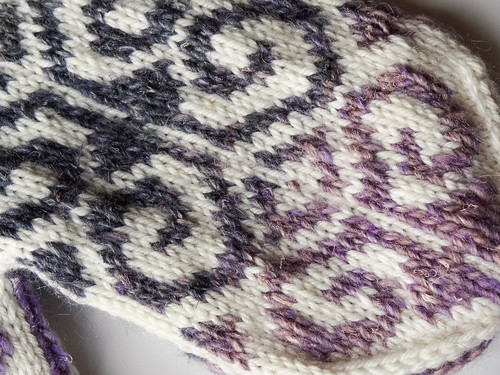
However, the position of the thumb was not exactly spot on.  My fingers are a bit low in the mitten, as you can see above.  The length of the cuff is great, as it comes several inches past my wrist, so in an ideal world I probably would have started the thumb maybe a few rounds further into the mitten to allow my hand to fill the top of the mitten.


But even with this area of air at the top of the mitten, from the outside it looks fine.  It may even work in my favour as there is more air to trap around my fingers, which will warm my hands better.


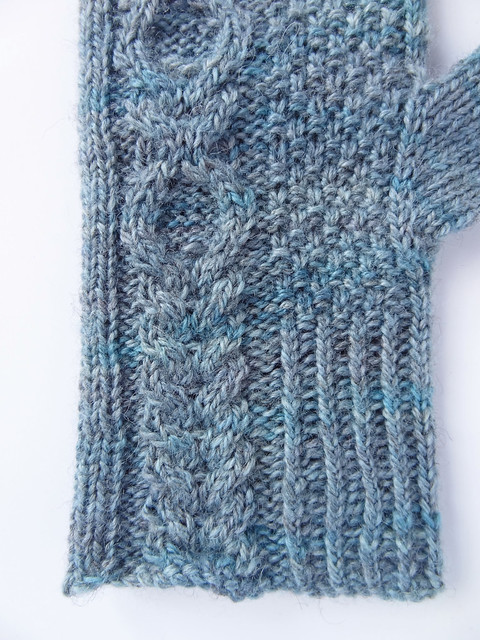
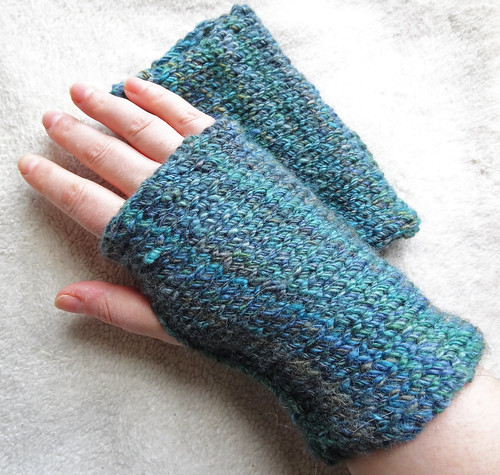
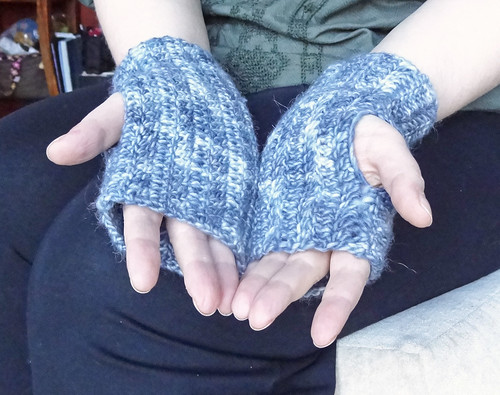
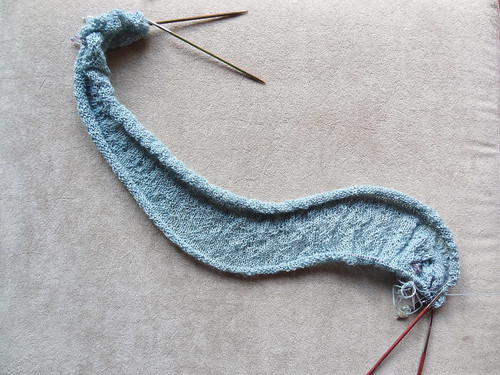
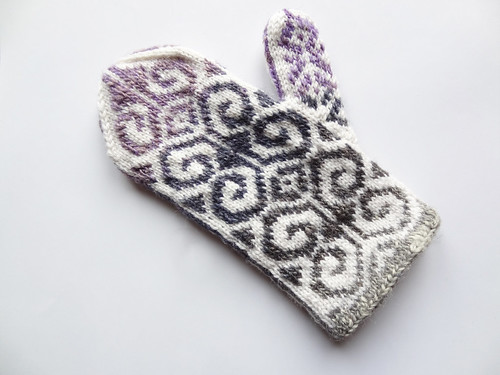
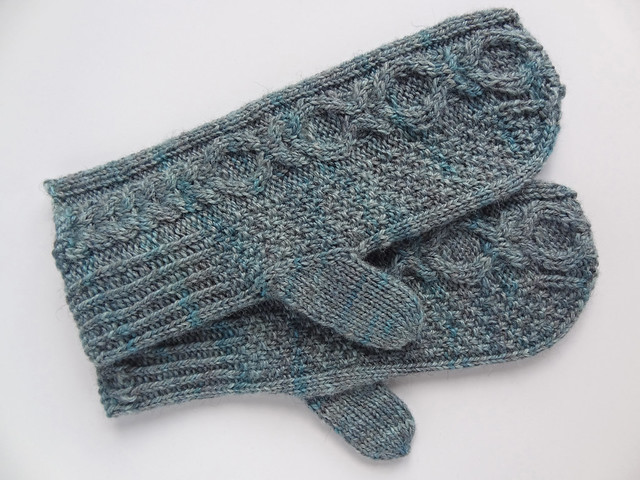
My favourite part of this project was the cuff.  I really enjoy twisted rib and being able to cable the whole mitten without a cable needle was definitely a bonus. I also really like the way the increases for the thumbs are worked.  It's a very well thought out pattern.  By the way, if you've never cabled without a needle, I have a tutorial on how to do it if you are interested.

I know my yarn choice means that a lot of the texture stitches are obscured, but they are certainly still visible and the cable patterns still pop.


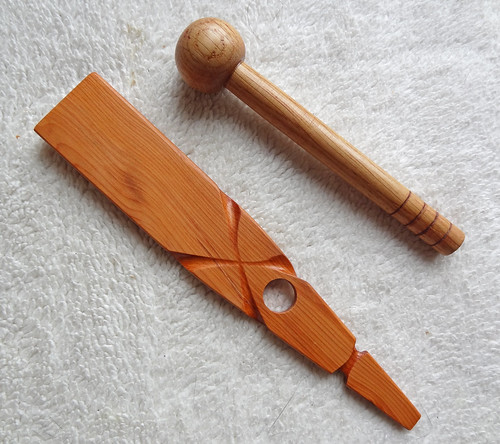
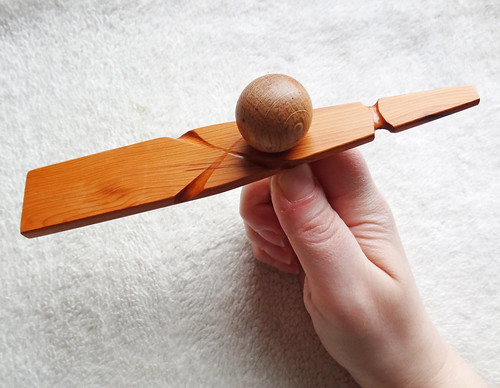
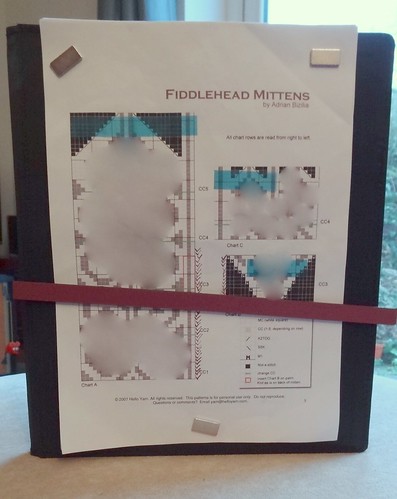
The mittens definitely needed blocking, especially as my fingers don't fill the ends completely.  I used my homemade mitten blockers that I created for use on the Fiddlehead Mittens I made eons ago.  I originally made the blockers because the original blocking didn't stretch the mittens enough to make them comfortable for me to wear (with my enormously square hands).  I made the mitten blockers using a tutorial from Eskimimi Makes. It was well worth the time it took to make them, as the blockers will be used time and time again.

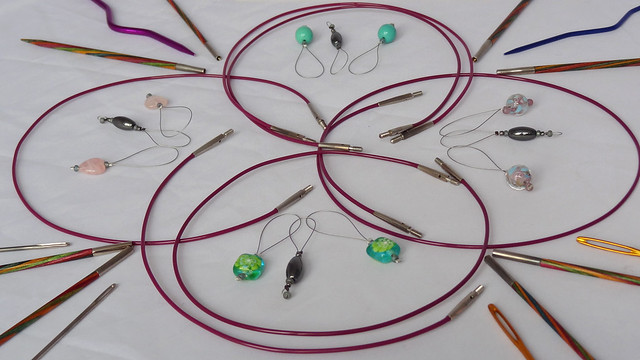
I would quite happily knit this pattern again as it was great fun and not that tricky to do, especially as I used two circular needles to knit in the round.  It is my preferred technique for knitting in the round as I am incredibly clumsy and inclined to poke myself in the eye with a dpn!

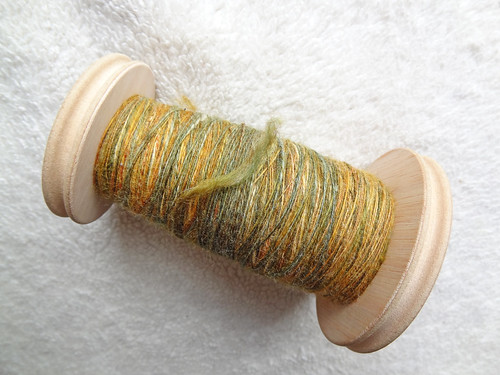
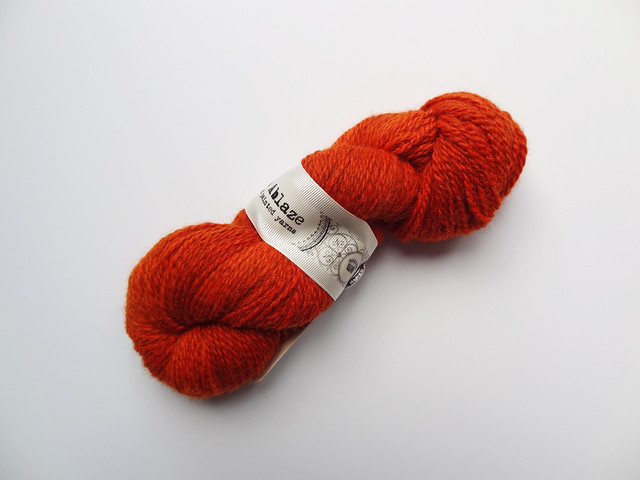
I also loved knitting with the yarn so much, I bought another skein (surprise, surprise).  This time in the You Keep Me On The Edge of My Seat colourway.  I would love to knit an entire sweater with this yarn, but sadly I have stash to use first.  I shall have to make do with my solitary skein, though I will probably make it stretch with the leftover yarn from the mittens.


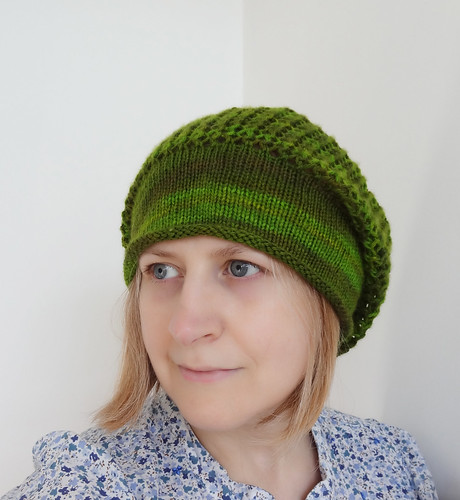
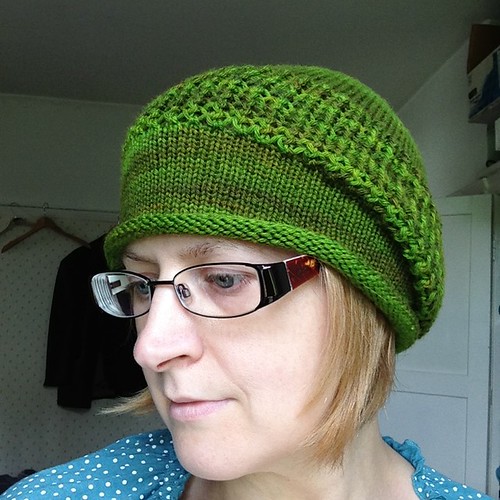
I'm thinking it could may become a hat, possibly a Rikke, what do you think?

In summary, lovely pattern, amazing yarn and nice warm and light mittens to replace the Fiddlehead Mittens as the weather becomes milder. I'm pretty happy.

Tuesday, 4 June 2013

Stash Dash 2013 with The Knit Girllls

As you might have gathered, I have recently been listening/watching podcasts.  Some of these podcasts have kals and challenges and the first challenge that I have felt like joining in with is from The Knit Girllls.  I love their podcast.  They are a funny couple of friends who live in different parts of the US, and Skype their podcast to each other.  I love the projects they do, the yarn and fibre they use and their humour.  They also get to review lots of interesting things, none of which are based in the UK :-(  However, they are doing a Summer challenge.  Laura, is a teacher and has a Summer break and each year she tries to use up some of her stash, during that break.  The plan is to use up 4,000 yards of yarn, or spin that yardage from fibre.  It started at the end of May and runs until August and I decided that I will try and join in this year.  If you are interested in joining in, the thread is on Ravelry.  I also recommend watching the podcasts, they are well worth your time, if you haven't seen them before.

These next three projects are my initial entries into #stashdash2013.  First up is the yarn that I finished, using the BFL/Silk fibre from Picperfic.  I adore this yarn and I'm really quite proud of it.  It's much more even than my previous skein.

Slinky Goodness

The colours are amazing.  The green and purple together has an oil on water effect to it.  I wouldn't hesitate to buy this colourway again.

Slinky Goodness

I have 399 yards/365 metres of this yarn, which is more than enough for a decent shawlette.  I really want to find a good pattern to show this yarn off properly.  I'm thinking possibly of doing Ginko Crescent, which is a free pattern by Jade Keaney.

Next on my list is the Drizzle Hat.  I'm really pleased with how this turned out.  The yarn is perfect for this sort of pattern, it has lots of spring in it and is nice and plump.  This was my first project knit with sport weight yarn and I really enjoyed it.  The thickness of the yarn as it runs over your fingers is really pleasing, for some reason, or maybe it's just because the yarn was a merino/cashmere/nylon blend!

Drizzle 01

I chose to do the small size and use a medium amount of slouch.  When I first finished the hat, before blocking, I was wondering if I should have done a larger amount of slounch.  Here is a quick snap I took before blocking.

yarma

As you can see from the first picture of the hat, it blocked out to be much more slouchy.  I'm not used to wearing hats with slouch.  I generally go for head hugging styles, but this one was so appealing I knew I wanted to knit it.  The pattern gave good guidelines about how to to block the hat, which ended up being done twice, the first one to even up the stocking stitch part of the hat, and the second to stretch out the lace, without stretching the brim.  I think this might have been where I have gone wrong, blocking hats with slouch or berets, in the past.  I always stretched out the brim too much.  This hat has tonnes of slouch in the back and a nice snug brim.

Drizzle 02

The lace section on the crown, was my least favourite part of the knit, even though it only lasted a few rounds.  I didn't really enjoy doing K4tog and slip 3, k1 and psso whilst moving small amounts of stitches around the needles.  It was tricky, but I understand why the lace panel was included.  It breaks up the stocking stitch crown and adds interest. It also give more shape to the slouch part at the back of the head, to make it less pointy.

Drizzle 03

So whilst I didn't enjoy it, I know why it is there and I would do it again, especially as it only lasts a few rounds.

I'm so pleased I won this pattern, thank you Mel Ski and Faith for giving it to me.  I have a lovely hat and I will be happy to try this new type of style more often now.

In accordance with Stash Dash, I decided to use up the rest of my yarn from this skein, so I knit some very simple garter stitch mitts and used up every last scrap of the yarn.

Drizzle Mitts 01

I nearly lost these, after several people at knit night threatened theft after trying them on.  They are lovely and snug as well as being soft and light.

In total I used up another 285 yards/260 metres with these two projects.  This means I have a start to my Stash Dash total of 684 yards, only another 3316 yards to go!  I wonder how close I'll get to the target?


Thursday, 9 May 2013

Spinning Away on my Bogway

I am seriously addicted to hand spinning.  It's hypnotic and I love it.  I'm also loving the yarn that I'm producing.  It's improving as I move forward.  The most recently completed is the fibre from Picperfic.  I think the yarn was actually more like a chunky/bulky weight than the aran I originally thought it was.  I decided that as the yarn wouldn't go very far, I would make it into mitts.

I used 5.5mm needles and got a nicely dense and even fabric.

Hand Spun Mitts 03

I cast on 25 sts and slipped the first stitch of each row .  Knitting in stocking stitch for 8”, I then cast off on the right side row.   I sewed the cast on and cast off edges together leaving a gap for the thumbs, using a simple whip stitch.

Hand Spun Mitts 04

The slipped stitch edges form the top and the bottom of the mitts and makes the edge slightly curl under.  I decided not to block the mitts because it would then probably lose that curl.

Hand Spun Mitts 01

Ooops, just noticed a woven end escaping.  I must trim that!  I love the fabric this yarn has made.  It is beautifully mottled and subtle in it's colour variations, but there are almost visible stripes.  When I wear these mitts they make me happy, not just because they are pretty and very warm, but also because I made the yarn as well as the mitts.  It feels closer to the origins of the knitting craft, to make the yarn you use.

I now have a full bobbin of the first ply spun with The Yarn Yard's BFL Superwash.  It's much finer than the first plies I created.

Superwash BFL 01

I love how this fibre is spinning up.  The different colours are elongated by spinning so finely.  I am approximately three quarters of the way through my second 50g braid of this fibre.

Superwash BFL 02

Whilst I am enjoying hand spinning tremondously, I have found the Bogway to be a bit heavy on my wrist when I'm spinning for a while, especially when it is getting close to being full.  I decided to give a Mayan Spinner (also known as a Rakestraw Spinner) a go, as they look much lighter.  They are also very pretty.  I got mine from Hand Spinner.

Mayan Spinner 02

It comes in two parts, unlike the Bogway which is fixed together with a nail/screw.  The handle is inserted in the hole and the forefinger and thumb hold the paddle in place.

Mayan Spinner 01

I like the idea of being able to take the handle out for ease of transport, even when fibre is wound on to it.  I can't wait to experiment with it, but I am going to be strict with myself and only spin on the Bogway until that fibre is all spun up and plied.  Then I will allow myself to experiment with the Mayan Spinner.  If I get on with it, there are so many beautiful versions available.

This is looking to become another hobby where I could spend lots of money!  Luckily I barely leave the house these days, so I have some savings.

I actually spoke about the contents of this post in my recent podcast.  Episode 2, went live last night, if you are interested in listening to me talk about this and lots of other things.

As I become more confident in the spinning, I think I will be able to stop focussing so completely on it, and be able to ease some more knitting time into my day!

Friday, 7 December 2012

Little Grey Mitts

One of the selfish projects that I told you about on Wednesday, was finished in two days.  I was inspired earlier this week by the sudden drop in temperature.  My hands really suffer from the cold, sometimes when the rest of me feels quite warm.  I think it's a side effect of some of the drugs I take, because my feet suffer too, to a lesser extent.  As my hands were really painful with cold, I wanted a quick fix to sort things out.

I looked around and saw the left over yarn from a cowl I made for my friend (which once again I haven't blogged about, I really must catch you up!).  The yarn I used was Araucania Aysen.  It's a merino/alpaca/silk mix and it is aran weight.  It is gloriously soft and incredibly warm.  The left overs seemed perfect for some mitts.

I grabbed a 4.5mm crochet hook and got going.  I made these.

Grey Mitts 01

They are so lovely and warm that I can't believe I didn't do this before!  I also can't believe how quickly they worked up, but they are just a flat piece sewed up the side with a gap left for the thumb.

Grey Mitts 03

If anyone is interested in how I did it, here it goes:

I used around 50g of this aran weight yarn which equates to approximately 90yds/97m, and a 4.5mm hook.  I've used the abbreviation DC to indicate a US double crochet.  In UK terminology this equates to a treble stitch.

  • Ch31, turn DC into 4th loop back and DC into each chain until the end of the row. Ch3 turn. 
  • DC into 2nd DC, from the previous row, back. DC into each following DC for the rest of the row. 
  • Repeat last instruction until 18 rows are created and then cut the yarn leaving approximately 12" before pulling it through the last live stitch on the hook. 
  • Match together the top and bottom edges of the rectangle (the top being the edge just worked on and the bottom being the beginning chain row). Using a tapestry needle threaded onto the long piece of yarn, whip stitch over edge to edge for 12 DCs, ensuring both the starting stitch and the finishing ones are secure by sewing over them several times. 
  • Run the yarn down a further 8 stitches, by whip stitching over only one of the edges, and then secure the next stitch with the matching one on the opposite edge, by looping over both stitches several times before using whip stitch over both edges to the end of the row. At the end of the row secure the stitch by duplicating it several times.
  • Run the yarn through the fabric of the mitts in two directions to ensure it is anchored before trimming. Sew in the starting tail of yarn in the same way.

And there we have it.  A a pair of warm and soft crocheted mitts to stop my hands freezing while I type.  To be honest, I've put the instructions here so that I can do it again if I need to, without having to work it out again before I start!

Grey Mitts 02 

I'm sharing this with FO Friday, which you can check out by clicking a button.

FO Friday Button.jpg

Wednesday, 10 October 2012

It's Wednesday..... I think!

I gather, from all the WIP posts in my feed reader, that it must be Wednesday.  I don't really keep track of days much at the moment, because I have an empty schedule.  But I thought I would join in today, with WIP Wednesday, and test out my new "easy on the body" version of blogging.  It has gone surprisingly well so far!  I simply snapped some photos (they aren't great, but they are certainly not bad) and loaded them onto my lovely new laptop, tweaked them a bit and here we are!  I have to say, getting a laptop was one of my better ideas.  It is lovely to lay on the sofa downstairs - in the same room that I take the photos in - and work on the Internet.

As I went into hospital last week I, of course, had to have surgery knitting.  Surgery knitting has to be very straight forward, it has to take up only small amount of space and most importantly it has to start conversations!  When you are in hospital you are surrounded by strangers, both staff and patients, and having something to keep you occupied AND encourage conversation is a winner on my list.  So I scoured my favourites and my stash and came up with a combination I could live with.  It wasn't until after I got home from hospital, that I found the reason the combination felt so right together was because I had seen the yarn and the project together before - in the same colourway too, on Crafts from the Cwtch!

Nuvem 01


The pattern is Nuvem by Martina Behm, the same person who designed Hitchhiker, the scarf I made last year.  It's a HUGE stocking stitch elongated hexagon with a ruffle around the edge.  The pattern is perfect brainless knitting and you can see that I got started in hospital, where it did indeed mean that I had 3 nurses and another patient round my bed at one point.  They were fascinated by knitting this on two long circular needles. I had to carefully explain how it worked and they loved the yarn as much as I do.  The yarn is Garnstudio DROPS Lace, which is a lace weight, alpaca/silk blend.  It's lovely and the sage green bares a very striking resemblance to another project I am working on.

Posh Lily's Slice of Pi 03


The yarn on the left is the Garnstudio yarn and the yarn on the right is Posh Yarn Audrey 2ply, which is a cashmere/silk blend.  They look as if they were dyed in the same pot.  The Posh Yarn has 60% silk content and the Garnstudio has only 30% silk content which is why I think it has a more matte finish.  I am feeling pretty lucky about this close match because my Posh Yarn seems to be running out faster than I would like.  I may have to subsidise the Posh Yarn project with the Garnstudio yarn as an edging.  I won't share the pictures or project details here, because it is a gift.  If you are a knitter who is interested, you can see it on Ravelry.  This secret project has had most of my attention this week, but it hasn't stopped me casting on yet another project!

Meet Stonybrook!

Stonybrook Mitts 01


This pattern is by Wendy Poush, and is part of the Twist Collective Winter 2011 Collection.  These are convertible mitts, which are something I've wanted for ages.  I had been looking for the right pattern for a while and these seem to fit the bill.  They are quite long in the arm and the flap isn't loose and floppy when not fastened down.  It also has the option to create a convertible thumb flap too.  This means, out on my scooter I can have toasty warm hands and wrists and not have to remove the mitts when I get inside a shop.

I am not sure my yarn choice is the best one for showing off the cables as it is a fuzzy alpaca based yarn.  The yarn is Rowan Lima and it is so light and pretty, and also in this post's colour theme of sage green!  The soft fuzzy chainette yarn hides the cable quite a lot.  I did think about ripping this mitt back and using a different yarn that would make the reversible cable pop, but this yarn is too delicious for me to set aside.  I really want to wear these mitts even if the cable is lost, because they will be warm and light and soft.  Maybe after I've made and worn these for a while I will get the urge to knit the pattern again in a nice plump wool, but at the moment I just want these mitts to be done so I can wear them.

To see other projects that aren't sage green, click on the button!


Monday, 6 February 2012

Month of Crafty Photos: Days 2 - 6

I thought I'd share with you my photos from the challenge I talked about last week.  I already shared Day 1 in the linked post so here are Days 2 - 6 for your visual delight!

Day 02 - Craft Tools

Day 02 - Craft Tools

For this I simply emptied out my big bag of knitting tools and started making pretty patterns.  It was a really overcast day so I used my pop-up light tent.  I do think it gives me a fair chance at getting a reasonable picture, even on dark days!

Day 03 - An Old FO

Day 03 - An Old FO

The choice for this photos was actually pretty easy to make.  I dug my blanket out of storage this week as it has been rather chilly, and have been huddled underneath it whilst surfing the web.  This blanket had never been photographed in it's finished state because I wanted to block it and that has been impossible to do.  It needs pinning out on blocking boards outside in warm weather, as we have no inside area big enough that doesn't need using over a few days in Winter.

This picture of an old FO is actually the reality of how our knits are after the "pretty as a picture" photo shoots we try to do for our blogs and project pages.  I love that it is a picture of a blanket that is being used in it's intended manner, to keep me snug.  It has been on my bed all week too!

Day 04 - Inspiration Outdoors

Day 04 - Inspiration Outdoors

As our weather forecast told me it would snow on Saturday afternoon I decided to try and wait until the snow came to take my photos.  We haven't had any snow yet this Winter and I thought snow would offer a nice image.  It got to around 3pm and the snow started to come in tiny little specks.  I decided to go out and start snapping.  It didn't start to really come down heavily until after dark.

In the end, the best image I captured was this one, and you can hardly see the snow at all.  The photo is of a wooden railing that runs around the side of the raised platform upon which our summerhouse resides.  The railing is covered in trailing ivy, which I love.  I really like the way the summerhouse provides a rich, deep background for the paler railing and ivy.

Day 05 - Notions

Day 05 - Notions

This one was a tough one, so soon after doing Craft Tools.  I should have read ahead, and realised this would happen, and chosen a different subject for my tools photo - maybe a sewing machine or something.  But as I didn't read ahead I was a bit more restricted than I originally hoped I would be.  So, I took a photograph of my felted purse that houses all my notions, that are tiny and easily lost.  This purse has proved invaluable since I first made it.  The pattern can be downloaded for free by clicking on the Downloads tab.  It's a great way of using up odd balls of yarn, left over from a project.

In the end, I like how the photograph came out.  Lots of jumbled up stitch markers with pops of colour, against the fuzzy grey felted fabric.

Day 06 - Colour 

Day 06 - Colour

I loved today's subject.  Colour is so important to all crafters.  Colour is one of the main driving forces in creating each project.  The subject matter of today's photo seemed pretty obvious to me.  I'm currently working on my Tribute Wrap, which involves using 9 different skeins of Rowan Kidsilk Haze.  This is a very decadent project that was only made possible by receiving a very generous gift of yarn from a bereaved mother, who is friend of my Mum.  Every colour change on this project brings me such joy as I plunge my hand into a bag of glorious yarn in delicious hues.

All I did for this photograph was line up all the yarn and start snapping.  I think nothing more needs to be said except - YUM!

-----------------------------------

This project of taking a photograph every day is challenging, but not in an overwhelming way.  I am enjoying having a topic to focus me on taking photographs each day.  It is giving me a reason to really get to grips with my new camera and also with Photoshop, which I got just before Christmas.  This is exactly what I wanted - a way of focusing my attention on my photography.

As a side benefit of focusing on my photography, I am finding that as well as snapping my Challenge photograph each day, I'm also taking other photographs that are worth keeping and adding to various project pages.  One of my favourites was this one:

Posthouse Appreciating Mitten

As always, when I went outside, the neighbour's cat came to see what I was up to.  He is the friendliest little thing and always wants a fuss.  He kept following me around to see what I was taking photographs of.  I went to stroke him and he decided that he needed to check out my new mittens - he obviously is a fan of quality knitting!  I think he wanted to keep it.


Friday, 3 February 2012

Finished Fiddleheads!

Yes, I finally have finished Fiddlehead Mittens - and I love  them.  They are so wonderfully warm without causing my hands to overheat - a perfect combination.

Fiddlehead 09

As you can see, in contrast to the photos in my last post about these mittens, there are no lumps and bumps.  I can fit my hand inside one without forcing it into a crabbed claw.

Fiddlehead 11

As you can probably tell, I am delighted!  I solved the lining problem by following the directions given by Lucyann in her project notes.  It worked!  I am definitely going to check helpful project notes for knits before casting on next time. It would have saved me a bit of time if I had done for this project.

If you don't know where Helpful Notes are located, look at the Projects page and select the most left hand drop down menu and select Helpful Notes. The projects with the highest number next to the little lifesaver graphic has been found useful by the most people.

I'm so impressed at how neat the lining is after blocking.  I used the leg part of my sock blockers, which have a nice mitten shaped top, and wet blocked them.  I don't know if the shaping on the top of the blockers is deliberate or not, but it worked a treat.  Blocking these mittens made such a difference to the fit and the appearance that I can't believe that I was debating whether they needed it or not!

Fiddlehead 10

I am very tempted to apply this type of lining design to a bag or a hat.  It would make a hat super warm and give a bag a professional looking lining without having to sew one in.  Hmmm....... thoughts aplenty there!

I hope you click on the buttons below to check out other people's projects.  There are always some corkers!

FO Friday Button.jpg

Creative Friday

Wednesday, 25 January 2012

Mittens hit a Brick Wall

Well my gorgeous mittens have hit a brick wall.  I now have two finished outer mittens and they look lovely.

Fiddlehead 04

This was aided by new purchase.  After working with the colourwork chart, I remembered how difficult it is to keep the paper pattern on my lap and keep marking it off.  I did use highlighter tape, which was great but didn't stop the paper bending and sliding off my lap.  As I know that after this project I'll be doing more stranded colourwork and lace charts I decided to splash out on something I've wanted for a while.

Knit Pro Chart Holder 01

It's the Knit Pro Chart Holder.  It is the same fabric finish as the needle case I have, which is designed to hold my KnitPro Options, plus a small project.  (I have to confess my case doesn't have room for a project as it is stuffed full of notions!)  This chart holder is the larger size and I got it from Hulu.  I've used them before and they are great for service, plus they have a great magazine selection, though sometimes I wish I could choose to have something delivered from them, that I didn't have to sign for!  At least it arrives properly if you have to sign for it, I suppose, but it does mean waiting in for a package that could fit through the letterbox.

This chart holder has three small powerful magnets that hold the paper in place.  There is a long magnetic strip that you use to mark your current row and then you can close the whole thing up to keep it marked properly.  The closure tab also is used to keep the chart upright, if required, either in landscape or portrait mode.

Knit Pro Chart Holder 02

You can see on the above picture the highlighter tape that I had been using.  I believe that you can get longer strips of highlighter tape, which would be better for marking long rows than the little tabs I have.

I have blurred out the charts, as this is not a free pattern!  I used to have something very similar to this chart holder, that I used when I used to do cross stitch, except it was a metal sheet that was attached to my sewing frame.  This is much better for carrying around with my knitting and it is better for sitting on my lap, which is usually where my patterns rest.

So with my new whizzy chart holder you'd think everything would be going quickly, and it did, as you can see from my outer mittens.  But things have ground to a halt somewhat after finishing the lining of my first mitten.  It looks great.

Fiddlehead 08.jpg

I love how crisp the lining edge looks after picking up and knitting stitches from under the I-Cord cast on.  It even looks great when you put the mitten on.

Fiddlehead 06.jpg

What you can't see from this picture, is how bunched up the lining is.  The picture below, shows a little bit of how the tip of the liner is bulging out the mitten top.

Fiddlehead 05.jpg

But it is only when you look at the actual liner that you can see the real extent of the problem.

Fiddlehead 07.jpg

After hitting this brick wall, I decided to have a look at the helpful notes section of the projects page for this pattern.  I should have done this before I started knitting, as I am not the only person to have this problem.  Lucyann's notes give her changes to the liner to make it smaller.  I'm not sure if I need to change things quite so drastically, but this is what has caused me to pause.

I need to reduce the bunching at the top.  I'm almost tempted to rip back the top edge of the liner and reduce it back to before the decreases, plus a few more rows, then perform the decreases , plus a few extra and then graft the end closed rather than pulling the stitches together to form a bulky ring of stitches.  I think that might work.

I want to get these mittens right.  They aren't any good to me if they are uncomfortable, no matter how nice they look.  Someone suggested that I line the mittens with fleece, and I'm sort of thinking that might work well, especially as I have enough Noro left to knit another pair of mittens.  If I saved the main yarn and didn't knit the liners, then I could knit someone else a pair of these mittens, and I KNOW that idea would be popular, as everyone who has seen these mittens wants to steal them from me!

So, while I have some thinking to do, I hope that this problem can be resolved soon, as the weather is getting colder and I need to get some wear from my lovely new warm mittens.

To look at other works in progress, that hopefully don't need so many problems solving, click on the button.

WIP Wednesday Button.jpg


Wednesday, 18 January 2012

Working on Mittens

As the title suggests, I am currently working on mittens.  I was inspired by the mittens I knit for Martin at Christmas.  These new ones are marvellous mittens and everyone wants to steal them from me.  I am enjoying these mittens so much, and I am drawing out their knitting so I can knit them for longer.  It helps of course the this Winter is yet to really kick in, and my hands haven't yet required mighty mittens of great thickness.  If it gets colder I may speed up my knitting process.

So after all this preamble I will share my first finished outer mitten.

Fiddlehead 01

This is a Fiddlehead Mitten which is designed by Adrian Bizilia of Hello Yarn.  I loved this design from the first time I saw it, but as it required several contrast yarns, I decided that I wouldn't be knitting it anytime soon.  But, a few weeks ago I found two skeins of Noro Silk Garden Lite that needed to be scooped up and made into something beautiful.  They needed to be Fiddlehead Mittens.  I decided that in order to maximise the buttery softness of this yarn, it should be teamed up with a contrast yarn that was equally soft.  I decided on Debbie Bliss Cashmerino DK.  I am really happy with my yarn choices.

This design uses an I-Cord cast on, which I'd never done before, but I really like the nice rounded edge it creates.  The instructions in the pattern were clear enough that I didn't have to go looking for a tutorial.  I think I may use it in the future on something else, as it's a useful new technique to add to my repertoire.

Now I have started to knit in the Continental style, I have found stranded knitting so much more simple.  I hold the contrast yarn in my left hand and the main yarn in my right hand and knit the appropriate colour with the relevant hand.  It speeds thing up no end.  I also chose to knit the mitten inside out so the floats didn't pull across the back of the fabric.

Fiddlehead 03

As you can see, I've done pretty long floats across the back, but as there is a lining to the mittens I didn't think it would matter, as I will not be able to catch the floats when I wear the mittens.

I really have enjoyed watching the colours gradually change on the contrast yarn (the Noro) as the long stripes emerge.  It makes it as effective as having several contrast colours, but without the hassle of weaving in ends!

Fiddlehead 02

I have done the cast on to the second mitten and plan to take this project with me for a train ride back to York to see my family this weekend.  I hope to then gently block these outer mittens and then I will have to pick up from the I-Cord cast on and knit the inners in the Cashmerino yarn.  These are going to a VERY cozy pair of mittens as effectively they will be three layers thick.  I am going to be toasty warm and stylish too!

To check out other projects still in progress, click on the button!

WIP Wednesday Button.jpg


LinkWithin

Related Posts with Thumbnails