Showing posts with label Fibers on Friday. Show all posts

Friday, 4 May 2012

Crocheting Continues

I have had so much fun doing my Craftsy course with Stacey Trock.  She is a lovely teacher and I've learnt loads.  I have now finished the second project in the series, which is a bear.  Isn't he grand?

Teddy Bear 04

My only problem with the project, was running out of the main colour and having to use the paler brown to make the ears.  I don't think it looks too weird though.

I was unsure about the positioning of the eyes, but they have grown on me.  I think it gives him a quizzical expression.

Teddy Bear 01

What do you think?  I think he would have looked better with the safety eyes I used for my Teal Bird, but this bear is destined to be loved by a baby, so his eyes have to be woolly.  I think his huggability levels are high though.  I mean look at how squishy he is!

Teddy Bear 03

He's got a great booty!  I think no one could resist such a bear.  What do you think?

Teddy Bear 02

I am probably going to take a little break from this course, as my OH is desperate for me to try out my Big Book of Knitted Monsters.  I think he wants his very own Computer Monster to blame for the state of his cable box!

Knitted Monsters Book.jpg

I think I might let him chose the first project from the book, to see if my theory is right, as it really seems to have captured his imagination in a way most of my projects don't.  I can't resist his interest!

Before I list the buttons to link to other people's projects can I take a moment to post a little advert on my brother's behalf.  He is going to be running the Jane Tomlinson Half Marathon in Leeds on 13th May to raise money for Bliss.  Bliss is a UK charity that is working to provide the best possible care and support for all premature and sick babies and their families.  If you would like to show your support for this long run my brother is doing, and this very worthwhile charity, please click here to donate money on his JustGiving page.

Stephen January 2012 After Edit

How could anyone resist that face??  Thank you for listening.

Now back to to our normal programme!  To look at other finished projects, click a button!

FO Friday Button.jpg

Fibers on Friday Button.jpg

Creative Friday


Friday, 13 April 2012

A Friday Finish

I actually finished this project a while ago, but didn't get round to blogging about it.  This surprises me as I LOVE it.  I wear it all the time.  It has stripes and garter stitch and lovely colours.  Can you guess what it is yet?  Yes, that's right.  It's the Color Affection!

Color Affection 04

Hasn't it come out well?  I loved making this shawl so much, but I also adore wearing it.  It is such a flexible shawl.

Color Affection 05

It is a great shawl, but it also makes a great squishy scarf too.  I won't get much chance to wear it as a scarf for now, but when the cold weather starts again, I think I will wear it in that fashion, a great deal.

I love the asymmetry of the pattern.  It makes it so interesting.  The picture below was the best I could get of it laying flat.

Color Affection 06

It's pretty wide and shallow, which makes it a tricky one to photograph without a stepladder!  But as this project looks best wrapped around a body, that's not too much of a problem.

Color Affection 03

I love how the colours work together.  I am pretty sure that I will knit another one of these at some point, when I look at the stash again.  It does leave quite a bit of yarn over and I think next time I might extend the middle section a bit to try and make it deeper.  I would like the shawl to be about 2" deeper to rest on my elbows when wearing it wrapped around, like the photo above.  It just makes it warmer if it is that little bit longer.  But that is the only issue I have with this project.  Everything else about it has been a great success.  I can truthfully say, I LOVE this project and wear it all the time.  Garter stitch wins again!

Oh by the way, I have finally got Instagram, as they have brought out an Android version.  If you want to follow me I'm stitchedtogether. If you want me to follow you, then leave your username in the comments and I'll add you.  I'm enjoying my new toy very much.  It's great to be able to just snap and share things.

If you want to look at other finished projects, click one of the buttons.

FO Friday Button.jpg

Fibers on Friday Button.jpg

Creative Friday


Friday, 30 March 2012

Help Needed With Quilting

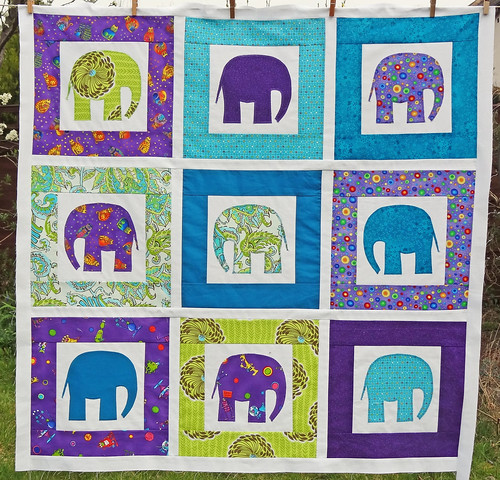
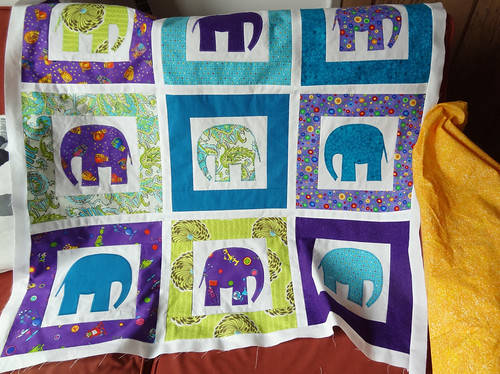
OK.  This is a shameless plea for advice.  As you may, or may not, be aware, I am working on a cot quilt.  I can finally confirm I have a completed quilt top.  It is my first EVER!  I have nearly finished quilt tops and blocks that are going to be made into quilt tops, but this is the first I have ever finished and it damn near killed me in the process, but lets put that to one side for the moment.

Here is the finished top.

Cot Quilt 08

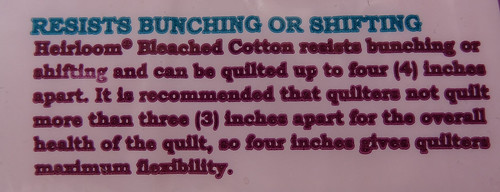
I really love it and I don't want to ruin it now, and here comes the bit where I plead for advice because I really don't know what I'm doing.  I have some cotton batting and it has this on the side of the packet:

Batting.jpg

For ease and speed I wanted to simply stitch in the ditch along the obvious straight lines of the quilt and inside each "box" of the blocks, but I'm afraid that will leave too much of a space unquilted.  The white part of block on which the elephant stands is approximately 8" x 8".  If I leave this space unquilted will it look weird, or is it bad for the quilt?  I've never done FMQ and I don't know if I have the time or the stamina to learn in the week I have until we visit the recipient.

As I like the crisp look of the squares I plan on pre-shrinking the batting.  The instructions are for a top loading machine.  If I simply leave it to soak in a sink for a while and then get rid of the excess water with a towel will that do the trick, or does it really need a spin in the machine to get rid of the water before leaving to dry?  I'm asking because I don't have have a top loading machine because I live in the UK, where these are rarer than hen's teeth.

Right, on to the next bit.  I have found a piece of fabric that I think might work for the back of the quilt.

Cot Quilt 07

This mottled orange and yellow fabric is nice and bright.  I plan to is break up the back with a panel that has the three purple fabrics that have yellow and orange in them, divided with white fabric.  The panel will be bordered by white fabric.  Will this tie it together enough, or should I find another fabric which is more lime or turquoise in colour?  Basically will I get away with using stash fabric or do I have to the shops? I know the baby won't care, but the parents will, not to mention I'm more than a little precious with my very first quilt.

I know there are experienced quilters out there - please help me!!!  I don't want to mess this up after all this work.

If you want to see an actual finished project, click on the buttons below.  I'm only very tenously joining in with my finished top!

FO Friday Button.jpg

Fibers on Friday Button.jpg

Creative Friday

Friday, 16 March 2012

An old FO

I sat here this morning wondering if I could write a "Finished Object" post and thought I had nothing to share at all.  I'm currently in the middle of lots of BIG projects that are taking an age to finish and I've not finished anything since my socks two weeks ago!  This state of affairs is most unusual.  I like finishing things off quickly by having small projects alongside my larger ones, but at the moment my large projects are utterly captivating and therefore taking me away from quick fix finishes.

Then I remembered an FO I didn't share with you, from February!  It was my "handmade" gift as part of the Blog Hub Swap.  Paula, the recipient, already shared the project as part of her blogging about the swap, but I never did.

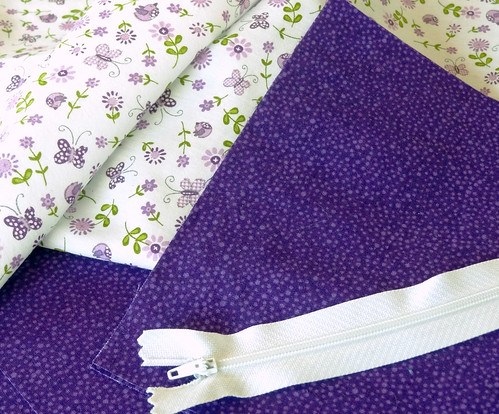
For the swap I knew that I wanted to sew something for Paula, as it is not a craft she pursues.  I also had a clue about a fabric she liked, because she posted a favourable comment on my blog about a felted bag I made for my new niece.  She liked the lining fabric and that gave me a starting point.  It helped that I also had in my stash a nice strong fabric that would compliment the sweet fabric that I had selected for the project.

Day 11 - A WIP

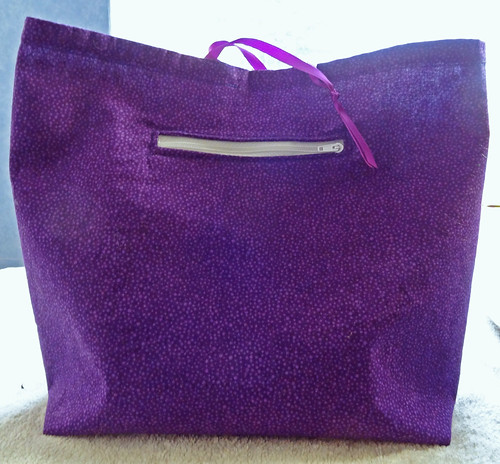
I decided to make a project bag from these fabrics.  Every knitter and crocheter I know always needs project bags.  We can never have enough!  I decided to put a zipped pocket into the bag as well, for things like stitch markers or cable needles, or basically any little thing that is useful to that project.  I also decided to put the pocket on the outside of the bag to make it easier to gain access.  As usual I followed the tutorial from U-Handbag to insert the pocket, though I now know the method off by heart!

Purple Project Bag 02


I used firm fusible interface on the outer part of the bag, in order to give the bag enough structure to stand upright.  The structure enables it to be easily placed on the floor with the yarn inside while knitting.  The structure was a very simple one and at some point I will make one of these for myself, and possibly take photos and make notes while I do it.  It is actually pretty easy if you don't add the pocket.

Purple Project Bag 03

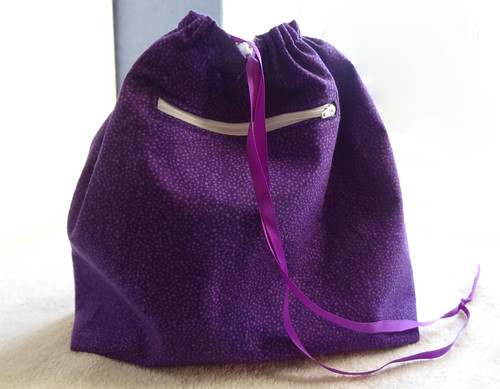
As you can see, I used ribbon for the drawstring.  I had it in my stash and it seemed perfect for this bag.

Purple Project Bag 04

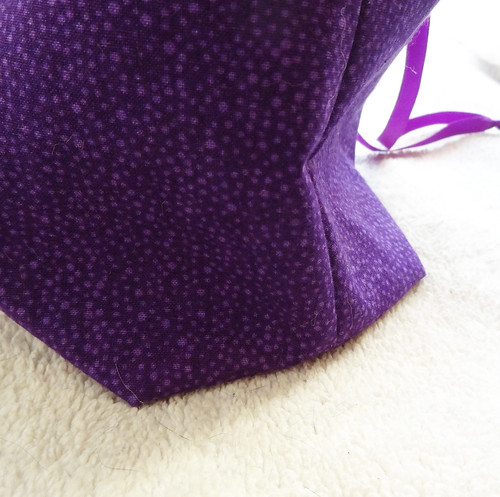
Making the bag "boxy", at the bottom corners, adds to the stability and enables it to stand up right.

Purple Project Bag 01

As usual, with a sewing project, I added my little "handmade by..." label.  I really do think this lining fabric is charming.  I wish I had bought more of it, as I think it would make a lovely set of a pyjamas!  I love that the sweet lining is hidden away inside the strong purple outer.  It's like a little secret bit of girliness.

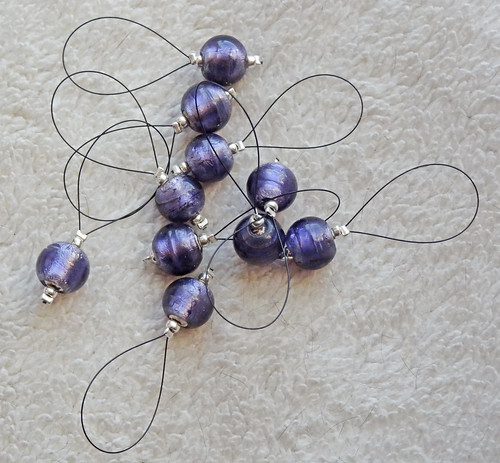
Paula seemed very pleased with her handmade gift, and the added bonus of some stitch markers I made for her which were tucked into the zipped pocket!

Stitch Markers 02

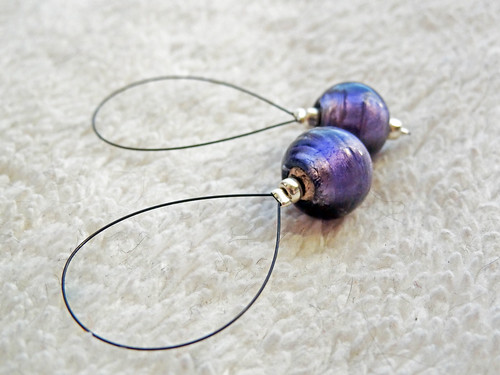
I picked up the beads at John Lewis and thought they went perfectly with the bag.  I love this particular design and it is my favourite out of all the styles I have tried.  I'm hoping that they will be useful, but I'm guessing it's just like the project bag, all knitters always need more stitch markers, no matter how many they have.  They just seem to disappear down the back of sofas, or into big bags!

Stitch Markers 01

So here is the last of my FOs from the past.  I better get a move on for next week and finish up one of my mammoth projects, so that I have something to show you!  To look at other projects, that are probably more recent than mine, click on a button!

FO Friday Button.jpg

Fibers on Friday Button.jpg

Creative Friday


Friday, 27 January 2012

A Test Knit Revealed!

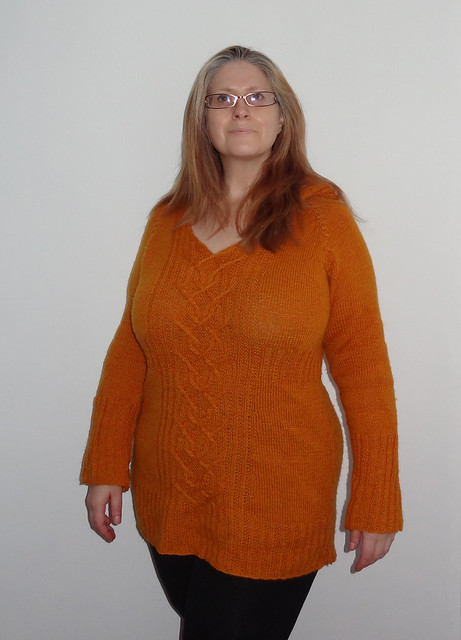
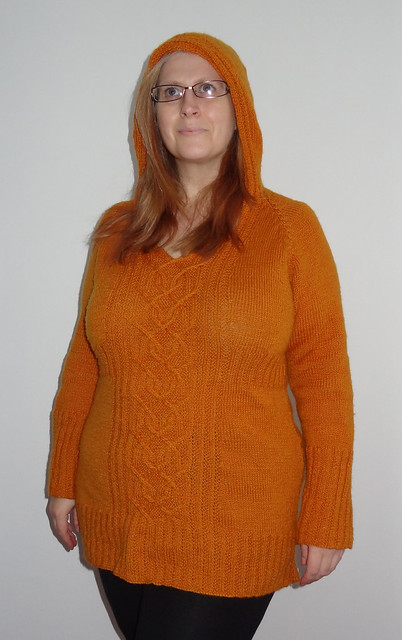
Well, I finally have permission to show you the test knit that was taking up so much time in November an December.  I really wanted to share the process with you guys, but the designer wanted it kept under wraps while the testing was going on and changes were being made to the design.  The design is fantastic and is by Carine Lai.  The garment I made was a tunic with a cabled panel up the front, raglan sleeves and a hood.  It also has interesting ribbing on the bottom of the tunic and on the sleeves.  Most importantly (to me) was it has bust sizing!  The garment of which I speak is The Archer.

Archer Tunic 04

The pattern is knit in DK Weight yarn and I used some very cheap yarn I picked up for a song on eBay.  It is Stylecraft Pure Wool DK (Machine Washable).  I got 2560m for £15.98 (including delivery).  This means that this lovely tunic cost me the grand total of  £8.59 - now beat that Tesco!  More importantly, because I used this yarn, I can chuck it into the washing machine.  This may be useful as I am wearing this tunic a LOT!

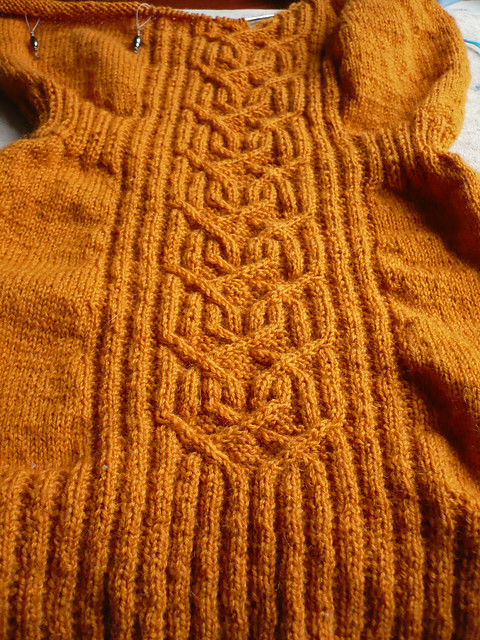
I did take photos whilst knitting this project and I think this one shows the cable panel quite well.

Archer Centre Front

The ribbing on bottom of the tunic is broken, which means it doesn't pull in around the hips and instead skims over them (and covers my bum!).  Because the panel extends from the broken rib, the cable is knit over a background of garter stitch and bordered by the continuing broken rib.  I love this panel so much and I really enjoyed working it.

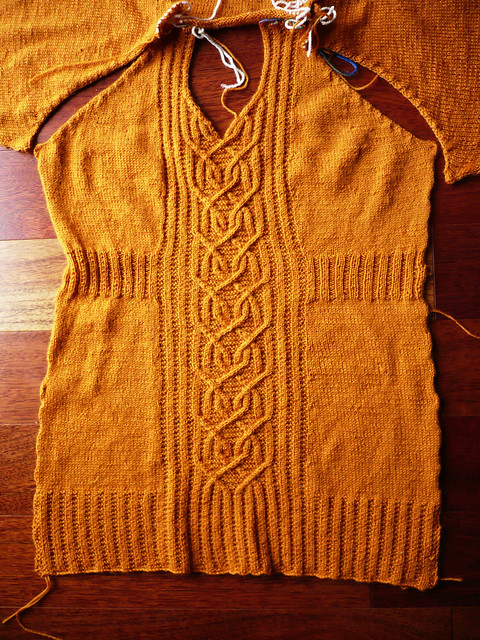
I also really like how the cable panel splits to give an almost sweetheart neckline.  Which again, can be seen more clearly on a work in progress photo.

Archer Tunic 02

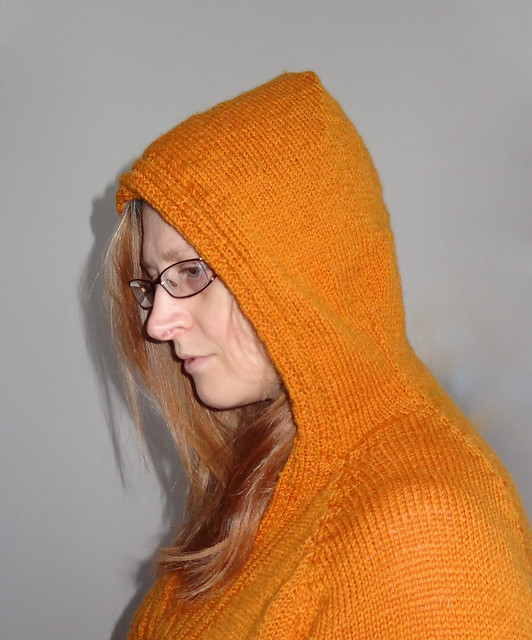
This photo was taken after the pieces were blocked, so the cable looks a bit neater too!  The pattern was created from the bottom up in pieces then assembled using mattress stitch, before picking up the live stitches, round the top of the tunic and creating the hood.  The hood continues the broken rib from the central panel around the front edge.

Archer Tunic 06

Short row shaping brings the rear of the sleeves up to meet the raised back neckline.  It's a lovely detail and makes the shoulders fit beautifully.  The hood is joined together using grafting (or 3 needle bind off if you don't fancy fiddling about with a sewing needle!).  Personally I really enjoyed the look of the grafted hood, it made it feel more organic, than having a seam would.

For me, the best part about this garment was the bust sizing.  As someone who usually has to do short row shaping to get a sweater to hang right it was interesting looking at a different method of creating an increased bust size.  Carine provides a worksheet with the pattern, that you need to use to calculate how many increases you need and over how many rows, for your particular measurements.  The increases are done above the ribbed band and are spaced out according to your calculations.  If you are looking for a simple and quick knit, this probably isn't it, though if you are a B-Cup or less, you don't need to do any maths!  The maths aren't that hard to do but it will take a bit of time and patience to work through it properly and to make sure you know what you are doing.  Personally as I have to do this most times I knit, it didn't bother me at all.

Archer Tunic 03

I can honestly say that despite a few hiccups, that were part of the testing process, I really enjoyed knitting this garment.  It has plenty of straight forward bits for mindless knitting and lots of interesting bits to keep you entertained.  And most importantly, I LOVE wearing it.  I have had so many compliments about this garment, because not only is it a nice looking knit, it also actually FITS!  At the end of the day, can you ask for anything more?

If you want to look at anymore finished projects, hit a button!

FO Friday Button.jpg

Fibers on Friday Button.jpg

Creative Friday

Friday, 13 January 2012

A Finished Winter Warmer

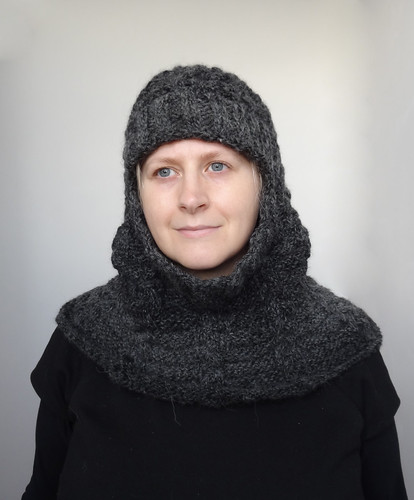
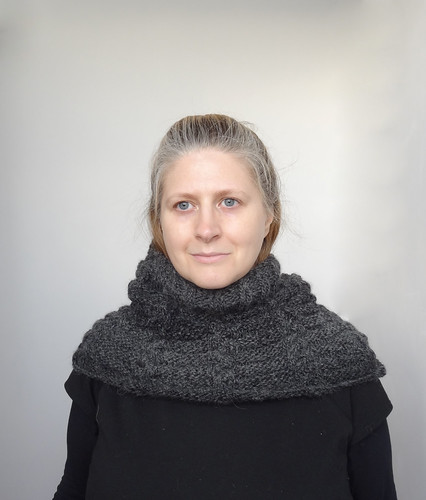
Well I finally got around to taking my photos of the Winter Warmer, I told you about a couple of weeks ago.  Here it is:

Winter Warmer 05

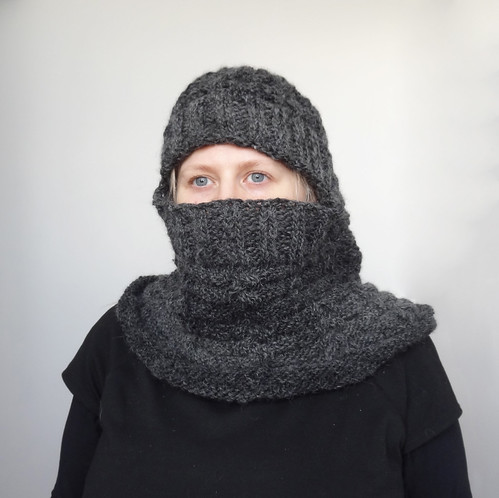
I have been wearing this for over a week now and I've come the conclusion it works well when worn like I am in the above photo, though it is a bit loose around the chin so a draft hits the neck in high winds.  However, when you try and lift the bottom half up around your nose, as was shown in the original pattern photos, for when it is really drafty, it looks a bit silly and I have to hunch my shoulders to get it to stay up.  See for yourself:

Winter Warmer 06

Essentially, my ribbing is too loose.  If I was to knit this again, and I may well do one day, I would use smaller needles for the ribbing section.  It wouldn't be easy to do, but I think it would be doable if I used two circular needles for knitting in the round.  Another solution might be to make the ribbing section smaller, so the  opening wasn't as wide.

I think to fix this problem, I will buy some knitting elastic, and weave it through the couple of rows nearest to the "face hole".

When the hood is worn back, the cowl portion of this accessory is very very snug indeed.

Winter Warmer 07

Wearing it this way is wonderfully warm.  Which is why I'm determined to fix the little gaping problem.  I know it could be a fantastic way of keeping warm.  In fact, what I did the other day was wear my Central Park Hoodie under my Winter coat and put the hood up, then I put the Winter Warmer over the top with the hood up.  Now THAT was cozy!  So I may also try it with a hat on underneath the hood, but I have high hopes for the knitting elastic solution.  I'll keep you posted.

If you want to look at some other finished objects, click on the buttonshown below.  I'm sure you will be inspired, I know I always am!

FO Friday Button.jpg


Friday, 6 January 2012

Not the advertised post...

I'm afraid I can't keep my promise, of Wednesday, to do a big woolly Winter Warmer reveal.  It's not that it isn't finished, because it is.  My broken promise is a result of breaking myself yesterday by being silly.  By being silly, I mean trying to work my through my massive pile of craft magazines, ripping out patterns and articles I want to keep and recycling the left overs.  I also found new homes for mountains of yarn tucked behind the sofa.  This was silly because I didn't listen to my body telling me to stop.  I felt the twinges and I ignored them.  I went into my old "get everything done NOW" mode that I had before I was ill, when I could push through fatigue and pain and just get the job DONE.  I can't do that now.  I forgot.  I now hurt LOTS.  I blame my horrid colds and coughs.  They laid me low for several weeks so I forgot how to pace myself, because I wasn't doing anything except laying in bed surrounded by empty tissue boxes, feeling sorry for myself.

All this means that I can't face taking photos today.  It requires too much standing and bending for this broken body, I'm afraid.  So instead I bring you a couple of FOs from my Christmas gifting pile.  The ones I didn't share because I thought they might be revealing too much.  The first FO is a fake fur stole that I stitched.

Mum's Stole 03

I gave one to my mother and one to my mother-in-law.  Both of them thought they were shop bought.  They couldn't comprehend that this was something that could be handmade.  I think it was because the fur was so opulent.

Mum's Stole 01

This was my first time sewing with fur.  It was a learning experience!  I followed the tips given on BurdaStyle and it went fine.  I won't say it was quick or easy, but it worked.  Pulling out all the trapped strands of fur using a knitting needle was strangely addictive though!  I think it was a very successful experiment, especially when you consider I have quite a big chunk of the fur and the lining left.  I'm wondering what to do with it - maybe a fur lined muff?  I shall have to ponder.  It's not like it's going to go off or anything.

Secondly, I have a bag that I felted at the same time as making my felted slippers.  In fact it was the same wool.  I bought the skeins on eBay for a song, basically it was like buying the three skeins half price.  I knew I needed one skein for the slippers and I searched for a pattern for the two remaining skeins.  I found the perfect one, in the shape of the Woolly Bully Bag by Lori Puthoff.  This pattern is lovely and a bit different, with garter stitch and stocking stitch combining to give lovely curved edges.  It is also free!

Here is the bag after being felted, and then dried while stuffed with shaping materials.


By the way, that table top ironing board has saved my body so much pain.  It is light and easy to get out and put away and when it sits on my table, it is the perfect height.

I really liked the finished bag and was all set to use it myself when I realised that the strap was just too short for me to wear it messenger bag style.  I don't use bags that just sit on my shoulder, very often.  It's because they always slip off, and when you are using a walking stick or rollator it's hard to shove the strap back to where it belongs.  So, after sobbing that I wouldn't be using this bag, I thought about who else might want it.  Maybe someone who is shorter than me - maybe a child.  Then I thought about my step-niece, H.  H, is 7 years old and quite a girly girl.  She likes pink but it is being eased into the purple by my sister-in-law.  Then I found the perfect fabric to line the bag, especially if being lined for a 7 year old girl.

Heather's Bag 02

I love this fabric.  More importantly, H did too!  I was stitching the lining in on the 27th of December, the day before we were due to do our "in-law's Christmas".  I had left it so late because of being ill.  I was determined to get it finished though, and I am so glad I did, because it finished the bag off perfectly.  Changing it from a funky bag, to a funky bag for a 7 year old.

Heather's Bag 01

H, seemed to love it a lot. Apparently my sister-in-law does too!  H, immediately put her stuffed toy in the bag and carried it up to bed with her at the end of the night.  I think it will be useful for the little girl who has everything!

Heather's Bag 03

I am almost tempted to try the pattern again but on with the yarn held double on bigger needles.  It is such a lovely shape.

To go and see other finished things, perhaps more recent than mine, click on one of the buttons below.


FO Friday Button.jpg


Fibers on Friday Button.jpg


LinkWithin

Related Posts with Thumbnails