Saturday, 30 October 2010

Sewing Jersey

I am so proud of myself. I actually sewed jersey fabric, well officially it is called "Tactel" fabric, but essentially it is a knit fabric and therefore comes under the same group heading.  The fabric is stretchy and therefore needs different techniques for sewing.

Before I started sewing with my Tactel fabric, I consulted my oracles of all things stitchy, Mary Clare and Linda.  I was told to use a special jersey needle on my sewing machine, which has a ball point so it slides through the knitted stitches rather than piercing the threads.  I also picked up a tip from the internet that I should either use a long straight stitch or a zig zag stitch to allow for the stretching of the fabric.  I used the zig zag, and it seemed to work really well.

The fabric I bought was from Tia Knight through her eBay shop.  I have bought jersey fabric from her before, but I haven't actually sewed with it.  This time I bought the Tactel I used for the project and some light purple cotton jersey.


There was reason for this purchase, as I had been invited to a Hallowe'en Party with the theme of animation and cartoon.  I had decided to go as Daphne from Scooby Doo.


I bought a dress pattern that I thought I could alter to make roughly this style and I thought I was sorted.  Then family obligations meant that I couldn't go to the party so I decided to make the dress without the stripes and just follow the pattern I had bought, because comfortable and reasonably smart dresses are always useful.

The pattern I bought was Simplicity 2766 and I felt like I got a real bargain with this pattern.  This pattern has a dress, tunic, skirt, trousers, a jacket and a coat pattern all included.


You will note that it also says "Easy Sew" which is just what I need, as I am still a very beginning type of sewist.  I think I will definitely use the dress part again, along with the tunic, trousers and skirt.  They are classic cuts and will be useful for years.  The dress is marked as "A" on the pattern above and I love the shape.

In order to preserve the paper pattern I used a new product I had not seen before, made by Prym, Plastic Tracing Sheets.  These are large plastic sheets that come with a pen to trace your pattern.  This way you preserve the pattern and get a more robust pattern piece to pin to your fabric and cut out.  I can definitely recommend these sheets and will buy them again.  I am always terrified of ripping my pattern pieces or not being able to make something in a different size, once I have cut something out.  I am glad in this instance that I didn't cut out the paper pattern as I think I will be adjusting the pieces for the next time I make this pattern.

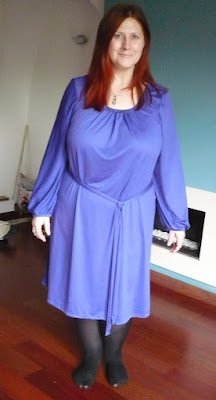
I am lucky to have an hourglass figure, however, the shape is not in the prescribed proportions that our lovely UK sizing would have us all be.  My waist is quite narrow compared to my bust and hips, and my bust is proportionately larger than my back.  When I cut out the pattern pieces according to my bust size, my waist got lost in the fabric.  To bring it out of hiding again, I used some of my left over fabric to fashion a long tie belt, which I am pretty happy with.


I think that I would make the dress a little shorter next time.  I would also blend the sizes from the bust down to the waist and out to the hips again.  Then the belt would not be necessary.

The above picture isn't the best photo, but I am really pleased with my first attempt at doing gathers on both the front neckline and the bottom of the sleeves.  I really love the shape of the sleeves.

This dress will be very useful and great for days when I have to travel or sit upright for any length of time.  It won't press on my tender tummy on days when it is swollen and sore.  It is also quite smart so I will be able to wear it on nights out, when I am unable to lean back very much, for example in restaurants or bars.

I am very proud of my very first stretch fabric dress, and I intend to make at least one more this season so I can work on the fitting.  I have some great jersey fabric in black with white polka dots which I think would be quite funky, even though I had intended to use that for another pattern I bought.  Time will tell which version gets made. In the meantime I will enjoy this new addition to my wardrobe.

By the way, what do you think of the radical new colour of my hair?  I decided that as I don't have to go to a formal office the way I did before I was ill, it was time to try something a little more fun.  Have you noticed it is the same colour as our floor?  I hadn't, until I looked at the photo - I think it may be a trick of the light!

Wednesday, 27 October 2010

Not Much to Show

I feel like I have been gone from my blog for some time, even when I know it's less than a week.  I had got into a nice rhythm of posting regularly and then I fell into a big black pain filled hole.  I have been struggling quite badly with increased pain levels over the last couple of months and I'm not used to them yet.  I have been debating going back to the GP or waiting to see my Consultant in December, or waiting to see if things improve when my quilting course finishes.  Basically I've been wallowing around in my own little bubble trying to stay relatively sane while I get my head around the fact that things are getting worse again.

The my condition tends to go in fits and starts.  It gets worse, then reaches a balance for a time and I get a chance to get used to my new limits and things seem to improve because my coping mechanisms are back in place at the new level.  I'm currently going through trying to reach my balance and I'm not doing too well this time round.  Luckily I have an understanding partner and friends who bring me flowers to cheer me up (pink gladiolus always make me smile!)

During this "adjustment phase" I have been chugging away on my cardigan.  I love this cardigan more and more as it grows.  I didn't enjoy ripping back the 6" button band but they really were wonky due to picking up too many stitches.  I have since finished the button band again and am so glad I ripped it back.  It looks so much better now.


The cardigan definitely needs blocking before the buttons are sewn on and you can see that actually it is a perfect fit.   I've bought some fabulous Italian buttons that probably cost more than the yarn did, at £3.40 a pop (ouch).  But the buttons are great and they will transform my sensible, warm cardigan into sleek and fabulous garment (in my head at least).


I am now working on my first sleeve, which is a set in sleeve worked in the round, using short row shaping.  This technique is the same as I used for my Boccolo Jacket in January, and full details are in that blog entry.  It is a neat and clever way of adding sleeves to a garment.  It is looking very neat at the cap, which as far as I've got, and I just have to decide on the shaping for the sleeve.  I will probably try and keep it fairly slim.


You will be pleased to know that I have picked up my baby blanket again and I am now on my 6th row of 8!


I love this pattern so much, I may even add a couple of extra rows on, to make the blanket slightly bigger than it is looking at the moment.  I shall have to decide if I have enough time to make it larger, what with the Christmas knitting season creeping up on me.  Speaking of which, I had a brainwave and bought Woolly Wormhead's latest book, Twisted Woolly Toppers.  I love her patterns and will be cranking out hats for many people this season.  If you normally get a present from me at Christmas and don't like hats, please let me know, or you might be disappointed!

I will be very surprised indeed if I have anything finished to show you on Friday, but at least I am still making pretty things, even if they are taking a while. In the meantime I recommend you go and have a look at what the other folk on WIP Wednesday are doing.

Friday, 22 October 2010

Big Mittens

I have some new mittens and they are BIG!  They stretch from the tips of my fingers to my elbow and I love them.


They were inspired by Bella's Mittens by Marielle Henault.  I saw these mittens some time ago and thought what a wonderful idea it was to have mittens that covered your forearm.  As you know I have a mobility scooter, which gives me the freedom to actually pop out to the shop and buy a pint of milk when I need to, rather than waiting for someone to come and bring me some.  I love my scooter very much, what I don't love is how cold my hands get in Winter.    In order to steer the scooter and keep it moving you have to hold the steering bars and keep the lever in place.  This means my hands are held out to the front of me while I'm moving which leaves my hands exposed to the cold wind.  It also means the wind rushes up my sleeves.  It is very cold, even when I am wearing gloves.  These mittens seemed the perfect solution.

I decided that I wouldn't follow the pattern, that inspired these mittens, as I didn't have any bulky weight yarn.  What I did have was super bulky weight yarn in the shape of Big Softie.


This cheap and cheerful acrylic yarn called to me.  It was desperate to come home with me and it then quietly sat in my stash for nearly a year.  I really really wanted to use it for some big and chunky mitts.  So I did.

I didn't use the free pattern for Bella's Mittens because of the weight difference, but also because  I also wanted to see if I could work out how to do the thumb myself.  So after looking at the original picture one last time I cast on using Judy Becker's Magic Cast On using 9mm needles (I love chunky needles) and increased until I had the width I wanted.  I chose my cable of C4F, C4B, repeated every 4th row and knit in the round until I reached the base of my thumb.  I then cast on 8 stitches, using new yarn and needles and knit an i-cord thumb, which I then attached to the mitten by knitting the live stitches at the base into the next round of the mitten.  I also switched the places of the two stitches nearest the main body of the mitten.  I did this using stitch markers.  This method of making the thumb and attaching it was taken from the I-Cord Gloves pattern by Nona Knits.

After the thumb was joined I added ribbing to the back of the mitten and then increased by two stitches every couple of inches until the mitten reached my elbow. I  then cast off in the rib.  I kept the cable pattern all the way up the front and I think this really worked well, as did deciding not to have a reverse stocking stitch background to the cable.  I like that the cable forms ridges in the mitt and blends into the body of it rather than looking like a separate entity.


The gloves could probably do with blocking to even out the stitches, but when they are worn, you don't notice it very much.


I love my mittens, they are dense and warm and they work exceedingly well on my scooter.  If they start to feel they aren't working properly later in the Winter, they will probably fit over a normal pair of gloves to give extra insulation.

These mittens were a quick and satisfying knit, that only required the hand being frogged once while I worked out the gauge!  They were finished in three days flat, with much interruption.  I had forgotten how quickly super bulky yarn can knit up.  I have most of the fourth ball of yarn that I used left, I wonder what I can make with that?

This post is linked up to the Blog Hub Group FO Friday linky party. I have to say Tami's giraffe is the such a cutie pie, you won't regret following the link.

Wednesday, 20 October 2010

Progress Report for WIP Wednesday

I haven't got any progress on my blanket to show you.  I have done NONE since last week.  I think I have overdosed a little on baby knits.  I wanted to do something for a grown up, namely me.

I have been working all week on my cardigan in Ethical Twist.  This yarn is scrumptious. I have enjoyed every minute of working with its yummy softness.  This is why I have pretty much devoted myself to it's knitting, the yumminess and the increasingly cold weather.


The shaping has worked out really nicely and I love it's length, which is about mid-thigh.  The broken rib, which provides the only decoration of this cardigan (except the buttons and I haven't chosen those yet) is a beautiful stitch that I've never used before.  I stole it completely from the Essential Cardigan and I am so glad I did.  It looks like a rib, but it doesn't pull the fabric in the same way, but prevents curling.  As I'm making a close fitting cardigan I didn't need to have the fabric pull in any more than it already does.


At the bottom of the cardigan I have cast off in the rib with the right side facing, and I really like the look of the cast off edge.  I will repeat this on all the cast off edges.

The front of the cardigan looks a little strange because the centre panel of it is a really wide button band.  I have started the mammoth task of knitting the really wide button band, but it is slow going on a long line cardigan!  As the bands are going to be really wide, I will probably use some short row shaping to stop the back of the neck rolling over.

Once I have the button bands completed I can move onto the sleeves, and if I have enough yarn left over I will make some pockets too.  I've not done pockets before, but they are pretty essential on a cardigan, you need somewhere put your hands when it's cold!
Speaking of hands, my mobility scooter is a very cold place at the moment, particularly for my hands.  That's because of the wind chill factor felt on the steering bar.  Plus the wind always whistles up you coat sleeves.  So this year I have decided to make really long mittens!

I'm using Big Softie, and it is growing pretty fast.  I should be finished by Friday, so I'll tell you all about it then.  What I can tell you is this, my hands are going to be soooo toasty warm this Winter!!

I'm linking this (as usual) to the Blog Hub Group WIP Wednesday link up.  Go check out some other interesting blogs!

Tuesday, 19 October 2010

Actually managed to finish my homework!!

I don't believe it, but I managed to get two blocks done this week.  And they weren't totally awful.


This is a variation on the Prairie Queen block that I was talking about last week.  I managed to do about half of it on the sewing machine and then I did the rest of the piecing by hand, when I couldn't sit up any longer. 

I've decided that I don't like cutting fabric from templates.  I can't seem to make the accurate enough.  Those triangles in the "on point" blocks (where the squares stand on one corner) were cut from a template and those blocks are the only ones that didn't end up the right size.  At least with hand piecing you can wiggle the seams around more easily and fudge things a little.  I don't think it looks too bad.

I've been up to other knitting this week, but I'll talk about that in tomorrow's post for WIP Wednesday!  See you tomorrow.

Friday, 15 October 2010

Pairie Queen Block

I have another block to show you.  If you come for the knitting, I'm sorry, but I'm really enjoying my quilting course and want to document my progress.  This block is called Prairie Queen and I do believe it is my best block yet.  It's by no means perfect, but it is getting to the point where I don't feel embarrassed showing the block to the tutor.


I think I am also getting faster at piecing, mainly because my cutting is getting faster.  I was really nervous about wasting fabric when I started, but I'm a bit more bold now.  My seam allowances are a lot more even as well, which makes for slightly less wonky blocks.  I really like this block, and I think a quilt just in this block would look lovely and really show off the fabrics well.

I'm using two new fabrics in the this block, that I bought on a recent trip to The Bramble Patch.  I felt I was running short on fabric for this sampler quilt and that a couple of extra fat quarters couldn't hurt.  I bought the light and dark fabrics that are in the above block, both of which I adore, and a medium shade as well.  I think they will blend in fairly nicely with my existing fabrics.

I was pretty good on my shopping expedition and only bought the three extra fat quarters I wanted for this quilt, 2m of flannel which was also on my list to buy, and only ONE more fat quarter that was too pretty to resist.  Are you impressed?  I was, until we went to Heart of the Shires, that is just up the road, for our lunch.  I hadn't factored in the lovely little craft shop there, called Crafts & Quilts.  They have a nice selection of fabrics there and they sell 4 fat quarters for £9.00, so you have to buy 4, don't you?  And then I fell in love with a Tilda fabric that I just had to have.  So all my hard work resisting the lure of fabric was blown out of the water.  I think it is because I relaxed too soon!  However, if you are a lover of gorgeous fabric, a little trip to the Bramble Patch, followed by a jaunt up the road is highly recommended, but you will blow your budget, especially as there are lots of other lovely little shops on the site as well.

I am supposed to be doing another block this week, for my homework, but I don't know if it will get done.  I have decided that trying to keep up with everything is not going to help my health at all.  So, I am going to try and do at least part of the homework each week, so I can see if I am doing the right thing, and then catch up at the end.  If I have fewer blocks than is recommended for the quilt, it doesn't matter.  I can either do some more at the end of the course, or I can make a smaller quilt.  This is only meant to be a quilt for on the sofa, so it doesn't need to be huge.  I think taking it more slowly means I will enjoy the process a lot more and not fall out of love with quilting.  My tutor agrees with me.

If I have a burst of energy later this week, you may see another version of this block, but don't hold your breath!

Test Knitting A New Pattern

Do you remember the hat from last week?  I have decided that it is too small for the recipient after some sneaky testing.  I got my brother to try on the hat as I have knit him one in a larger size.  This version is much too small for him.


However, it is a good fit on my sister in law.


This size will be labelled for women, as it fit me quite well too.  However, this hat was designed to go on a man's head.  I will be frogging this particular hat, but at least it has given me the sizing for my pattern.  I have, since this little fitting session, made my brother a hat in a larger size.  It's his Christmas present, so shhhh!


I also tidied up the crown decreases, which I am really happy with now, so re-knitting my first effort is not too heart breaking.


This yarn is Rowan Pure Wool Aran and is lovely and springy to knit with.  The colour is perfect for my brother and matches his Winter coat too.  My sister in law agrees that this is a hat that my brother will like and wear.


He can even fold over the brim if his ears get extra cold.

Even though I now have to re-knit my first hat, I am quite pleased at having this process tested by myself, because now I am keen to try my first sized pattern.  I have even done the maths!  I am going to have three sizes; Women's, Men's and Large Men's.  This was meant to be a masculine pattern but I think with the right yarn it will work for women, or it could be used for a teenager.

I hope to finish my pattern tweaking very soon and then I'll be looking for testers.  If you are interested in testing my hat pattern then have a look through the Free Pattern Testers Group rules and see if you can adhere to them, then drop me an email at craftycripple@gmail.com and I'll let you know when the test is due to start.

And as this is another finished object, I'm linking to Tami's Ami's blog again.  Please go and take a look at some of the other amazing projects completed by my fellow bloggers.  They are well worth the time.

Wednesday, 13 October 2010

WIP Wednesday

It's that time again.  My weekly update of the work in progress on my needles, that I link up with others in the Blog Hub Group.  As with the last couple of weeks I can show you my baby blanket growth.


I'm officially half way now.  Not only that, but I have weaved in the ends of yarn.  I did a huge weaving in session at the end of row 2, and then I have done each block as it was finished.  I'm so glad I have done that, as the mammoth weaving in session of only 2 rows was bad enough.  Doing 8 rows in one sitting would have been just too depressing for words.

I would have made better progress if it wasn't the lure of the dreaded Kemps.  If you have never heard of Kemps Woolshop, you will have a larger bank balance left than the rest of us.  Kemps are an ordinary yarn shop, that also happen to get ends of lines and clearance colours.  This means they have a really big clearance section on their website that has amazing bargains.  They are so amazing they are impossible to resist.  On this particular occasion I was seduced by the Ethical Twist yarn.


This yarn is 70% organic wool and 30% alpaca.  It feels light and fluffy, like wool, and soft and silky, like alpaca.  I imagine it will be incredibly warm because of the loft of the yarn, despite only being double knit weight, though I believe it verges on the heavy side of that weight.  This yarn is beautiful and I chose the Camel colour as paler shades wash me out.  Each skein is 100g and Kemps is selling them at £2.50 each.  I believe that all this explains my moment of madness with my debit card.

No matter how much I love my vivid shades of hand dyed glory from BabyLongLegs, I still adore un-dyed yarn.  I love being able to see the natural origins of my garment.  When a yarn has less processing, I somehow feel closer to the original knitters, our ancestors in craft.  I know this is ridiculous as our ancestors had little to do with alpacas in the UK, but you get my drift, don't you?

This recent purchase has tempted me away from my baby blanket knitting and led me by the hand to more selfish knitting.  I am knitting a top down fitted cardigan.  My inspiration comes from a pattern from Interweave Knits, called Essential Cardigan, by Laura Grutzeck.


I really liked this garment and I actually have the pattern, but I wanted it to be a little more tailored and longer.  As I was going to be doing maths I thought I'd just work the whole thing out from scratch.  This is how much I have got knitted, so far.


It's not very far, I know, but I did have to do lots of maths, especially for the short row shaping around the bust.  If you didn't know already, I have a tutorial on this subject here, and a worksheet to help work this out, which you can find here.

Now I've done the tricky working out stuff, I hope this cardigan will grow more quickly.  I hope this process is quick because the weather is getting progressively colder and I need more woollies to wrap up in!

Tuesday, 12 October 2010

Half Square Triangles

I managed to get my Patchwork and Quilting homework done in a reasonable amount of time this week.  Probably because I didn't have lots of fiddly little bits of fabric to sew (and no I haven't done my fiddly little Court House Steps yet).

This week's homework was using 16 Half Square Triangles to make a block.  This is such a clever concept and I think will help with future quilting a great deal.  I found a couple of tutorials to explain the principles of this technique, because any description I gave would be rubbish!

How to Calculate Half Square Triangle Measurements
How to Measure and Cut Half Square Triangles

This is a good video on how to measure, cut and sew a single Half Square Triangle.


We were taught how to make a grid of 9 squares using two pieces of contrasting fabric.  Each piece of fabric is pressed and laid with right sides facing each other.  Then a grid is marked out, with each square measuring 7/8" greater than the size of the required final square.  Below is an illlustration of what we were told.


All the red lines marked were 1/4" away from the central diagonal lines, on either side.  These lines were sewn.  Then all the black lines, including the vertical and horizontal ones, were cut using a rotary cutter.
Then each piece was then pressed with the seam allowance towards the darker side.  This gave 18 squares, of which we only needed to use 16.  We then laid out our squares in a pattern of our own making.  I cheated and used a pattern I had seen in a magazine.


I am half pleased with my piecing in this block.  Our tutor told us to piece in strips and then piece the strips together.  I don't think this worked, as I followed this method on the right hand two strips.  As you can see, the "arrows" don't line up too neatly.  On the left hand two strips I pieced each "arrow" together and then attached it to the matching "arrow".  I then pieced these blocks of 4 together.  These left hand pieces are much neater and I'm really pleased with how aligned they are.

I learned from this exercise that next time I make Half Square Triangles I will allow 1" extra on each square and cut down to the right size after sewing.  I will also piece the pattern in a way that makes sense to me, rather than blindly following the instructions, that may not apply in each case.

Other than the slight mis-match of arrow points on the right hand side, I'm really happy with this block. I love the fabrics I used, especially as the red fabric has not had enough chance to shine in the blocks so far.

I will definitely be using this technique again, as it is a really fast way of piecing together a good size block, with very little waste of fabric.

Sunday, 10 October 2010

Baby Jacket No. 2

I bet you were thinking that I had stopped all my baby knitting hadn't you?  Well I haven't.  I got another baby jacket finished yesterday when I finally got round to buying buttons.  This jacket has taken sooooo long to make.  It was done in sock wool, you see, and sock wool is very skinny.


It was worth it though.  The pattern is available to download for free, and the Ravelry link, to the project page is here.  The pattern is called Garter Stitch Baby Kimono and was designed by Joji Locatelli.

There is a tie on the inside to hold the inner flap closed.  I made this by casting on, knitting a row and then casting off cos it's quicker than an i-cord.


As you can see, there are two different yarns used in this garment.  The stripey yarn is Zitron's Trekking Yarn and it turns out it was a 3ply weight.  The solid colour yarn is Paton's Diploma Gold 4ply.  Even if you don't know much about knitting you can see the difference in the names - 3 ply and 4 ply.  So yes the solid colour yarn is thicker and this caused a slight puckering where the two yarns meet.  It would have been better for the appearance of the jacket if I used the Zitron for the edging.  But this yarn is slightly scratchier and I wanted the edges to be as smooth as possible where they might rub on the baby's skin.

I don't think most people would notice this issue unless it was pointed out to them, but I will make sure, next time, that I have the right amount of yarn to actually finish the project.  It was because I ran out of the main yarn that I had to have contrast yarn on the edging and the sleeves.  It was annoying to have to find a contrast yarn that worked, but I quite like how it looks.  Many thanks go to Litlemouse for finding the yarn for me.  

Now I have finished 3 baby knits.  I don't think that is bad going.  I don't know what will get made next.  I shall have to consult my fave's on Ravelry and make a decision.

Friday, 8 October 2010

A New Pattern (Coming Soon)

As I haven't released a new knitting pattern in eons, you won't be surprised to know that I'm not going to be releasing one today, however I will be giving you a preview.

You  might have noticed that I have a deep and abiding love of all things BabyLongLegs.  I have wanted to purchase some of her lovely Radiance yarn for some time.  It is comprised of 3 plies of merino yarn that take dye in slightly different ways.  It means that you get a subtle variegation within the stripes.  It really is lovely stuff.  So I decided that I should splash out and get a skein to play with.


Here is a close up so you can see what I mean about how the plies take the dye differently.  Isn't it pretty?


As usual the yarn is incredibly soft and bouncy.  That BabyLongLegs sure knows how to source a good yarn!  I decided to use this yarn to make a hat which would go into my Christmas present stash.  I am decidedly short on presents for the men, so decided it would make a hat for the male of the species.  I knew I wanted to play around with some cabling but wanted enough plain knitting to show off the nature of the yarn properly.

After spending some time looking at Ravelry patterns, I decided that I couldn't find any that screamed "knit me" and consulted my stitch dictionary.  After a few days of playing I came up with this:


I'm really pleased with how the yarn is shown off with this pattern, but the wide cabling keeps it entertaining and adds a nice solid masculine feel to the hat.


I have never used this cable design before and really love it.  I kept the decreases for the crown pretty straight forward, but I think it looks interesting too.  I doesn't, however, photograph well.


I have written the pattern up and am testing it now with another knit for the Christmas pile, but this time in a solid yarn, Rowan Pure Wool Aran.


I love this chocolate colour and I think it will show off the cables really clearly, so they will pop out more in photographs.  After I finish my test, I will be looking for a couple of other test knitters.  If you are interested, keep an eye on the Free Pattern Test Knitters group on Ravelry, as I plan to post a request in around 3-4 days.

So although this isn't a launch of a pattern, it is hopefully a pattern that will be available within a few weeks.  It is also officially a Finished Object, so I'm linking it to Tami's Amis.  If you want to look at pretty projects, go and have a look!


Thursday, 7 October 2010

A Little Treat for Me.

I feel like I have been knitting for other people like fury for ages now.  Don't get me wrong, I enjoy doing it, but sometimes I need a quick hit of selfish knitting.  I decided that I would delve into my new Boutique Knits book.


This book had been in my Amazon Wish List for, what seems like, forever.  I adore the hat on the cover and desperately wanted the pattern for it.  There were also a couple more other patterns that I loved.  I happened on it in Waterstones and decided to splash out.  I'm so glad that I did.  I only wish I'd done it sooner.

The pattern from this book that I decided to treat myself with was the Sideways Grande Cloche.  I chose this pattern because I just so happened to have some yarn that would work with the pattern.  I had some left over yarn from my Peru Gilet.  I had just over 2 skeins to be precise.  As usual I had set these extra skeins aside to be used for either repairs or small knits.  This pattern was the ideal small knit.  In the end I have about half a skein left for repairs now!


Isn't this yarn just meant to be made into this hat?  I love this hat even more than I loved the pattern.  I'm so happy I wasn't disappointed.  It took me a while to get gauge as I'm such a loose knitter, but I don't begrudge the time at all.  It is always worth swatching, even when you use the recommended yarn.


This hat is filled with interesting little details.  I love the twisted side accent.  This twist is made by picking up and knitting two bands of ribbing, twisting them together and then sewing them to the top of the hat.  This twist pulls the side up slightly to enhance the narrowing of the depth of the hat.  The body of the hat is knit sideways, getting narrower by working with progressively smaller needles.  The twist also covers the mattress stitched seam.


The top of the hat is knit by picking up and knitting along the top edge of the hat body, before the hat is seamed.  The decreases make a nice strong circular top, framed by the last rib on the body of the hat.

This hat is knit entirely on straight needles, so if you hate knitting in the round, this hat is perfect for you.  I love how it cups the back of your neck and covers your ears all the way down to the lobes.


My cloche will be warm and comfortable even on the coldest of days.  I am so pleased I have been able to knit this hat, in this yarn, because I have worn my Gilet constantly over the last couple of weeks.  It is warm, soft and breathable.  I LOVE this hat.  I am so glad I spent a day knitting this for myself as it has recharged my knitting batteries, so I'll be able to get back to selfless knitting again.

Going back briefly to the Boutique Knits book.  I can highly recommend it.  It has many interesting accessories, with imaginative twists on every day items.  There is a bag that incorporates both felted and un-felted knitting, which is really interesting and there are at least three hats, in addition to this one, that I want to make.  I think this book will be referred to time and time again for quick and interesting knits, especially if I'm running out of time on my gift knitting schedule. This is a valuable addition to my craft library, and anybody else's.

Wednesday, 6 October 2010

WIP Wednesday

Following on from last Wednesdays Work in Progress Post, I have decided to share the very sparse progress on my blanket.


I have only got a quarter of the way through this blanket.  It is a lovely knit but I've been distracted.

Here is the obligatory arty shot.


I really must start weaving some of these ends in, because if I leave them to the end, they will never get finished.

I'm linking this over on Tami's Ami's.  Go and have a look at other lovely blogs!

Tuesday, 5 October 2010

Ruffles Galore

Every couple of years there is a new fashion in scarf yarns. Last year was pompoms, this year it seems to be ruffly yarn.    I was quite skeptical of how these would feel against the skin, because they look a bit scratchy in the photos.  However, Mary Clare got some yarn in from Katia called Ondas.  I tried to resist buying into the whole fashion scarf frenzy, but I failed, as usual.


The yarn looks like nothing on the skein.  But, the yarn is actually a very long tube of mesh.  To knit the ruffles required, instead of wrapping the yarn around the needle as normal, you wrap only a small part of the tube around the needle, so in effect you are splitting the yarn.  The part of the yarn tube, that isn't in the stitch, is stretched out to make a lovely ruffle.  The ruffled edge hides the stitches that are knit.


Clever huh?  I didn't take home the free pattern, but I'd seen the scarf being knit at the knitting group and thought I could just wing it.  I was right.  I cast on 6 stitches and knit each row (in the manner described above) and voila - a scarf was born.


It is 4.5" wide and 52" long, which gives a nice length for wrapping around the neck in a glamour puss style.


See what a glamour puss I am on Sunday mornings??  Yes, I am that tired, and no, there weren't any better pictures of me wearing the scarf.  I'm sorry that's just the way it is!

I quite enjoyed knitting the scarf as it was completed so quickly.  I needed a quick finish project this week, as everything seems to be taking ages at the moment.  I don't know if I'd knit another one, but then I have most of my female Christmas gifts completed already  If I was running short of time I'd whip up loads!

I can confirm that the Ondas yarn is nice and soft, despite being made of nylon.  It feels more like cotton next next to the skin.  I don't know what the other ruffly yarn, Rico's CanCan is like, but this stuff is lovely and the colourways I've seen are really nice.  I particularly like the black, grey and white variant and also the hot pinks and red.

I love the look of the variegated ruffles as they blend into each other, so here is another gratuitous ruffle shot.


If you see one in the flesh, you'll want one too!

Sunday, 3 October 2010

Two New Blocks

After the nightmare that was the Log Cabin block that I did for homework last week, I can report I am starting to come to terms with my sewing machine.  I had a chat with my tutor and with Mary Clare.  I tried to sew the seam on Mary Clare's beloved Bernina and I have to say it was soooo much easier than on my machine.  I was shown how to tighten the tension on my bobbin case and also where to oil my machine.  These two things have made my machine less clunky and the tension more even.  However there is still an element of the fabric being swizzled round.  My four small Log Cabin blocks seemed to be going well, until I tried to piece them into one block.


At first glance it looks ok but then when you look at the centre where the dark logs meet you can see how wonky the small blocks were.  I have fudged it as much as I could and I had to make a judgement call on whether to match up the light blocks at the edge or the dark blocks in the centre.  I think I made the right decision.  To be honest I don't think I will EVER be doing this particular block again (until a new machine is bought anyway).  I hated it with a passion and I had to complete it over several days, even with chain piecing.  It was so fiddly and involved lots of sitting at the machine.

After the headache that was the small Log Cabin blocks, the large Courthouse Steps was a dream.


It was lovely to have more fabric to hold on to.  It was also nice being able to do two strips at once before having to trim and press.  It meant it was a much speedier process.  I think it also means there is less risk of pulling the fabric sideways too hard and causing the square to go wonky.  I shall have to see how the smaller versions go, it can't be any worse than the Log Cabin ones!

LinkWithin

Related Posts with Thumbnails