
After looking again at the incorrect charts from the original file I was working from, it appears that I have made the garment 2" bigger than required, rather than 2" smaller as I originally thought. I put the garment onto waste yarn and tried it on. It is is much bigger than I thought, when I tried it on whilst still on the needle, and it may be big enough to insert a zip into it, as the edges meet at the front, which is not how the garment is styled (it should have a gap between the front edges of around 2 inches). I like the idea of being able to close the garment completely as I think it will be much warmer worn like that and a zip will be hidden beautifully behind the lovely plump borders. I saw a project by giraffgirl done in this way and I like how it looks.
So, once I had decided to keep knitting this size, I have made excellent progress. I've done the main body of the garment and done the hip shaping and gone back to start knitting the top of the pockets. I got a little confused with this so I've done some photos showing what I did. I found this project that had a photo giving me a hint. I then was able to move forward, as the pattern wasn't very clear at this point, for someone who didn't know what they were trying to create.
The idea behind using this technique is to have the top of the pocket appearing seamless. The body of the garment forms the back of the pocket and the front of the pocket is formed by knitting the border stitches and creating the top fabric at the same time.
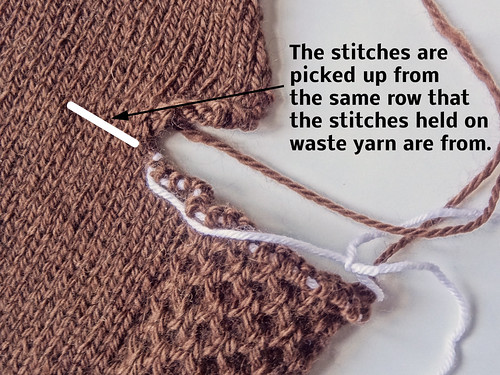
To create this seamless pocket, whilst the body of the garment is knit, the borders are put on waste yarn. After knitting it, the body is also put on waste yarn. You are next told to place the stitches held on waste yarn for the pockets back on the needle. These stitches are the border stitches. Once the border stitches are back on the needle, you pick up the required stitches from the same row as the stitches now held back on the needle. The next row knit will create the new fabric growing outwards from the body of the garment.

On the right hand pocket the picked up stitches are picked up and knit at the same time, working from the body out and then the border stitches are worked in pattern. On the left hand pocket the border stitches are worked in pattern and then the picked up stitches are knit. This ensures the picked up stitches grow from the same point, at the same rate, as the border stitches.
As the pocket is worked it will create a flap that forms the front of the pocket.

I think this technique is very clever and looks fantastic, it just took me a while to get my head around it. I hope these pictures will help others, trying to muddle through this part of the pattern, get it straight more quickly than me!
This garment is captivating me, and, despite all the woes of the incorrect pattern version, I can't seem to stop working on it! To see other works in progress, click the button.
