
Since starting these socks I discovered an interesting looking blog called Knit Better Socks. This blog is fabulous for people who want to, as the title suggests, knit better socks. One of the areas that really interested me was what to do with a forethought heel. This appealed to me on two levels;
- Doing a tube sock and then adding a heel requires less thought in the middle of construction, so I can merrily knit away until the end, and then worry about the heel.
- Adding a heel at the end means that when the heel starts to wear out it is easy to replace and therefore extend the life of the sock (I'm starting to get worn heels on some of my socks so this definitely has started to make more sense to me).
I used the technique that I learned from Cat Bhordi's Personal Footprints book to insert two lifelines on the sole stitches with one row in between, where you want the heel to start.
This technique allows you to slip the needles along each lifeline before snipping one leg of a stitch in the middle of the row between. You then unravel the yarn until there are two stitches left in place at each end of the row and the yarn left loose. This means there is no way for the socks to come undone or for the corners of the open part of the sock to leave holes.
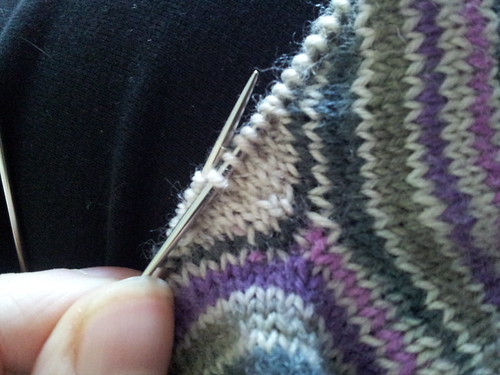
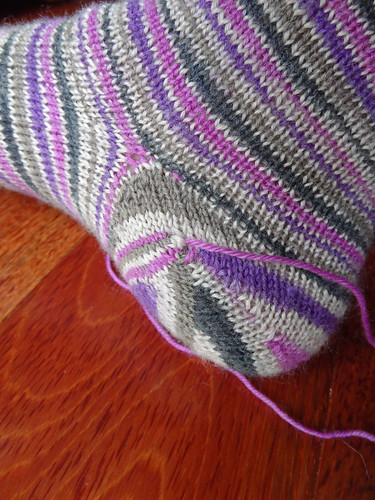
The above photo shows the corner of the heel opening and how the join is smooth and there are no holes at the point of contact. You can also see the start of a technique I discovered on Knit Better Socks, on how to add an extra short row gusset, at the edges of the heel, to stop the instep pulling too much. I like how it works and tried Reena's method of executing turns on short rows by "hoiking" the pivotal stitch instead of wrapping it. I like the way it looks, but it was a bit fiddly for me, so for the short row shaping of the heel I used the dig'n'lift (variation 4 on the linked page) technique, as described by Cat Bordhi, in her video tutorial on how to make Sweet Tomato Heels. I also used three wedges, as described in this video, for my short row shaping, after I'd done the short row gussets at the edge of the heel openings.
You can see the two techniques working together on the following photo.

My only concern with this technique is the little dimple that is created at the edge of the wedges. You can see it clearly on this photo.
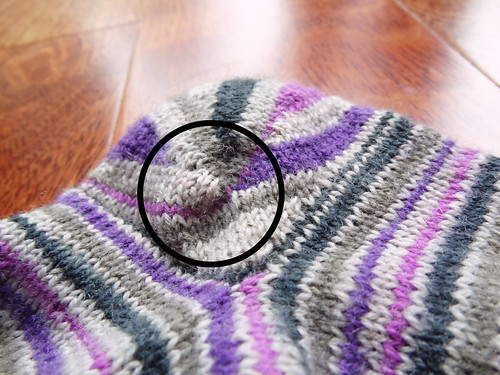
However, when the sock is worn, it is less of a problem. If anyone else has had this problem and overcome it, I'd be interested in a solution. On the next photo you can see the areas where I could do with adding more increases too. They aren't horribly tight, but they could be looser and fit better, if a few more stitches were added at those points.
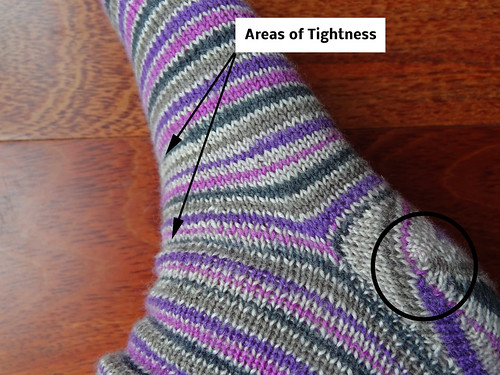
I really like this method of creating an after thought heel and the sock fits well enough. However, in the future I would add some extra increases, where marked on the above photo and I will place them all on the sole. I will do the heel shaping over this larger amount of sole stitches to take my wedge stitch count closer to the 2/3rds of the stitches recommended for the Sweet Tomato Heels. Hopefully with the additional gusset described by Reena, and the extra stitches, this heel will work perfectly.
If you are interested, I grafted the stitches from the sole of the sock and the wedges of the heel using TECHknitter's method of Grafting Using Knitting Needles. I find this method much easier to understand than the sewn version for some reason and it looks just as neat.
I'm not just working on these very technical matters, but also working on my Melia, though I will tell you about that later as I imagine your head may explode if I talk any more! To find out about other people's work in progress, click on the button.
