
As the top of this bag is rather distinctive and non-uniform I needed to do a fairly complex set of instructions for knitters who might not sew very much. Rather conveniently the bag that needed constructing had a very similar top to it, mainly because it was the prototype. So now I have lined my Point Bag & Purse and taken lots of photos throughout so I can write up the pattern. I have decided at some point to create a tutorial on how to line standard shaped bags as well. This may take another 6 months, but the intention is there!
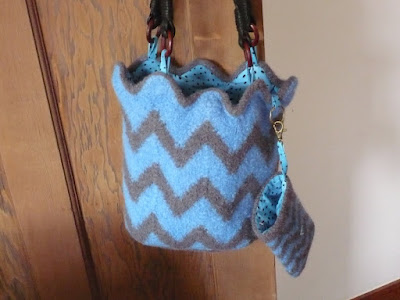
While you waiting with baited breath for my marvellous new pattern and tutorial here are the photos of the finished product.

The bag uses the same handles as I used for my Tulip Top Bag, which are made by Prym and have lasted really well. They also look smart and are an ideal length for me.
I used plastic canvas to form a firm base for the bag. This is a trick I use with nearly every bag I make now. It gives a nice smooth finish to the bag and gives a little structure where there is none.

Simply adding a medium weight cotton lining to a felted bag helps give it structure, but the plastic canvas firms up the edges. As this bag is for my own use I added a pocket designed to hold my mobile phone. I made a pouch, sewed on a press stud and sewed it to the lining. The press stud ensures that the phone doesn't slide out of the pocket when the bag is not vertical.

With this bag construction I made one major change from the Tulip Top Bag. I attached the loops for the straps and purse clip onto the bag before attaching the lining. It looks so much neater and I think it will be more secure, as the strain is applied to the bag rather than the lining.

The purse part of the project has been changed into a pocket into which I can slide my iPod Touch. It is the perfect size to take the case I made for it and the felted fair isle fabric, plus lining, will make it even more protected. It will also make it easier to find in the depths of my handbag, because I attached the pocket to the top of the bag, with a clip and ring.
If I had been going to use this as a purse, I would have added a zip to the top of the pocket. It could also be used to hold glasses, but a press stud or other fastening would have to be added.
The bag lining is attached just below the applied I-Cord edging. This covers the stitching that attaches the lining and gives it a crisp professional look.

I am really pleased with this bag construction and the improvements that I made this time round. These are definitely due to some of the skills I have learnt during my patchwork class. Who knows what my next bag will look like as my sewing skills continue to improve!