OK. This is a shameless plea for advice. As you may, or may not, be aware, I am working on a cot quilt. I can finally confirm I have a completed quilt top. It is my first EVER! I have nearly finished quilt tops and blocks that are going to be made into quilt tops, but this is the first I have ever finished and it damn near killed me in the process, but lets put that to one side for the moment.
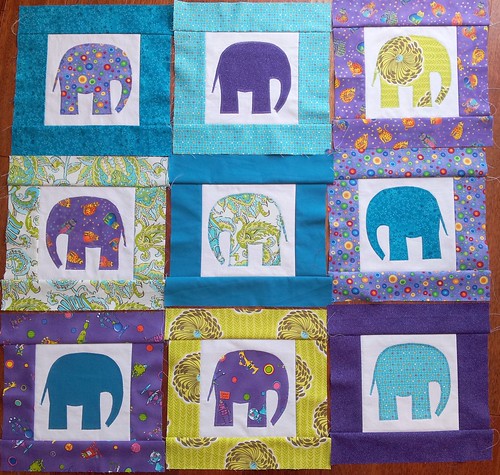
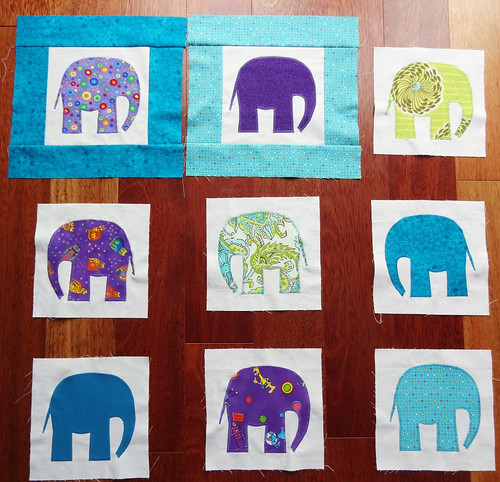
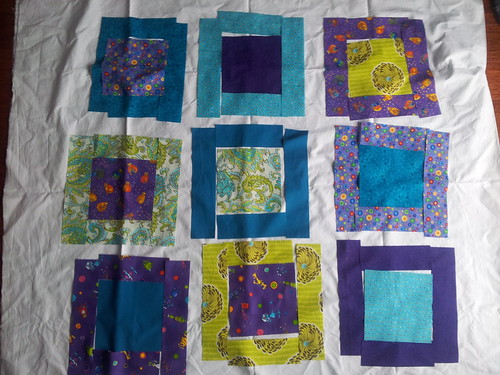
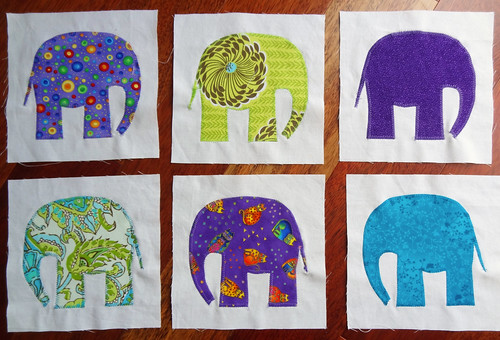
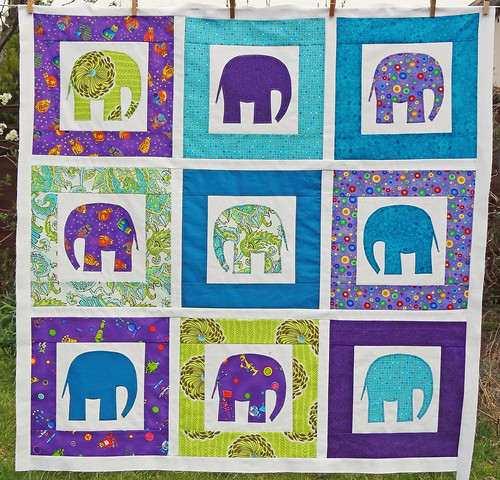
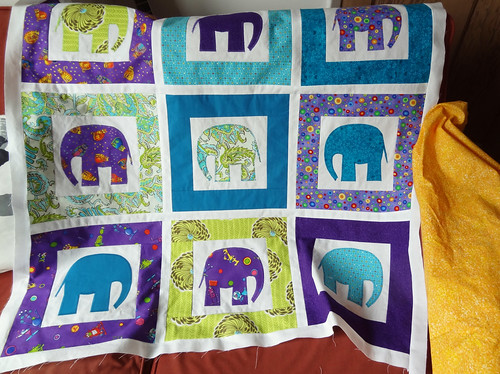
Here is the finished top.
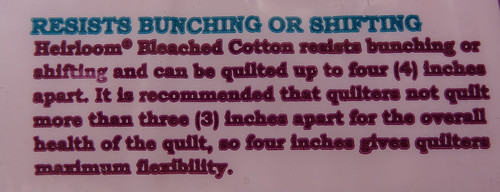
I really love it and I don't want to ruin it now, and here comes the bit where I plead for advice because I really don't know what I'm doing. I have some cotton batting and it has this on the side of the packet:
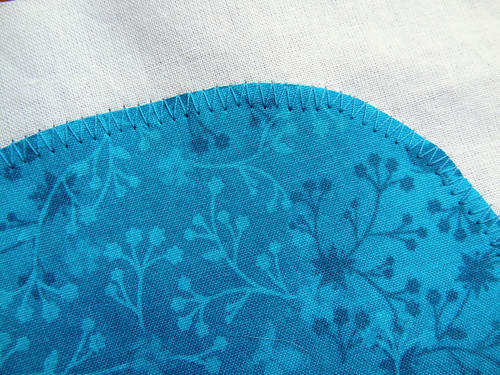
For ease and speed I wanted to simply stitch in the ditch along the obvious straight lines of the quilt and inside each "box" of the blocks, but I'm afraid that will leave too much of a space unquilted. The white part of block on which the elephant stands is approximately 8" x 8". If I leave this space unquilted will it look weird, or is it bad for the quilt? I've never done FMQ and I don't know if I have the time or the stamina to learn in the week I have until we visit the recipient.
As I like the crisp look of the squares I plan on pre-shrinking the batting. The instructions are for a top loading machine. If I simply leave it to soak in a sink for a while and then get rid of the excess water with a towel will that do the trick, or does it really need a spin in the machine to get rid of the water before leaving to dry? I'm asking because I don't have have a top loading machine because I live in the UK, where these are rarer than hen's teeth.
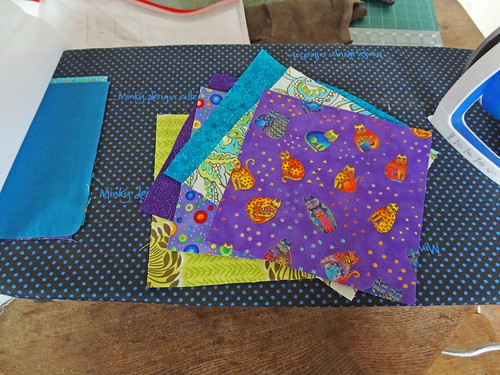
Right, on to the next bit. I have found a piece of fabric that I think might work for the back of the quilt.
This mottled orange and yellow fabric is nice and bright. I plan to is break up the back with a panel that has the three purple fabrics that have yellow and orange in them, divided with white fabric. The panel will be bordered by white fabric. Will this tie it together enough, or should I find another fabric which is more lime or turquoise in colour? Basically will I get away with using stash fabric or do I have to the shops? I know the baby won't care, but the parents will, not to mention I'm more than a little precious with my very first quilt.
I know there are experienced quilters out there - please help me!!! I don't want to mess this up after all this work.
If you want to see an actual finished project, click on the buttons below. I'm only very tenously joining in with my finished top!
Friday, 30 March 2012
Wednesday, 28 March 2012
New Project
As I have finished two enormous shawl projects (yes my circular shawl is complete, it just needs photographing) I thought I'd cast on another one! This project is one I've been longing to do since the pattern was first released. It has all my favourite things; colour, stripes and garter stitch. It was so frustrating that the pattern was only available as a kit for a the first few months, but as my wallet was bare of the $89 it cost, I waited patiently for the pattern to be released solo! I am, of course, talking about Color Affection, designed by Veera Valimaki of 100% Rain. Veera designs simple and elegant but quirky items. They are all instantly appealing, but this was the first one I HAD to make.
Now the pattern is out, I was very pleased to be able to raid my stash for the yarn requirements of this project. I selected:
1. Black Bunny Fibers Superwash Merino Classic Sock, 2. Artist's Palette Sweet Feet Sock, 3. Araucania Ranco Solid Sock
They all have different fibre contents, but it doesn't seem to matter much. The Sweet Feet Sock is amazingly soft and smooth, which is why I chose it for my main colour, as that is the yarn next to my skin. I am making good progress and I have started using all the yarns though, the most recent photo I have, is from right at the beginning. I have listed the project on Ravelry as Cloudy Skies, as this is what this colour combination makes me think of!
I love that all three yarns are semi solid, as that gives a more blurred appearance to the colour changes, I have a feeling that I will enjoy this knit right to the end!
The only thing I'm not enjoying is working with three yarns at once as they are getting twisted up all the time.
I have also been making progress on my cot quilt. I think I got a kick up the backside when the recipient was born yesterday! We are going to visit in about 10 days, so it might just be possible to get this thing done, if I don't muck about with fancy quilting. I think it might well be stitch in the ditch all the way!
I have a slight problem with the quilt. I have been using my 1/4 inch foot, was zipping along all happy, and then I realised that it wasn't sewing a scant 1/4". By the time I realised I only had 2 blocks left to do, so I carried on, so at least there is consistency. I looked at the needle position and realised that it needs to be over to the right, instead of in a central position. Ah well, lesson learned, I just wish there had been a note somewhere about it. At least this wasn't a complicated quilt with lots of seams. The finished quilt will be slightly smaller than intended, but it won't really matter.
I have cut all the sashing strips now, and I have chosen a fabric for the backing. It is a bright yellowy orange and I'll probably break it up with a strip of some of the fabrics from the top which will blend well, such as the cats, spots and aliens interspersed with white.
I know this quilt is taking forever and I am cataloguing every little thing, but I've always said that this blog is mainly my online notebook, so I can find my notes when I need to. This is the first quilt that I have a deadline for, and intend to finish, and the first using this machine, so I need to keep careful and detailed notes for future reference! I hope it isn't boring you too much!
Go and click the button to find some more works in progress!
Friday, 23 March 2012
An FO to be Proud of!
I LOVE this FO. Whilst it is not quite what I envisaged at the start of the project I, still love it very much. The FO I am talking about is the shawl from my KAL, that I'm running on my Ravelry Group. This shawl is different from my previous attempts because it is knit in 4 ply yarn, rather than 2 ply. As you can imagine this results in something quite different.
The lace patterns are much stronger in this heavier weight version, as you can see from this side by side comparison.
This new version was knit on the same size needles as the lace weight version and the same pattern was followed, apart from reducing the ruffle by approximately 4 rows. I ran out of the darker accent colour, which was meant to do the edging. If I'd not done the ruffle, I think the darker colour would have been more than sufficient for the border. However, I don't think the striping looks bad.
As you can see, there are hints of the paler colour visible in the dark colour, which is impressive as they were dyed by two different dyers. The pale yarn is Posh Yarns Sylvia 4 ply, and the darker yarn is BabyLongLegs Semi-Precious. Obviously I got lucky when I bought these at different times, from different people. It does make rather obvious my love for this particular shade though!
This version of the shawl feels much more substantial and is better at keeping out a draft. It feel more like I am wearing an extra layer, rather than the invisible but warm layer of the Rowan Fine Lace Shawl, which contains so much alpaca. I also think that as this shawl is much heavier, it will stretch out more, so the lace motifs will become less plump.
This heavier version may also work during the colder months as an extra layer to keep my head warm!
I've just realised that this photo makes me look like I have a massive quiff - ah well - Elvis impersonators, eat your heart out!
With this version of my Lily's Slice of Pi Shawl pattern, I would suggest either using all three 100g skeins in the same colour, or starting the accent colour, after the increase row at the end of the last lace section and the increase row for the ruffle. I would then knit and purl one row and weigh the yarn before and after those two rows to work out how many rows you will get from the accent skein. I would then decide if I wanted a shorter ruffle or whether I want to do striping, and which order I want to do it. It never ceases to amaze me how I can really love a project and final object, but still think of ways I would change it, if I were to do it again. I think that is one reason I love knitting so much. Each version of a pattern is different. It wouldn't surprise me if I were to knit this shawl again some day, but for now I think 3 versions is enough, even if I only own 2 of them!
To look at other people's finished object, click on a button!
Labels:
Creative Friday,
FO Friday,
KAL,
Shawl,
We Did It Wednesday
Wednesday, 21 March 2012
Sewing and Knitting Progress
Today I can show you a little progress on the cot quilt front. I finally got the Heat 'n' Bond Lite that I had been waiting for, and I have now made my final three elephant blocks. I have to say, the Heat 'n' Bond Lite is pretty good stuff. It's less rigid than the other interfacing that I had in my crafting cupboard, from eons ago. I think I would use it again for this style of applique. I now want to whizz on with the borders on the rest of the blocks, but at least I have the fiddly applique done now.
I'm loving this project and I hate not being able to just sit at the machine for a couple of days and finishing it off. Ah well, things can't be changed, I'll just have to enjoy it when I can work on it.
In knitting news I have been knitting a bit of my socks.
Not much progress, but that is because I've been working on my shawls. Still, I get great satisfaction from the way the stripes are lining up.
In shawl news, I have finished my KAL Shawl. I did this far too quickly, but it does give me some leeway to start work on a new pattern that I've had in my head for a few weeks. It's a sweet little shawlette that I hope I can create from the image in my head. I've only ripped back once so far, but I only started yesterday. I hope to have more to share next week about this one.
I have also been ploughing on with my Leaves of Grass Shawl. The edging has taken forever!
Isn't it a lovely blob? This is going to be huge when it is blocked! Should be a fun adventure trying to block it. I don't know if I have anywhere big enough to lay it down flat. I may have to wait for a dry and sunny day and put it outside!
I nearly finished this, and then I found the end wouldn't graft onto the starting row. I've obviously gone wrong somewhere. I'm about 3 stitches out. I've had to rip back so I can reduce the extra stitches over a reasonable amount of edging, so it doesn't bunch up.
So far I have pulled back 48 rows.

I might rip back for another 20-30 rows and then try again! So disappointing to be so close to the end, and then having to fix something from hundreds of rows previous. I will get it finished this week though.
I feel like real progress has been made this week, I wonder what I'll have to share with you by next week! I feel like I have got my crafting mojo back, after swimming through the fog of the increased levels of painkillers over the last couple of months. Hopefully things will get back to being a bit more predictable again.
Click on the button to have a look at what other people are creating, and I'll show you my finished shawl when I have some decent photos.
Friday, 16 March 2012
An old FO
I sat here this morning wondering if I could write a "Finished Object" post and thought I had nothing to share at all. I'm currently in the middle of lots of BIG projects that are taking an age to finish and I've not finished anything since my socks two weeks ago! This state of affairs is most unusual. I like finishing things off quickly by having small projects alongside my larger ones, but at the moment my large projects are utterly captivating and therefore taking me away from quick fix finishes.
Then I remembered an FO I didn't share with you, from February! It was my "handmade" gift as part of the Blog Hub Swap. Paula, the recipient, already shared the project as part of her blogging about the swap, but I never did.
For the swap I knew that I wanted to sew something for Paula, as it is not a craft she pursues. I also had a clue about a fabric she liked, because she posted a favourable comment on my blog about a felted bag I made for my new niece. She liked the lining fabric and that gave me a starting point. It helped that I also had in my stash a nice strong fabric that would compliment the sweet fabric that I had selected for the project.
I decided to make a project bag from these fabrics. Every knitter and crocheter I know always needs project bags. We can never have enough! I decided to put a zipped pocket into the bag as well, for things like stitch markers or cable needles, or basically any little thing that is useful to that project. I also decided to put the pocket on the outside of the bag to make it easier to gain access. As usual I followed the tutorial from U-Handbag to insert the pocket, though I now know the method off by heart!
I used firm fusible interface on the outer part of the bag, in order to give the bag enough structure to stand upright. The structure enables it to be easily placed on the floor with the yarn inside while knitting. The structure was a very simple one and at some point I will make one of these for myself, and possibly take photos and make notes while I do it. It is actually pretty easy if you don't add the pocket.
As you can see, I used ribbon for the drawstring. I had it in my stash and it seemed perfect for this bag.
Making the bag "boxy", at the bottom corners, adds to the stability and enables it to stand up right.
As usual, with a sewing project, I added my little "handmade by..." label. I really do think this lining fabric is charming. I wish I had bought more of it, as I think it would make a lovely set of a pyjamas! I love that the sweet lining is hidden away inside the strong purple outer. It's like a little secret bit of girliness.
Paula seemed very pleased with her handmade gift, and the added bonus of some stitch markers I made for her which were tucked into the zipped pocket!
I picked up the beads at John Lewis and thought they went perfectly with the bag. I love this particular design and it is my favourite out of all the styles I have tried. I'm hoping that they will be useful, but I'm guessing it's just like the project bag, all knitters always need more stitch markers, no matter how many they have. They just seem to disappear down the back of sofas, or into big bags!
So here is the last of my FOs from the past. I better get a move on for next week and finish up one of my mammoth projects, so that I have something to show you! To look at other projects, that are probably more recent than mine, click on a button!
Labels:
Blog Swap 2012,
Creative Friday,
Fibers on Friday,
FO Friday,
Project Bag,
Sewing
Wednesday, 14 March 2012
Being Careful
The last two days I have been careful. I've not done anything that will involve sitting upright for too long. I've not gone out. I've not seen anyone except my OH and I've definitely NOT done any sewing. Normally this would really make me grumpy but I am doing this for a reason. It is not because I have hurt myself more than usual, it is because I am trying to avoid hurting myself so I can go to see some live music tonight.
I very rarely get to go out with just my OH. We usually only go out on either pre-arranged big occasions such as a friend's birthday or a family wedding. It's either that or a completely spontaneous "let's go out for a pub lunch because I'm not in agony" type of affair. But this time we have bought tickets to go and see Polar Bear. I have been to only one other live music event at this venue, and that was also in a Cabaret Style set up. I love that you can sit at a table with a drink and watch live music, even if it is only a soft drink because of my meds. We are taking the wheelchair so I can sit in slightly more comfort than is afforded by fold up seats. I'm really excited, even if I am slightly disappointed that I haven't been able to do any sewing.
However, no sewing means more knitting. I've been working on my Leaves of Grass Shawl.
Yes, doesn't it look lovely! It's so easy to forget that when you are knitting a shawl, it is often an act of blind faith it will turn out ok. It resembles nothing more attractive than a woolly blob. I am in the throes of setting the woolly beast free from it's constraints.
I am finally at the knitted on border stage. As I complete each repeat of the 16 row chart, more and more of the shawl is liberated. I cannot wait to see how this turns out when it is finally off the needles and on the blocking board.
In other news, I have been online shopping this week. Susan of Canadian Abroad blogged about a new UK shop and a giveaway they were having. The shop is The Village Haberdashery. Susan is a very bad person for posting links to this yummy new shop. Of course when went to have a look at it, I ended up buying nice things. I only ordered my purchases on Monday afternoon and look at what came in the post this morning.
Isn't that the nicest plastic wrapping you've ever seen? It's so cheerful compared to the normal grey. Inside the pretty exterior were some Addi Turbo needles that I ordered. I'm trying to build up my supply of this particular brand of circular needle as I have found them really nice for using with laceweight or delicate yarns. The join between needle and cable is so smooth compared to my KnitPro Options. It's nice to see another UK supplier of Addi needles and I thought it would be a good way to test out the service of a new online retailer. While I was shopping for needles a skein of yarn accidentally jumped into my basket.
Isn't it pretty? It is my favourite shade of purple. When I saw it, I had to have it. It is perfect for an idea I have floating round my head at the moment for a shawl. One of the main problems of shopping for anything whilst in the midst of the dreaming stages of design, is when you see a lovely yarn, you justify it's purchase by knowing it is perfect for your new design. It is perfect, I promise..... it's just it might take a while to become that design!
Anyway, I thought I would share the details of the new shop and tell you that the service was great and you should have a look. It has both yummy yarns and fabulous fabrics. A lethal combination in my case.
This did actually start out as a WIP post, so if you want to hear about other people's projects rather than my social and shopping antics, click on the button!
Thursday, 8 March 2012
Craftsy
I am a little bit off kilter today. Yesterday I kept getting requests to share a Google Doc that I thought I had removed all links to. I am in the process of moving all my free downloads to Craftsy and I thought I'd amended all the links on the blog to reflect that.
Have you heard about Craftsy? It started out as a tutorials website. You can pay for an online course that you will always have access to. There are also forums and organised chats for the course members and the tutor. It seems like a great idea and if I had loads of cash I probably would have signed up for dozens of courses by now. I signed up for the emails for the site, just to keep up with what courses were available as I was really interested in the concept but was waiting for the right course to lure me in. One of these emails told me they were starting to sell patterns and Indie Designers could use their site to sell their patterns free of charge. On top of that, it was any kind of craft pattern! This was the service I'd been waiting for. I sell my knitting patterns on Ravelry and will continue to do so, but Craftsy was the perfect venue for my free tutorials that weren't really knitting patterns. I felt that with the service being free of charge I couldn't really lose and started to move put all my patterns and tutorials on there. I decided to list my knitting patterns as well as it can't hurt to have two different markets to sell in.
You can see my patterns here. It is quite a lot of work to upload and enter all your pattern details, so I got my main patterns and tutorials on there and ground to a halt ,due to KAL fever and growing pain. I really shouldn't have stopped with my uploads because yesterday I got a great deal of attention on Craftsy. In particular, my Glasgow Rose Stained Glass Template got a lot of attention. Do you remember that little blast from the past? It was a template I designed when I was doing my quilting class in April 2010. This block still isn't sewn into a quilt. To have any kind of interest has surprised me.
I have had over 1200 downloads in 24 hours! I couldn't understand where all this interest was coming from until someone tried to access my old Google Docs version of the pattern and couldn't. I emailed them the new link to the Craftsy Pattern Page and asked where she had heard about the pattern. She pointed me to this. It is a newsletter she received from a website she is a member of. If you look at the link you can see my little template in the top left hand corner. The newsletter was promoting free quilting patterns on Craftsy. This newsletter was the reason I had so many downloads of my pattern in the last day or so.
I am really flattered, but I wish I'd known it was coming and then I would have ensured there were no links anywhere to the old Google Docs download. I didn't think to update the link in the old post from April 2010, because I assumed no one would be reading it. How foolish was I? I updated the links on the sidebar of the website, and on the Downloads page, but didn't think about the original post. So this has given me a kick up the backside. I am going back to checking all my tutorials and downloads and making sure nothing links to Google Docs anymore, and it all points towards Craftsy where I can see how many people are interested in my patterns. It has been a very interesting couple of days! It's amazing how the Internet can suddenly recycle old patterns and posts and create a storm in a teacup. It reminds me that whatever goes online, stays there, just waiting to be found again!
Wednesday, 7 March 2012
I've Been Sewing!
I know it's a small miracle, but I have been sewing. I'm really excited about this as normally when my pain increases I have to lay off the sewing, but recently I have been working on ways of managing to continue to sew, despite my increased pain levels.
The main method of managing my sewing is to actually do what I'm supposed to do - PACE!!! This is the first thing you learn when you are starting to deal with a chronic condition. You learn that you need to break tasks down into manageable chunks, to do little and often rather than do things in one big push. You learn to stop before you start to hurt more than usual and to carry on doing a little bit even when you feel rubbish. It's meant to help you even out your highs and lows and stop you doing serious damage to yourself. I always found it really hard to pace with sewing. I would get stuck into what I was doing and get distracted, and the next thing I knew I was lying on the sofa in agony. So rather than carry on sewing last time I was really bad, I stopped so I didn't damage myself.
I have decided that this time, I will not stop sewing, I will just be more strict with myself. I will only work on my sewing projects for 20-30 minutes a day and no more. And so far it is working! I'm really proud of myself for sticking to my guidelines. It means that I am moving slowly on with a project I really want to finish. I don't think it will be finished by the deadline set by an impending birth, but I think the recipient will forgive the lateness of the gift.
The project is a cot quilt. It has elephants on it! I fell in love with it when I first saw the pattern on Sew Much Ado. I am hoping that this will be my first finished quilt. I have started two other quilts, but they are still awaiting their sashing and their putting together and quilting. This is because they are both fairly large sized quilts and I have been put off by their size. This cot quilt is meant to be a finished size of 45" x 45". I think I can manage that. I have cut all the block fabric out and have decided on a layout.
I apologise for the poor photo but I used my mobile phone camera and it was an overcast day. The photo was meant only as an aide-memoir so I would know how to construct my quilt top. You can see some of the fabrics a little more clearly in the following photo.
By the way, that little table top ironing board is one of the ways in which I have aided my pacing. It is incredibly light and when it is put on the table, where I do my sewing, it is the perfect height for me to do my pressing. It means I can put the board up without having to ask my partner to do it when he comes home from work. I can use it whenever I want. As it is not free standing it does not take up any extra space, so it can be left up if I know I'll be using it again the next day.
With this quilt I have been working slowly, day by day, sometimes having to rest for a while before starting again. First I cut each fabric out and now I am working on the elephant applique.
I have done 6 of the 9 blocks! I am being held up after ordering more heat n' bond, but I will probably start attaching the border to each of the finished blocks while I wait. I am so proud of what I have accomplished with this quilt, by breaking it into little bite sized chunks. I know it won't be finished in time, but I'm sure the baby won't mind getting it for Christmas!
The pattern recommends sewing the applique pieces 1/8th" inside the outer edge. I decided that I didn't want the ragged edge look and decided to try out the zig-zag stitch on my sewing machine. It was so nice to use something other than a simple straight stitch. This machine was supposed to grow with my abilities, but I haven't really tested it much of late!
I'm quite proud of how well I managed to control the machine, even if a few of the zigs went a little awry, essentially the edges are all encased within the stitching. So tomorrow, if my heat n' bond doesn't arrive, I will stitch on the border to one of my blocks. It is always difficult to stop after each little session, but I want to keep on sewing and I can only do that if I stick to my own rules and only do a little each day. If I can't stick to those rules, sewing will be banned again, and that would break my heart. I really think quilting is the way forward in this new future of paced sewing. It naturally breaks itself up into small sections. I hope that my first machine quilting endeavour will lead to me finishing up those original quilts that never got to completion! At least this quilt will be small enough for me to wrestle around the machine (I hope).
For other, less slow, works in progress, click on the button!
Monday, 5 March 2012
The KAL Begins!
Today was the official start date for the Lily's Slice of Pi Knit-A-Long (KAL). I've been itching to get started, which seems a bit crazy considering I was the one who set the start date! However, the wait is now over. We have our participants and it seems like a nice group of people. I have had online contact with most of the participants and one is a friend from the real world.
We've already started blethering in the thread I created on Ravelry, in fact we are now on page 5! I think this bodes well for the future chattiness in the KAL. A few of the participants are bloggers.
sunshinegirl3's blog is called Kismet's Companion.
Susie99's blog is called Useless Beauty Designs.
CJMacGregor's blog is called Josie's Misadventure's in Knitting.
Have a look, as these are all blogs I regularly read, and all three make attractive things and also have interesting things to say.
The rest of the participants are not regular bloggers, and I'm looking forward to getting to know them better throughout the KAL.
In order to keep to my official start date, I cast on my project this morning. I am using 4 ply (fingering weight) yarn instead of the recommended weight of 2 ply. I want to try making a heavier version to see what it looks like, and to see if fewer repeats of patterns are required to keep the shawl to a sensible size.
I think it is looking pretty good so far! I'm using the same size needles as I used for the 2 ply versions of the shawl and whilst it is denser than the lace weight, I think it makes the lace patterns more visible. It will be opaque than the gossamer look of the lace weight version.
I have finished Chart A now, which is the Gull Wing pattern given in Elizabeth Zimmermann's Knitter's Almanac: Projects for Each Month of the Year (Dover Knitting, Crochet, Tatting, Lace) for the February Baby Set. I felt that was an appropriate first lace pattern for this shawl as it's shape was was inspired by the Pi Shawl which also appears in the book. The original Pi shawl is a circular one, whereas my version is a half-pi or semi-circular style, but it uses the same principles. When I knit this first Chart, each time it makes me tip my mental hat to a knitter who has inspired so many other crafters.
Plus, this stitch pattern is so very pretty, it was hard to resist putting it in to my first shawl pattern.
I have also started the first few rows of Chart B.
You can't really see the pattern yet. This chart has twice as many stitches in it, so I'm pretty sure that it is going to take much longer than a couple of hours to finish this section.
In case you are wondering, the yarn I am using for the main body of the shawl is Posh Yarns, Sylvia 4 ply, which is 50% merino and 50% silk.
The above picture gives the best representation of the colour of the yarn. I have two skeins of 400m each in this colourway, which I hope will be enough for the main body of the shawl. I am using BabyLongLegs Semi-Precious 4 Ply for the ruffle.
Again, this yarn is comprised of 50% merino and 50% silk. The colours really seem to work together well. I love both of these colours and will definitely be keeping this shawl, as it will be thicker than most of my other large shawls, and in a colour that I wear a lot of. I really hope that this shawl works out well in this weight of yarn as it might encourage more people to have a go at a design which is not that complicated. A lot of knitters are scared of lace weight yarn, so introducing an example of what the shawl can look like in 4 ply is a good idea for the pattern pages.
Now I've cast on for this third version of my shawl, I am still excited about the design and I am going to really enjoy the knitting process with my KAL colleagues! I'll keep you posted on how it goes.
Friday, 2 March 2012
The Pain......
Luckily before my hand gave up the ghost I finished my stripey green socks.
The stripes are not quite matching up, but it is unlikely that anyone will get close enough to point that out to me.
I used Jeny's Surprisingly Stretchy Bind Off, as I always do now. I knitted a 2" cuff of 1x1 ribbing and this is enough to keep my socks up without pinching. The main reason I love hand knitted socks is that, as you can see, I have deep ankles and large calves. This means that shop bought socks nearly always pinch at the cuff. The video below shows how to perform the bind off and is filmed by Cat Bordhi who wrote the book I got my sock pattern from, Personal Footprints for Insouciant Sock Knitters.
This style of socks is perfect for me and I'm working my way through a pile of loud and fun yarns in order to build up my basic stock of socks, so I can throw my shop bought ones away at last. This pattern is very simple and a basic stocking stitch sock is perfect for busy yarns. Once I work my way through this pile, I will probably start to experiment again with styles and patterns.
Until then, get used to this type of FO Friday! Socks that are comfortable, simple and fun make me smile, and that has to be a good thing! If you want to see more interesting finished objects, click on one of the buttons below.
Labels:
Creative Friday,
FO Friday,
Socks
Subscribe to:
Posts (Atom)